The core of this post is an introduction to Gulp, a powerful taskflow tool. The reason why it is titled “Gulp for front-end automated builds” is that Gulp itself is an npm package written in JS that runs in a Node environment, and most developers also use it as an automated front-end project build tool for front-end projects. However, essentially, Gulp is not just for front-end build automation, but also for back-end build and release automation, scripting toolset automation, test process automation, etc. So no matter what technology stack you’re in, you’ll benefit from learning to use Gulp.

This article will teach you.
- Installation of the Gulp tool
- How Gulp works
- Creating independent tasks in an automated process
- Serial and parallel tasks
- Using pipelines to handle data flows
- Listening for file changes
- Easy front-end automation build DEMO process
This article can’t cover all the details of Gulp, but in general, we have selected the core and most useful parts of it, and demonstrated the complete automation process of [environment initialization -> code merge -> code compression -> start server -> listen to files -> hot update browser] using Gulp through a front-end DEMO example.
1. Gulp Basics
It seems that developers in any technology stack have time consuming and painful process issues. In addition to the basic R&D, testing, and deployment processes, there are often additional tasks that need to be performed in between, such as code checking, code compression, code obfuscation, and so on. Although these processes are not related to R&D, they are necessary for product launch. Not only do they consume extra effort from developers, but it is also difficult for the team to control that all developers perform consistent and complete processes, for example, some members may forget to do code compression due to carelessness and release the project online. Gulp is a simple, efficient and ecologically complete automation tool that has been found to solve this problem.
1. Install Gulp
Gulp runs in a Node environment, so you’ll need to install Node.js first, so we won’t go into that here.
There are two parts to the Gulp tool, the global Gulp CLI and the local Gulp, and we’ll go into more detail about their relationship later. First, let’s install the global Gulp CLI tool by executing the following command in the terminal.
|
|
After the installation is complete, to check if the installation was successful, you can type the following command.
|
|
At this point, you should see the following output.
The first line indicates the version number of the global Gulp CLI tool we have installed, and the second line indicates the local Gulp version number, which is installed in a specific project directory that we have not yet installed. We can then create a project directory, for example, a folder called gulp-demo, and initialize the Node module in that directory using the following command.
|
|
Use the following command in the current directory to install local Gulp.
|
|
Once the installation is complete, run gulp -v again to see the local version of Gulp as follows
Note that you’ll want to use a native Gulp version 4.x and above when testing.
2. How Gulp works
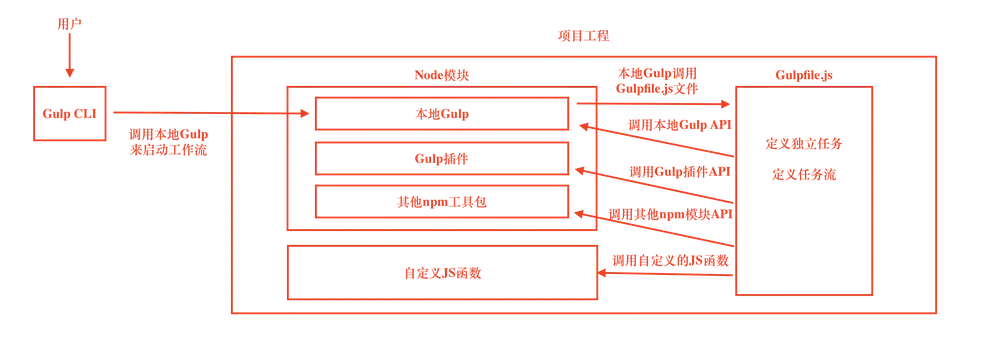
Having installed the Gulp CLI and native Gulp earlier, it’s time to go over how Gulp works. To use Gulp, we need to write a file called Gulpfile.js, which is the core of Gulp’s work and defines various tasks and task flows. The Gulp CLI tool is the entry point for starting Gulp, and it calls the local Gulp in the project with a command. The defined tasks in the Gulpfile.js file usually require calls to the API methods provided in the local Gulp module, as well as to the functions of the local Gulp plugins or custom functions to implement the tasks. The working principle is shown in the figure below.
3. Writing the Gulpfile.js file
When learning a programming language, the first program is usually HelloWorld, and learning Gulp is no exception. Create a new file named Gulpfile.js in the project directory and write the following code in it.
The task function is used to define the task, the first parameter is the task name, and the second parameter is the task method to be executed. Here we pass in a custom function that will pass in a callback parameter done, which will be called when the task logic code is finished to inform Gulp that the task is finished, otherwise it will block the execution of subsequent Gulp tasks.
In the current directory, execute the following terminal command.
|
|
The purpose of this directive is to have the global Gulp CLI tool call the local Gulp to execute the task named gulp defined in Gulpfile.js. After execution, the terminal output looks like this.
As you can see, the correct output Hello Gulp! and the start time and end time of the executed task are recorded, and the task elapsed time is also recorded.
2. Gulp Task Chains and Data Flow
We already know how to execute standalone tasks with Gulp, but in more practical scenarios, automated processes can’t be done with simple standalone tasks, and we need to form task chains of tasks. For example, let’s simulate these tasks.
|
|
The above 5 tasks simulate the basic process of front-end automation build, some of these tasks are dependent on each other, for example, the task of cleaning up the build directory comes before copying the template file and compiling the code, otherwise the compiled code may be cleaned up again, and the development server is started after copying the template file and compiling the code, but the two tasks of copying the template file and compiling the code can be done in parallel The two tasks of copying the template file and compiling the code can be done in parallel. Gulp task chaining makes it very easy to handle inter-task dependencies.
2.1. series and parallel
series means serial and parallel means parallel. With these two APIs in Gulp, tasks can be easily combined into serial or parallel chains, and task chains can be combined into other task chains as a standalone task, which makes the combination of Gulp tasks very flexible. Add a task chain according to the requirements described earlier as follows.
Type gulp dev in the terminal and the output will look like this.
|
|
As you can see from the output, the serial and parallel relationships between tasks are sufficient for our needs, and using Gulp to handle task dependencies is as simple as that.
Let’s go back to the series and parallel methods, which can be passed with an unlimited number of arguments, either strings, functions, or other combinations of task chains. When the argument is a string, it will be used as a task name to call the specified task, when the argument is a function, the function will be executed, and when the argument is a combination of task chains, the corresponding task chain will be executed. When the argument is a function, special attention must be paid to the callback to notify Gulp that the task is complete, otherwise the task chain will be blocked. As follows.
After execution, the terminal output is as follows.
|
|
You may have noticed that when executing to a custom function, the terminal displays the task name as anonymous, which means anonymous. A better way is for us to use a named function, which makes it easier to retrace the execution status of the task, as follows.
2.2. About Gulp data flow
Having understood serial and parallel Gulp tasks from a macro perspective, let’s now focus on more specific issues. Locally Gulp itself provides a number of powerful APIs, such as task, series, and parallel, which are all part of the APIs used earlier. Automated builds are essentially about scanning and processing files, so Gulp also encapsulates APIs related to file manipulation.
First, the two APIs for reading and outputting file streams are src and dest, respectively.
The src method is used to create a stream of file data that can be read from the file system into a virtual file object, which is a concept in Gulp that abstracts the name, information, and data of a file into a virtual object, and then the file operations are performed in memory, which is fast, until the processing is complete and the file is output to the specified file. For example, during development, our template code is usually in the src directory, and after compilation and packaging, the processed files will be placed in the dest directory, which involves file copy processing.
Create a subfolder named src in the project directory, create a simple HTML file in it, and modify the copy task as follows.
Executing the entire task flow again, you can see that a dest folder has been automatically created in the project root and the HTML files have been copied into it. In the copy task implementation function, we do not call the done callback, because the gulp API already implements the Gulp task interface specification and returns the result directly.
The src method reads the file data stream and can specify specific files or wildcards, as shown in the code above, which means that all HTML files under the src folder are selected and created into a data stream. It can be thought of as a pipe, with input flowing in from one end and processing flowing out from the other, and other pipes can be connected if additional processing is required. This chain-of-responsibility design pattern allows for a very flexible connection of the various processing plug-ins. As an example, the front-end code merge and compression processing flows as follows.
File System —->src [virtual file stream]–> File Merge Module [merged virtual file stream]–> Code Compression Module [compressed there virtual file stream]—>dest [write back to file system]–> File System
3. Practice: Simple front-end automation build process
Previously, we logically simulated the front-end automation build process, but in terms of implementation, we used log for simulation, which is not very interesting. To make it, building a simple front-end build automation process using Gulp is not complicated and can be done in a few minutes.
3.1. Install a few Gulp plugins
Gulp has a very rich ecosystem, essentially any npm module we can use directly, but in addition, there are over 4000 plugins designed specifically for Gulp that can easily support various file handling, code checking and other needs. The plugins are available at the following addresses.
For this practice, we need to use 2 Gulp plugins and 2 npm modules for file merging, code compression, file deletion and hot update for browser testing respectively. Use the following command in the project directory to install these modules.
Introduce these modules in Gulpfile.js.
3.2. Implement several tasks in the automated build process
Let’s start by implementing the clean task, modifying the code as follows.
The above code serves to remove the dest folder, and for each initial build, we delete the old directory so that the cached files do not affect the final package.
The copy task is implemented in the same way, by copying the HTML file template directly to the specified build directory.
The compilation process mainly involves CSS-related SASS or LESS compilation, or TS, CoffeeScript compilation, etc. For the sake of simplicity, we only do the merging and compression of JS files, as follows.
The purpose of the above code is to merge all the JS files under the src folder into a single file named main.js, compress the code, and finally output it to the dest folder.
The server task is implemented as follows.
The above code will start the local server and bootstrap the chrome project page.
For listening to changes in local files, Gulp comes with a corresponding API that implements the watch task as follows.
Note here that since we have separate tasks for compiling JS files and copying HTML templates, we can also separate our listeners, so that when we find a change in the JS file, we can only compile it, and when we find a change in the HTML file, we can only copy the template, and when the build folder changes, we can refresh the browser, thus enabling hot updates for testing during development.
Finally, we can write some test files. Create two new js files and one html file in the src folder with the following code.
Code in file1.js file.
Code in file2.js file.
Code in index.html file.
Use gulp dev to start the automated build process. You can open chome’s console, check the console output, try to modify the HTML and JS files in the src folder, and see the corresponding pages updated after saving.
At this point, we’ve implemented a simple automated build process for front-end development, and Gulp lives up to your expectations!
Tip: The Gulp process will not end automatically until the child process is finished, so it will keep listening for changes to the file to refresh the page.
4. Conclusion
In conclusion, although Gulp is mostly used in front-end automation builds, it is not the only use of Gulp. Any development workflow can be built with Gulp, and the richness of npm packages greatly extends the application scenarios of Gulp. I hope this article will help you open your technical horizons and explore more application scenarios for Gulp to help you simplify your workflow.