Recently, after taking over a new project, I streamlined the original 1.6GB image to over 600MB.
This article documents some of the lessons learned during the optimization process.
Theory and Rationale
Image is essentially a compressed package consisting of a image layer and a runtime configuration file. Building a image is the process of generating a image layer and a configuration file by running the RUN, COPY and ADD commands in Dockerfile.
Key points related to image size.
- The
RUN,COPY, andADDcommands create a new image layer on top of the existing image layer, and all file system changes resulting from executing the commands are committed as a image layer as a whole at the end of the command. - The image layer has the
copy-on-writefeature, so if you go to update an existing file in another image layer, it will be copied to the new image layer first and then modified, resulting in double the file space occupied. - If you delete a file in another image layer, it will only generate a delete mark for that file in the current image layer, and will not reduce the actual size of the whole image.
The above theory can be verified by the following Dockerfile.
We simply add, modify and delete a resource file in Dockerfile and then build the image to see its image layer information.
|
|
In the output of docker history you can see that.
- The
RUN touch /resource.tarcommand only modifies the file’s meta information, but still copies the entire file to the new image layer. - The
RUN rm -f /resource.tarcommand removes the file and makes it invisible when running the container, but it is still present in the first two image layers and in the final image.
Profiling Tools
When tuning code for performance, the first step is to find the performance bottleneck of the code with the help of Profiling tools, and the same is true for optimizing the image volume. Here are two tools that can analyze the image size.
docker history
docker comes with the docker history command, which shows more basic information such as creation time, instructions, and volume for all image layers, but is somewhat lackluster for complex images. See the example above for how to use it.
dive
The third-party dive tool, which analyzes the image layer composition and lists the files contained in each image layer, makes it easy to locate the build instructions and specific files that affect the image volume.
Take the golang:1.16 image as an example, first install dive, then execute dive golang:1.16, the output is as follows.
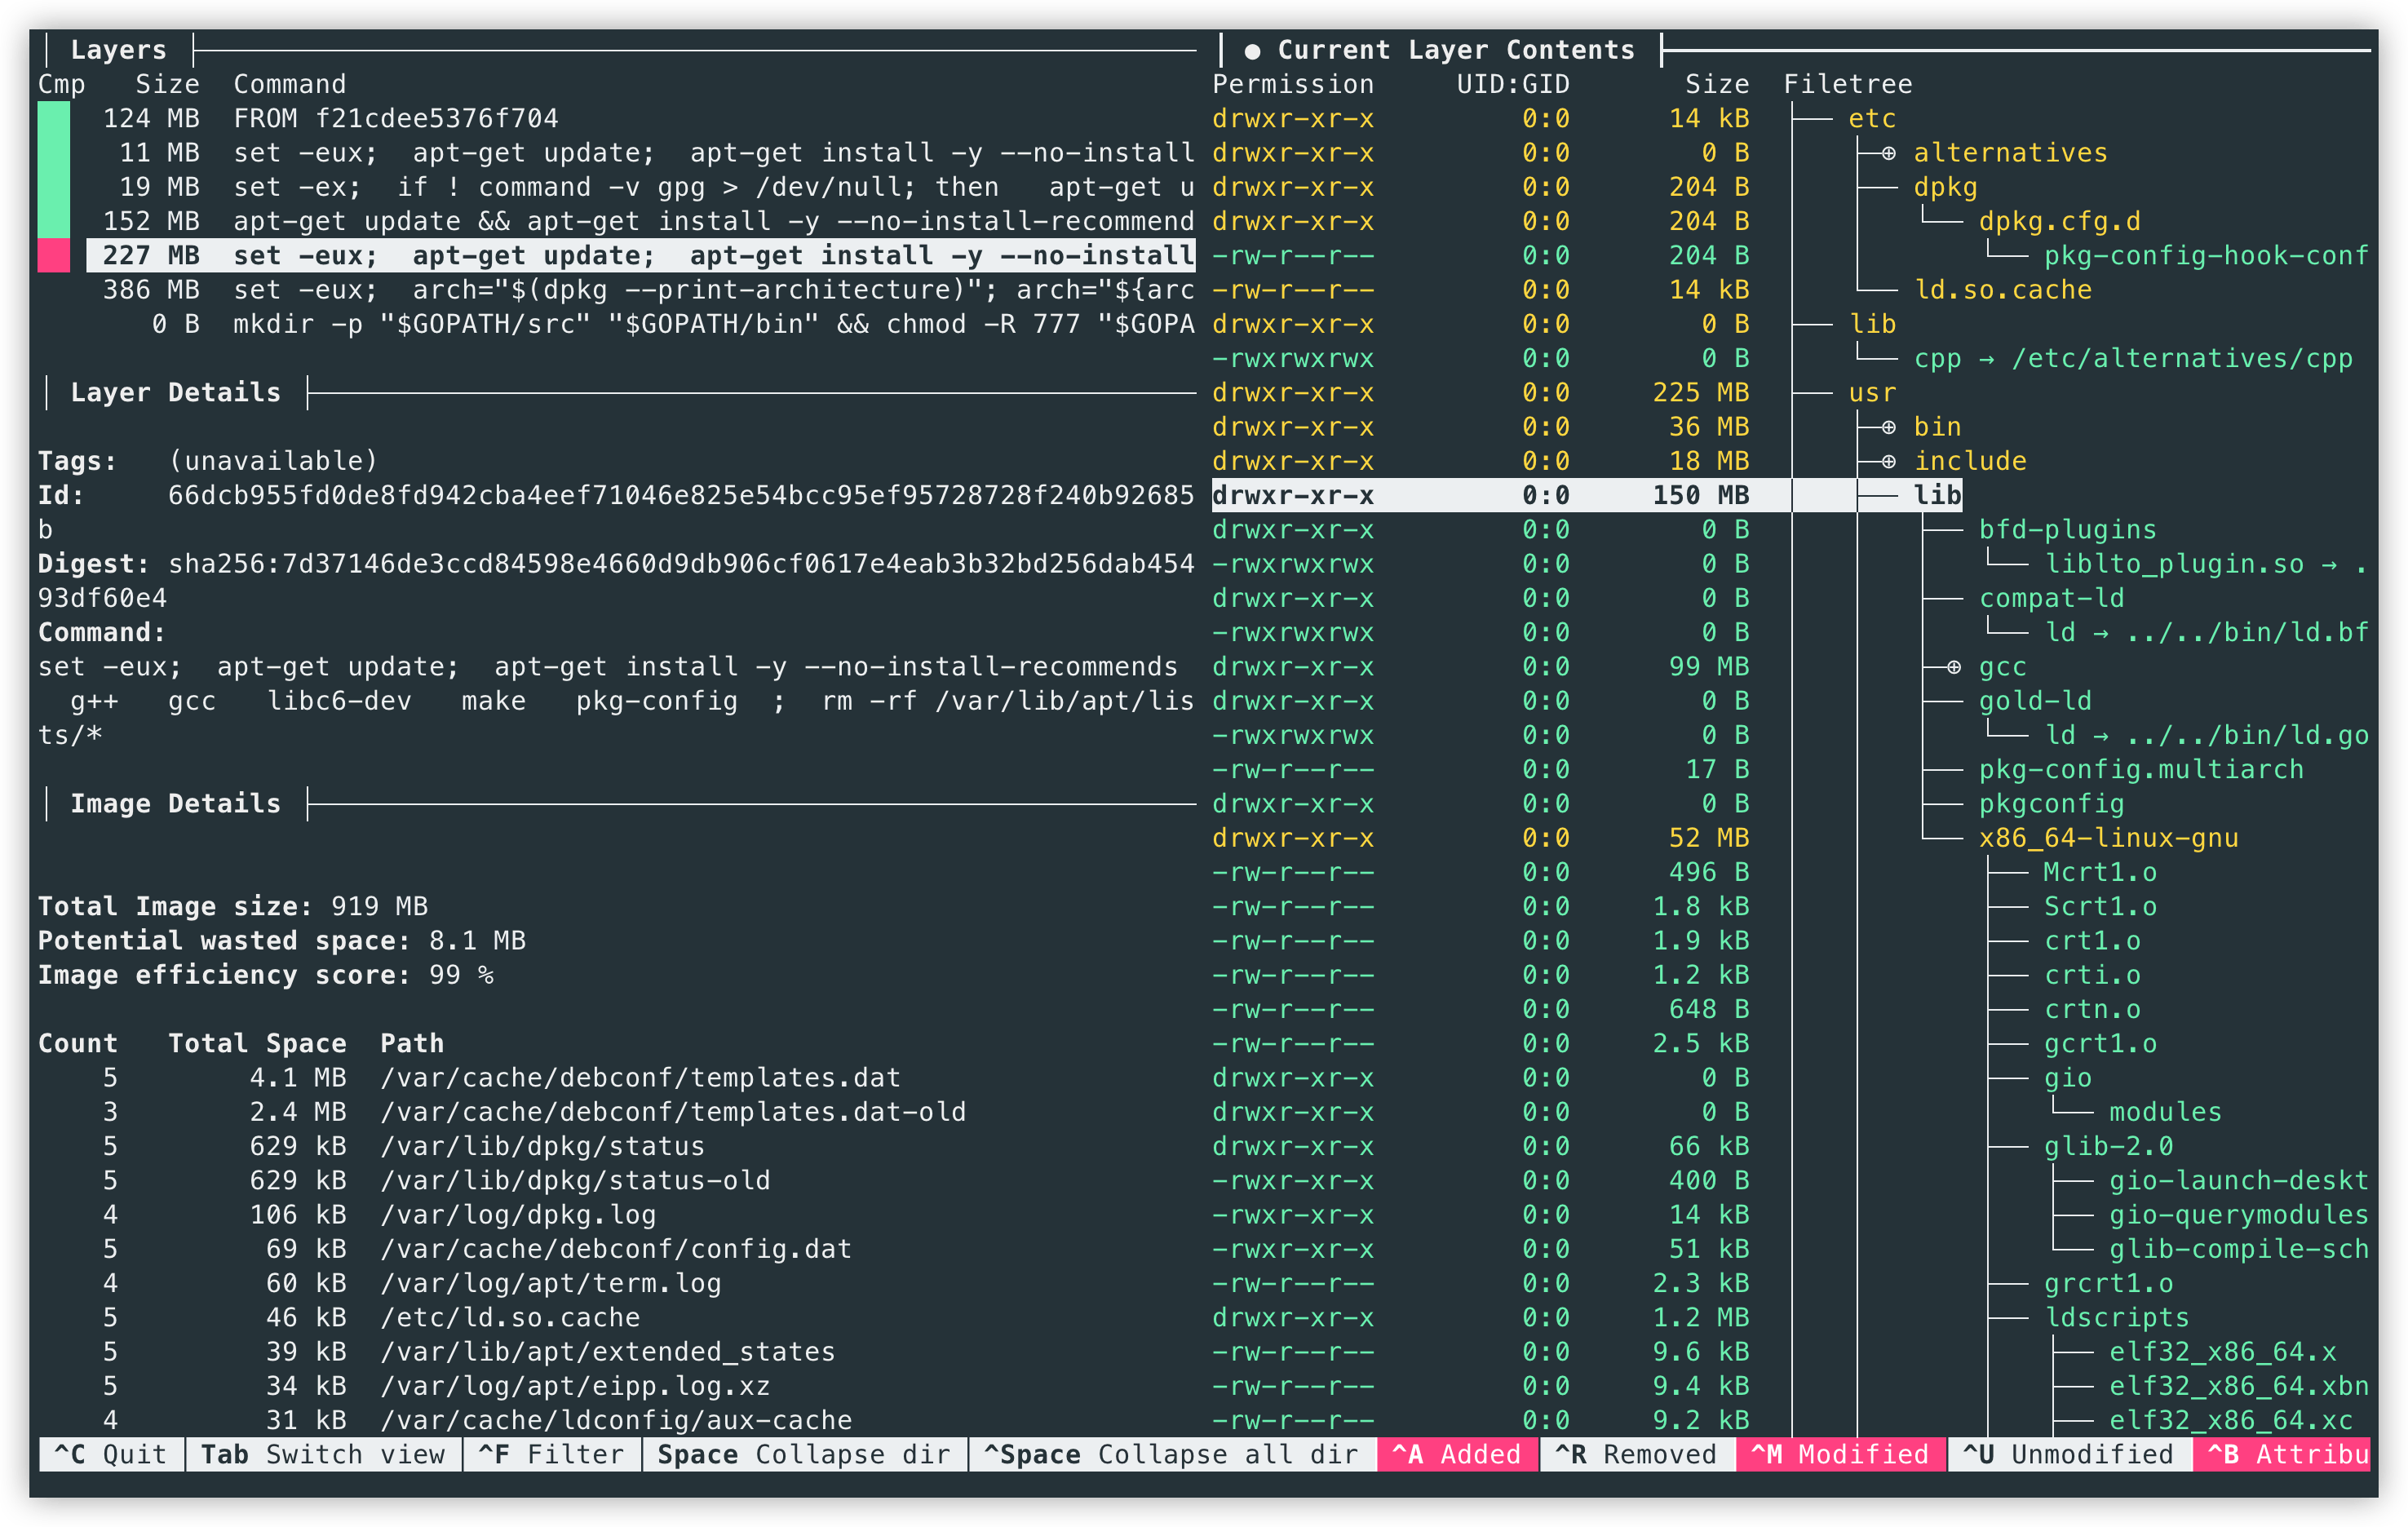
As shown above, after selecting the image layer on the left, you can clearly see the specific files in that layer in the file tree view on the right and can filter the files that have been added, updated or deleted compared to the previous layer. In the selected image layer, 150MB of dependency files have been added to the /usr/lib directory as a result of the apt-get installation of compiled dependencies.
Optimization Tips
Here are some optimization tips that are more effective.
Multi-stage builds and build from scratch
The multi-stage builds and build from scratch are basic tools and essential techniques for optimizing image size.
This approach separates the image building process into a build and a runtime environment, where the build environment installs dependencies such as compilers and compiles the required binary packages, and then copies them to a runtime environment that contains only the necessary runtime dependencies. This technique is particularly effective for languages like golang, which can compile static binaries, and we can run the compiled binaries in a scratch image (scratch is a special empty image).
If you use a golang image directly as a runtime environment, the image size is usually close to 1 G, and most of the files are not necessary to run the container. After copying the compilation results to the runtime environment, the size varies from a few tens of kb to mb. If you need to keep the basic system tools in the runtime container, consider using the alpine image as the runtime environment.
Avoid creating useless documents or caches
A docker image should not contain documentation, caches, etc. that are not useful for running containers.
-
Avoid keeping the installation cache locally
Most package managers cache downloaded resources at install time for later use. pip, for example, stores downloaded responses and build intermediate files in the
~/.cache/pipdirectory, and should disable the default caching behavior with the-no-cache-diroption. -
Avoid installing documentation
Some package managers offer the option to not install the included documentation, such as dnf with the
-nodocsoption. -
Avoid caching package indexes.
Some package managers try to query all enabled repositories for package lists, versions, and other meta-information to cache locally as an index before performing an install. The index cache of individual repositories can reach 150 M or more. We should only query the index when installing a package and clear it after the installation is complete. You should not run commands like
yum makecachein a separate command that caches the index.
Clean up unneeded files in a timely manner
Files that are not needed when running a container must be cleaned up at the same level they are created, otherwise they will remain in the final image.
Installing packages via package management usually creates a large number of cache files, be sure to clean them up immediately at the end of the same RUN command. This can save a lot of cache space when installing a large number of dependencies.
Take dnf as an example.
Take apt as an example.
Merging multiple image layers
As explained above, you should avoid updating files in different image layers and creating additional volume footprint. When building with many layers and complex execution instructions, it is difficult to avoid updating files in different image layers, and this extra volume can be streamlined by the following means.
-
Merging all image layers into one layer when the image is finally generated is done with
-squashin thedocker buildcommand (requires enabling experimental features of the docker daemon).As an example, take the Dockerfile at the beginning of this article.
1 2 3 4 5 6 7 8 9 10$ docker build -t squash-image --squash -f Dockerfile . $ docker history squash-image IMAGE CREATED CREATED BY SIZE COMMENT 55ded8881d63 9 hours ago 0B merge sha256:95f1695b29044522250de1b0c1904aaf8670b991ec1064d086c0c15865051d5d to sha256:e66264b98777e12192600bf9b4d663655c98a090072e1bab49e233d7531d1294 <missing> 11 hours ago /bin/sh -c #(nop) ENTRYPOINT ["/bin/ash"] 0B <missing> 11 hours ago /bin/sh -c rm -f /resource.tar 0B <missing> 11 hours ago /bin/sh -c touch /resource.tar 0B <missing> 11 hours ago /bin/sh -c #(nop) COPY file:66065d6e23e0bc52… 0B <missing> 7 weeks ago /bin/sh -c #(nop) CMD ["/bin/sh"] 0B <missing> 7 weeks ago /bin/sh -c #(nop) ADD file:8e81116368669ed3d… 5.53MBThe final generated image has only one image layer, including the last actual file system, which is equivalent to disabling the
copy-on-writefeature in the process of merging all image layers.The disadvantage of this approach is that images can reuse image layers when saving and distributing, pushing images over existing image layers in image repositories and pulling images over locally pulled image layers, but this advantage is lost when merging into one layer.
For scenarios where the image layer may be shared with others, the following approach can be taken.
-
Phased build, part of the intermediate image layer compressed into a layer as the base image. Within a development team, we often add or update some of the dependencies on top of the official image, and then use it as the base image for the team’s internal use, which can greatly reduce the actual size of the occupied image. Further, we can compress such base images into one layer. The following is an example of the official golang image.
After compressing into one layer, the image size of
golang:1.16has been changed from 919MB to 913MB. The official image has been optimized a lot so the space saving is very limited, but for the base image made by the development team internally, this optimization often brings unexpected surprises.
Modifying meta information while copying files
It is common in Dockerfile to first add an executable to the image and then modify the execute permissions and user of the file.
However, since modifying the file meta information also copies the file to a new image layer, the above command produces two copies of the same file. This can significantly increase the size of the entire image when the file size is large. In fact, it is possible to modify the meta information of a file while copying it. Both the COPY and ADD commands provide the -chmod and -chown options for modifying the meta information.
|
|
The -chmod feature has not been added to the official documentation yet, you need to enable docker’s buildkit feature before using it (add DOCKER_BUILDKIT=1 before the docker build command with DOCKER_BUILDKIT=1), currently only --chmod=755 and --chmod=0755 are supported, not --chmod=+x.