I recently learned about OIDC in the authentication system and put together a blog that covers the concepts, processes, and usage of OIDC. Before introducing these, we need to clarify two terms Authorization and Authentication.
Authorization vs Authentication
Here is OKTA’s definition of the two terms.
- Authentication, in the form of a key. The lock on the door only grants access to someone with the correct key in much the same way that a system only grants access to users who have the correct credentials.
- Authorization, in the form of permissions. Once inside, the person has the authorization to access the kitchen and open the cupboard that holds the pet food. The person may not have permission to go into the bedroom for a quick nap.
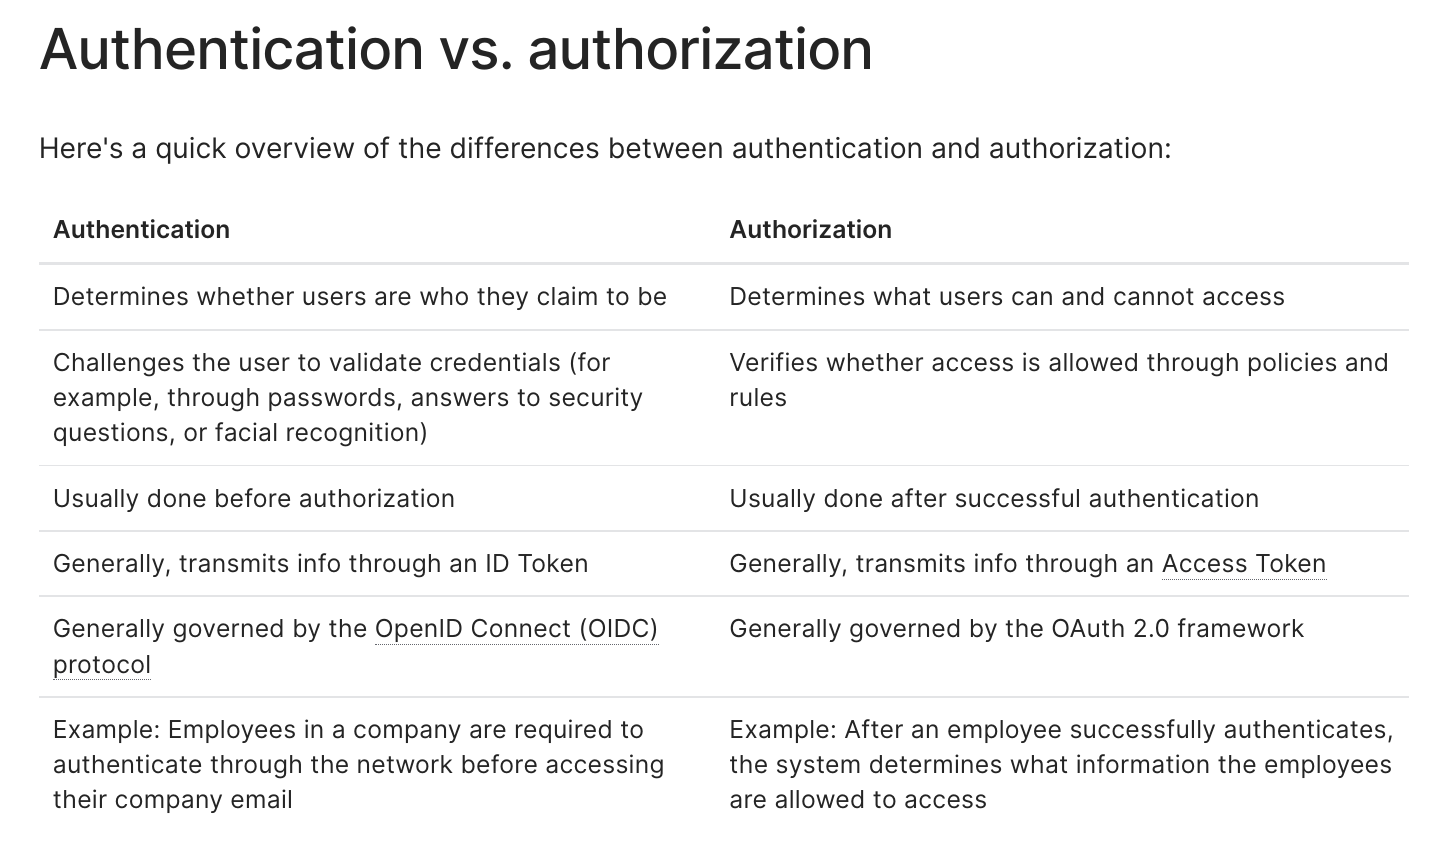
Authentication usually refers to the process of verifying that the user is the user, while Authorization refers more to whether the user has permissions. Usually we verify that the user is the user first, and then verify that the user has permissions. The following diagram shows the difference between the two, as organized in the Auth0 article.
Introduction to OAuth 2
Before we understand OIDC, we need to understand OAuth 2, because OIDC is based on the OAuth 2 process. Before that, let’s introduce the whole scenario with an example.
Suppose now we want to log in to the Slack iOS client with a Google account, what do we need to do? One easy way to do this is to give Slack our username and password so that Slack can log in as us, but this is a huge security risk, and there’s basically no good way to do this if Slack accidentally leaks the username and password, or if we want to revoke the authorization.
So we need an authorization protocol that does not give the user name and password directly to the third-party application, but introduces an intermediate layer, access_token. access_token binds the user to authorize the third-party application with certain privileges, such as reading the user name and other information, updating the user name, etc. OAuth 2 is the protocol used to do this.
OAuth 2 provides a total of four authorization modes, with a new enhanced mode for authorization code mode added in 2015. Let’s start with the simple one.
Client Credentials Grant
This mode is the simplest, in fact, the client tells the server which client it is, and the server sends the access_token.
|
|
This mode is rarely used and is mainly used when the client is very reliable, for example, when logging into a hosted cloud desktop system, the system requests a token from the server and the server immediately issues it, after which the user uses it as a specific user of the cloud desktop.
Resource Owner Password Credentials Grant
Resource Owner Password Credentials Grant
User-password mode, this process is relatively suitable for trusted clients, such as self-developed clients, where the client asks the user to enter a user name and password, and then requests the server, which checks the user name and password and issues the access_token.
|
|
Implicit Grant
Implicit Grant mode is suitable for places where it is not convenient to expose client_secret, such as browser side (web page), distributed apps, which are easy to be cracked, so you can use Implicit Grant.
|
|
In our example at the beginning, Slack pops up a webview, loads Google’s authorization page, Google displays the corresponding account, and then prompts the client to read the user’s information, and when the user clicks to confirm, Google checks the page and redirects the page to the address specified by the client, and brings the access_token in the URL fragment.
Authorization Code Grant
Authorization Code mode, which is the most complex and secure authorization mode, flows as follows.
|
|
First, Slack client opens webview, loads Google’s authorization page, and specifies the mode as Authorization Code, Google lets the user confirm, then redirects back to the URL specified by Slack, and includes a parameter called code in the parameter, then Slack’s server takes the code, takes client_id, client_secret and requests Google again. Then Slack’s server takes the code and requests Google again with client_id, client_secret, and Google verifies the token and sends access_token if it is successful. Since the token is requested directly by Slack’s server, it is more secure than the previous three.
Authorization Code PKCE extension
Authorization Code PKCE extension
This pattern, which is basically the same as Authorization Code, differs in that it does not expose client_secret, so it can be used in browsers, etc. The process is as follows.
- First the browser generates a random string, which we call code_verifier, limited to 43-128 characters in length
- Then, we do sha256 encryption of code_verifier, and then do URL safe base64 encode, the resulting characters we call code_challenge
- Next, the client opens the page of the authorization server, and in the parameters with code_challenge=foo&code_challenge_method=S256, code_challenge is generated in the second step, code_challenge_method specifies the hash method, S256 refers to sha256, and the authorization server logs this information
- Then the server prompts the user for authorization, and when the user is authorized, the server calls back the URL specified by the browser with the code
- The client extracts the code and then requests the authorization server with the code and code_verifier
- The authorization server extracts the code_verifier from the request, sha256 it, and compares it with the code_challenge in step 3, and if it is consistent, the authorization is successful and the access_token is issued.
JWT
Next, let’s take a look at JWT. The full name of JWT is JSON Web Token, which simply means that three JSONs are linked together with a dot, for example
|
|
There are actually three parts.
- Header, which indicates the token type and the signature algorithm
- Payload, which contains the really useful information, often also called claims
- Signature, which is the result of signing the Header and Payload
For example, in the JWT above, we decode it.
|
|
The advantage of JWT compared to the server-side session method is that you don’t need to read the database every time to get the information, the information is stored in the payload, just take it out and parse it, then compare the Signature and whether it expires. However, the disadvantage is that once issued, it can not be revoked, as long as someone gets the JWT, before the expiration date, you can operate with this identity. There is a remedy, which is to store the disabled JWT in the database, but then you have to read the database every time, so I don’t like JWTs very much.
OpenID Connect(OIDC)
Finally we come to our main point, OIDC, the main purpose of OIDC is to log in users and get user information, not to get other permissions. As we said before, OIDC is based on OAuth 2, so OIDC can use Authorization Code mode, Implicit mode, and a Hybrid mode.
Authentication using the Authorization Code Flow
Authentication using the Authorization Code Flow
The Authorization Code Flow goes through the following steps:
- Client prepares an Authentication Request containing the desired request parameters.
- Client sends the request to the Authorization Server.
- Authorization Server Authenticates the End-User.
- Authorization Server obtains End-User Consent/Authorization.
- Authorization Server sends the End-User back to the Client with an Authorization Code.
- Client requests a response using the Authorization Code at the Token Endpoint.
- Client receives a response that contains an ID Token and Access Token in the response body.
- Client validates the ID token and retrieves the End-User’s Subject Identifier.
The difference is that there must be an item called openid in the scope parameter, and another point is that there is an additional id_token in the final return result.
|
|
This is a JWT that, when parsed, contains the user’s information.
where.
- iss is the abbreviation of Issuer, the value is the URL that issued this OpenID
- sub is the abbreviation of Subject, which refers to the user corresponding to this OpenID
- aud is the abbreviation of Audience(s), which refers to the client id authorized by this OpenID (there may be more than one)
- exp is the timeout period
- iat is the issuance time
- nonce is a random string
There are a few other fields, which can be found at https://openid.net/specs/openid-connect-core-1_0.html#IDToken
Authentication using the Implicit Flow
Authentication using the Implicit Flow
The steps are as follows.
- Client prepares an Authentication Request containing the desired request parameters.
- Client sends the request to the Authorization Server.
- Authorization Server Authenticates the End-User.
- Authorization Server obtains End-User Consent/Authorization.
- Authorization Server sends the End-User back to the Client with an ID Token and, if requested, an Access Token.
- Client validates the ID token and retrieves the End-User’s Subject Identifier.
The process is basically the same as the Implicit mode of OAuth 2, the difference is that the value of response_type is not token but id_token token or id_token, and for the response result, a new id_token will be added in the URL fragment.
Authentication using the Hybrid Flow
Authentication using the Hybrid Flow
The steps are as follows.
- Client prepares an Authentication Request containing the desired request parameters.
- Client sends the request to the Authorization Server.
- Authorization Server Authenticates the End-User.
- Authorization Server obtains End-User Consent/Authorization.
- Authorization Server sends the End-User back to the Client with an Authorization Code and, depending on the Response Type, one or more additional parameters.
- Client requests a response using the Authorization Code at the Token Endpoint.
- Client receives a response that contains an ID Token and Access Token in the response body.
- Client validates the ID Token and retrieves the End-User’s Subject Identifier.
The difference is that the value of response_type in the request parameter is code id_token or code token or code id_token token.
- When the value is
code tokenorcode id_token token,access_tokenis returned - When the value is
code id_tokenorcode id_token token,id_tokenis returned - code will definitely return
The above are the three authorization methods of OIDC, through OIDC, we can login to another system as a third party system and get some basic information, such as first name, last name, username, email, avatar url, etc.
Summary
This article summarizes the 5 authorization processes of OAuth 2, and then on top of that, introduces the OIDC process, and its role. I hope it will be helpful to readers.