Git ops

Argo CD is a continuous deployment tool for Kubernetes that follows the declarative GitOps philosophy. argo CD automatically synchronizes and deploys applications when Git repositories change.

Argo CD follows the GitOps model, using Git repositories as the true source for defining the required application state, and Argo CD supports multiple Kubernetes manifests.

  • kustomize
  • helm charts
  • ksonnet applications
  • jsonnet files
  • Plain directory of YAML/json manifests
  • Any custom config management tool configured as a config management plugin

Argo CD automatically deploys the required application state in a specified target environment, and application deployment can track updates to branches, tags, or fix to a specified version of the manifest at Git commit time.

Argo CD Architecture

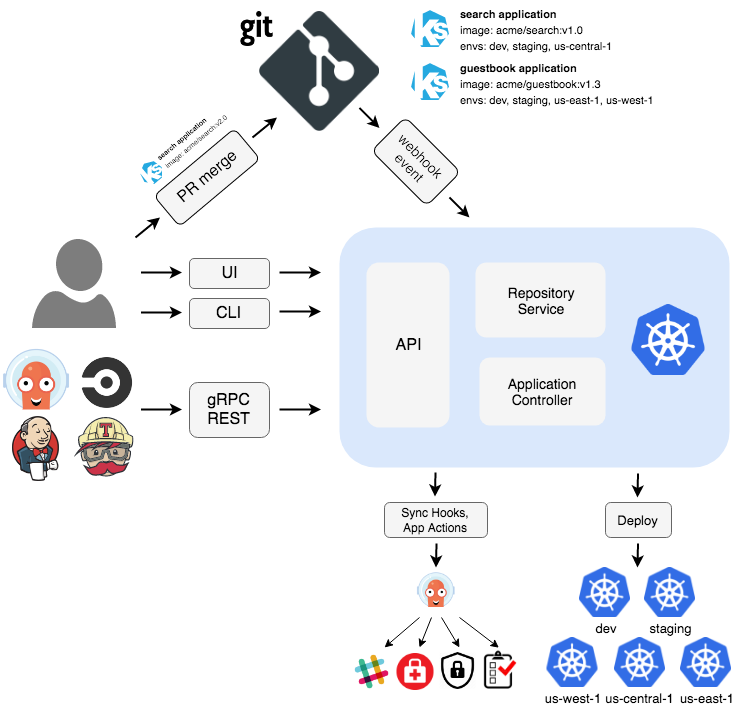
Argo CD is implemented through a Kubernetes controller that continuously watches running applications and compares the current live state with the desired target state (specified in the Git repository). Deployed applications whose actual state differs from the target state are considered to be in OutOfSync state, and the Argo CD reports showing these differences, while providing tools to automatically or manually synchronize the state to the desired target state. Any changes made to the desired target state in the Git repository can be automatically applied back to the specified target environment.

The following is a brief description of some of the main components in Argo CD.

API Service: The API Service is a gRPC/REST service that exposes the interfaces used by the Web UI, CLI and CI/CD system and has the following main functions.

  • Application management and status reporting
  • Execution of application operations (e.g., synchronization, rollback, user-defined operations)
  • Storage repository and cluster credential management (stored as K8S Secrets objects)
  • Authentication and authorization to external identity providers
  • RBAC
  • Listener/forwarder for Git webhook events

Repository Service: The Storage Repository Service is an internal service that maintains a local cache of Git repositories that hold application manifests. It is responsible for generating and returning Kubernetes manifests when the following inputs are provided.

  • repository URL
  • revision version (commit, tag, branch)
  • application path
  • Template configuration: parameters, ksonnet environment, helm values.yaml, etc.

Application Controller : The application controller is a Kubernetes controller that continuously watches the running application and compares the current live state with the desired target state (specified in the repo). It detects the OutOfSync state of the application and takes some steps to synchronize the state, and it is responsible for invoking hooks for any user-defined lifecycle events (PreSync, Sync, PostSync).

Features

  • Automatic deployment of applications to specified target environments
  • Support for multiple configuration management/template tools (Kustomize, Helm, Ksonnet, Jsonnet, plain-YAML)
  • Ability to manage and deploy to multiple clusters
  • SSO integration (OIDC, OAuth2, LDAP, SAML 2.0, GitHub, GitLab, Microsoft, LinkedIn)
  • Multi-tenancy and RBAC policies for authorization
  • Rollback/anytime rollback to any application configuration committed in the Git repository
  • Health analysis of application resources
  • Automatic configuration detection and visualization
  • Automatic or manual synchronization of applications to the desired state
  • Web UI that provides a real-time view of application activity
  • CLI for automation and CI integration
  • Webhook integration (GitHub, BitBucket, GitLab)
  • AccessTokens for automation
  • PreSync, Sync, PostSync Hooks to support complex application deployments (e.g. blue/green and canary releases)
  • Auditing of application events and API calls
  • Prometheus monitoring metrics
  • ksonnet/helm parameters for overriding Git

Core Concepts

  • Application: an application, a set of Kubernetes resources defined by a resource manifest, which is a CRD resource object
  • Application source type: the tool used to build the application
  • Target state: the target state, the desired state of the application, represented by a file in the Git repository
  • Live state: live state, the real state of the application, such as which Pods have been deployed
  • Sync status: Sync status indicates whether the live state matches the target state, and whether the deployed application is the same as described by Git?
  • Sync: Sync refers to the process of migrating an application to its target state, for example by applying changes to a Kubernetes cluster
  • Sync operation status: Sync operation status refers to whether the sync was successful or not.
  • Refresh: Refresh means comparing the latest code in Git to the live state and figuring out what the difference is.
  • Health: the health of the application, is it running properly? Can it service requests?
  • Tool: Tools are tools that create manifests from file directories, such as Kustomize or Ksonnet.
  • Configuration management tool: Configuration management tool
  • Configuration management plugin: Configuration management plugin

Install

Of course, the prerequisite is a kubectl-accessible Kubernetes cluster, which can be installed directly using the following command, here we install the latest stable version v2.4.9.

1
2
$ kubectl create namespace argocd
$ kubectl apply -n argocd -f https://raw.githubusercontent.com/argoproj/argo-cd/v2.4.9/manifests/install.yaml

If you want to use it in a production environment, you can deploy a highly available version of HA using the following command.

1
2
$ kubectl create namespace argocd
$ kubectl apply -n argocd -f https://raw.githubusercontent.com/argoproj/argo-cd/v2.4.9/manifests/ha/install.yaml

This will create a new namespace argocd to which Argo CD’s services and application resources will be deployed.

1
2
3
4
5
6
7
8
9
$ kubectl get pods -n argocd
NAME                                                READY   STATUS    RESTARTS   AGE
argocd-application-controller-0                     1/1     Running   0          103s
argocd-applicationset-controller-68b9bdbd8b-jzcpf   1/1     Running   0          103s
argocd-dex-server-6b7745757-6mxwk                   1/1     Running   0          103s
argocd-notifications-controller-5b56f6f7bb-jqpng    1/1     Running   0          103s
argocd-redis-f4cdbff57-dr8jc                        1/1     Running   0          103s
argocd-repo-server-c4f79b4d6-7nh6n                  1/1     Running   0          103s
argocd-server-895675597-fr42g                       1/1     Running   0          103s

If you’re not interested in features like UI, SSO, or multi-cluster management, and just want to sync application changes to the cluster, then you can disable authentication using the -disable-auth flag, which can be done with the command kubectl patch deploy argocd-server -n argocd -p '[{"op": "add ", "path": "/spec/template/spec/containers/0/command/-", "value": "--disable-auth"}]' --type json to achieve this.

We can then install the CLI tools locally for easy operation of the Argo CD. We can view the latest version of the Argo CD on the Argo CD Git repository release page or run the following command to get the version.

1
VERSION=$(curl --silent "https://api.github.com/repos/argoproj/argo-cd/releases/latest" | grep '"tag_name"' | sed -E 's/.*"([^"]+)".*/\1/')

Replace VERSION in the following command with the version of the Argo CD you want to download.

1
$ curl -sSL -o /usr/local/bin/argocd https://github.com/argoproj/argo-cd/releases/download/$VERSION/argocd-linux-amd64

Give executable permissions to the argocd CLI.

1
$ chmod +x /usr/local/bin/argocd

Now we are ready to use the argocd command. If you are a Mac, you can install it directly with brew install argocd.

The Argo CD will run a gRPC service (used by the CLI) and an HTTP/HTTPS service (used by the UI), both protocols are exposed by the argocd-server service on the following ports.

  • 443 - gRPC/HTTPS
  • 80 - HTTP (redirects to HTTPS)

We can expose the service to the public by configuring the Ingress. For other Ingress controller configurations, you can refer to the official documentation at https://argo-cd.readthedocs.io/en/stable/operator-manual/ingress/ for configuration.

Argo CD provides multiple protocols (gRPC/HTTPS) on the same port (443), so it is a bit tricky when we define individual nginx ingress objects and rules for the argocd service, because the nginx.ingress.kubernetes.io/backend -protocol annotation annotation can only accept one backend protocol (e.g., HTTP, HTTPS, GRPC, GRPCS).

In order to expose the Argo CD APIServer with a single ingress rule and hostname, you must use the annotation nginx.ingress.kubernetes.io/ssl-passthrough to pass a TLS connection and verify the TLS on the Argo CD APIServer on the Argo CD APIServer.

 1
 2
 3
 4
 5
 6
 7
 8
 9
10
11
12
13
14
15
16
17
18
19
20
21
apiVersion: networking.k8s.io/v1
kind: Ingress
metadata:
  name: argocd-server-ingress
  namespace: argocd
  annotations:
    nginx.ingress.kubernetes.io/force-ssl-redirect: "true"
    nginx.ingress.kubernetes.io/ssl-passthrough: "true"
spec:
  ingressClassName: nginx
  rules:
    - host: argocd.k8s.local
      http:
        paths:
          - path: /
            pathType: Prefix
            backend:
              service:
                name: argocd-server
                port:
                  name: https

The above rule checks for TLS on the Argo CD APIServer, which detects the protocol being used and responds appropriately. Note that the nginx.ingress.kubernetes.io/ssl-passthrough annotation requires the -enable-ssl-passthrough flag to be added to the command line arguments of nginx-ingress-controller.

Since each Ingress object for ingress-nginx supports only one protocol, another approach is to define two Ingress objects. One for HTTP/HTTPS and the other for gRPC.

The Ingress object for HTTP/HTTPS is shown below.

 1
 2
 3
 4
 5
 6
 7
 8
 9
10
11
12
13
14
15
16
17
18
19
20
21
22
23
24
25
apiVersion: networking.k8s.io/v1
kind: Ingress
metadata:
  name: argocd-server-http-ingress
  namespace: argocd
  annotations:
    nginx.ingress.kubernetes.io/force-ssl-redirect: "true"
    nginx.ingress.kubernetes.io/backend-protocol: "HTTP"
spec:
  ingressClassName: nginx
  rules:
    - http:
        paths:
          - path: /
            pathType: Prefix
            backend:
              service:
                name: argocd-server
                port:
                  name: http
      host: argocd.k8s.local
  tls:
    - hosts:
        - argocd.k8s.local
      secretName: argocd-secret # do not change, this is provided by Argo CD

The Ingress object corresponding to the gRPC protocol is shown below.

 1
 2
 3
 4
 5
 6
 7
 8
 9
10
11
12
13
14
15
16
17
18
19
20
21
22
23
24
apiVersion: networking.k8s.io/v1
kind: Ingress
metadata:
  name: argocd-server-grpc-ingress
  namespace: argocd
  annotations:
    nginx.ingress.kubernetes.io/backend-protocol: "GRPC"
spec:
  ingressClassName: nginx
  rules:
    - http:
        paths:
          - path: /
            pathType: Prefix
            backend:
              service:
                name: argocd-server
                port:
                  name: https
      host: grpc.argocd.k8s.local
  tls:
    - hosts:
        - grpc.argocd.k8s.local
      secretName: argocd-secret # do not change, this is provided by Argo CD

Then we need to run APIServer with TLS disabled. edit the deployment argocd-server to add the --insecure flag to the argocd-server command, or simply set it in the argocd-cmd-params-cm ConfigMap -server.insecure: "true" and that’s it.

Once created, we can access the Argo CD service via argocd.k8s.local, but note that the certificate we configured here is self-signed, so the first time you access it, you will be prompted that it is not secure, so force a jump.

By default, the initial password for the admin account is automatically generated and stored in plaintext under the password field of the Secret object named argocd-initial-admin-secret in the namespace of the Argo CD installation, which we can get with the following command.

1
$ kubectl -n argocd get secret argocd-initial-admin-secret -o jsonpath="{.data.password}" | base64 -d && echo

You can log in to Dashboard using the username admin and the password output above.

Dashboard

We can also log in via the ArgoCD CLI command line tool.

1
2
3
4
5
6
$ argocd login grpc.argocd.k8s.local
WARNING: server certificate had error: x509: "Kubernetes Ingress Controller Fake Certificate" certificate is not trusted. Proceed insecurely (y/n)? y
Username: admin
Password:
'admin:login' logged in successfully
Context 'grpc.argocd.k8s.local' updated

Note that the login address here is the service address exposed by gRPC.

After a successful CLI login, the password can be changed using the command shown below.

 1
 2
 3
 4
 5
 6
 7
 8
 9
10
11
12
13
14
15
16
17
18
19
20
21
22
23
24
25
$ argocd account update-password
*** Enter current password:
*** Enter new password:
*** Confirm new password:
Password updated
Context 'argocd.k8s.local' updated
$ argocd version
argocd: v2.4.9+1ba9008
  BuildDate: 2022-08-11T15:41:08Z
  GitCommit: 1ba9008536b7e61414784811c431cd8da356065e
  GitTreeState: clean
  GoVersion: go1.18.5
  Compiler: gc
  Platform: darwin/arm64
argocd-server: v2.4.9+1ba9008
  BuildDate: 2022-08-11T15:22:41Z
  GitCommit: 1ba9008536b7e61414784811c431cd8da356065e
  GitTreeState: clean
  GoVersion: go1.18.5
  Compiler: gc
  Platform: linux/amd64
  Kustomize Version: v4.4.1 2021-11-11T23:36:27Z
  Helm Version: v3.8.1+g5cb9af4
  Kubectl Version: v0.23.1
  Jsonnet Version: v0.18.0

Configuring Clusters

Since Argo CD supports deploying applications to multiple clusters, if you want to deploy your application to an external cluster, you need to register the authentication information of the external cluster to Argo CD first. If you are deploying internally (the same cluster running Argo CD, no configuration is required by default), you can directly use https://kubernetes.default.svc as the K8S APIServer address of the application.

First list all cluster contexts currently in kubeconfig.

1
$ kubectl config get-contexts -o name

Select a context name from the list and provide it to argocd cluster add CONTEXTNAME, for example, for the kind-kind context, run the following command.

1
$ argocd cluster add kind-kind

Creating Applications

The Git repository at https://github.com/argoproj/argocd-example-apps.git is a sample repository containing a guestbook application that we can use to demonstrate how the Argo CD works.

Creating an application via the CLI

We can create an application with the argocd app create xxx command.

 1
 2
 3
 4
 5
 6
 7
 8
 9
10
11
12
13
14
15
16
17
18
19
20
21
22
23
24
25
26
27
28
29
$ argocd app create --help
Create an application

Usage:
  argocd app create APPNAME [flags]

Examples:

        # Create a directory app
        argocd app create guestbook --repo https://github.com/argoproj/argocd-example-apps.git --path guestbook --dest-namespace default --dest-server https://kubernetes.default.svc --directory-recurse

        # Create a Jsonnet app
        argocd app create jsonnet-guestbook --repo https://github.com/argoproj/argocd-example-apps.git --path jsonnet-guestbook --dest-namespace default --dest-server https://kubernetes.default.svc --jsonnet-ext-str replicas=2

        # Create a Helm app
        argocd app create helm-guestbook --repo https://github.com/argoproj/argocd-example-apps.git --path helm-guestbook --dest-namespace default --dest-server https://kubernetes.default.svc --helm-set replicaCount=2

        # Create a Helm app from a Helm repo
        argocd app create nginx-ingress --repo https://charts.helm.sh/stable --helm-chart nginx-ingress --revision 1.24.3 --dest-namespace default --dest-server https://kubernetes.default.svc

        # Create a Kustomize app
        argocd app create kustomize-guestbook --repo https://github.com/argoproj/argocd-example-apps.git --path kustomize-guestbook --dest-namespace default --dest-server https://kubernetes.default.svc --kustomize-image gcr.io/heptio-images/ks-guestbook-demo:0.1

        # Create a app using a custom tool:
        argocd app create kasane --repo https://github.com/argoproj/argocd-example-apps.git --path plugins/kasane --dest-namespace default --dest-server https://kubernetes.default.svc --config-management-plugin kasane


Flags:
......

Simply execute the command shown below.

1
2
$ argocd app create guestbook --repo https://github.com/argoproj/argocd-example-apps.git --path guestbook --dest-server https://kubernetes.default.svc --dest-namespace default
application 'guestbook' created

Creating an app via UI

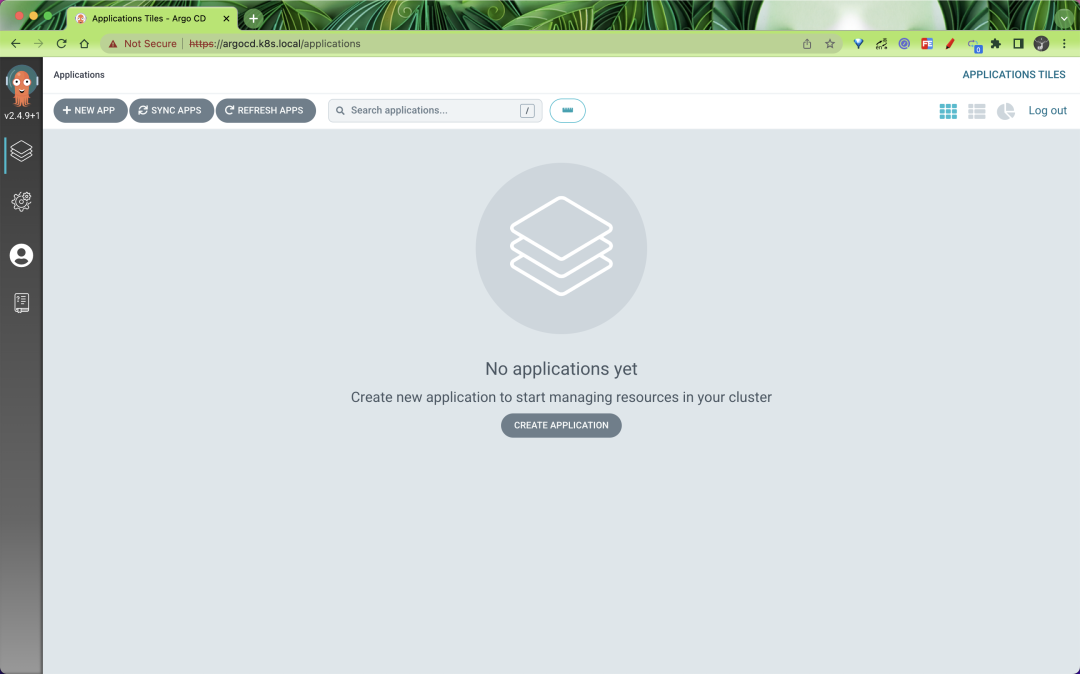
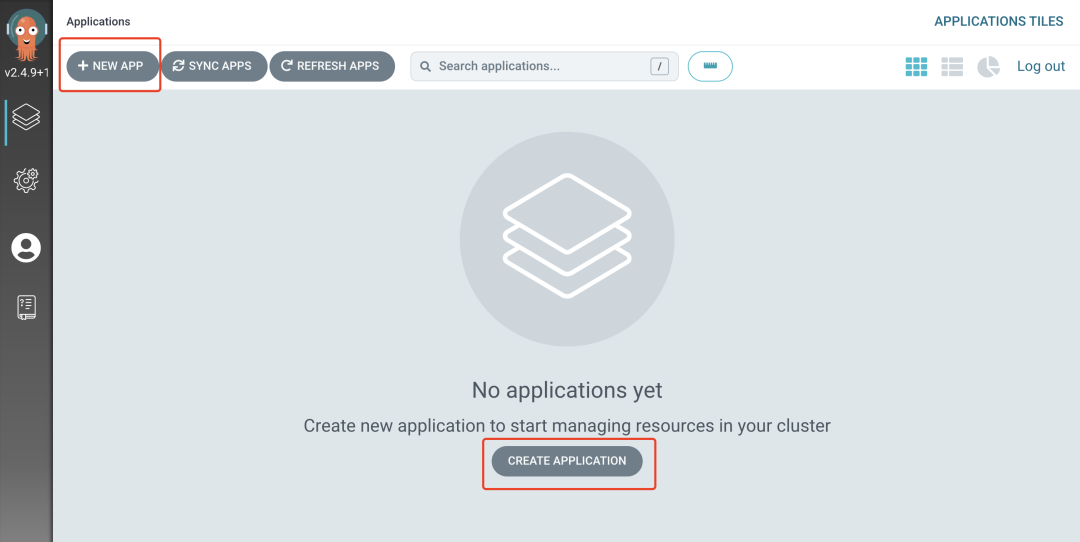
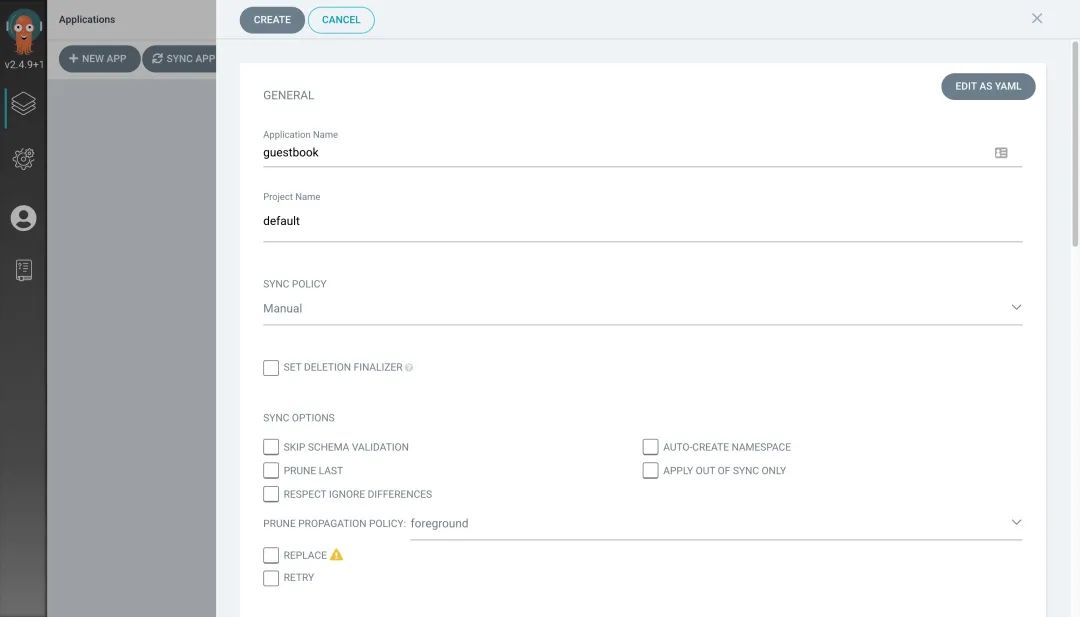
In addition to creating applications through the CLI tool, we can also create them through the UI interface by locating the argocd.k8s.local page, logging in, and clicking the +New App New App button, as shown below.

New App

Name the application guestbook, use the default project, and set the sync policy to Manual.

set the sync policy to Manual

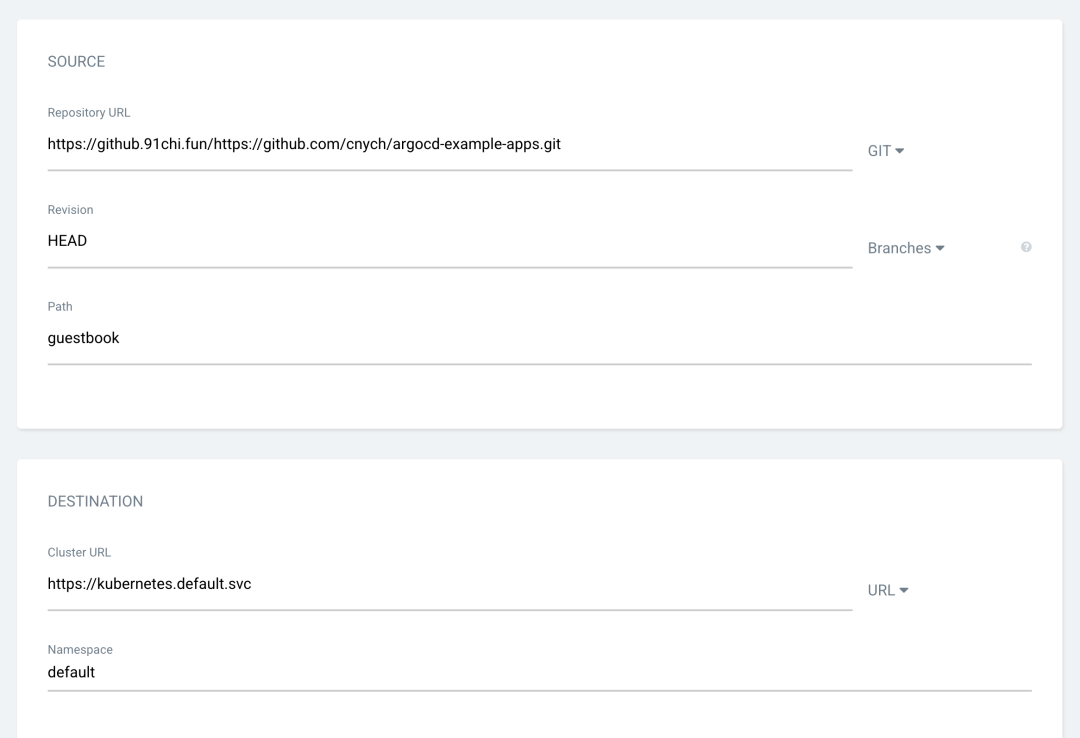
Then underneath, configure the Repository URL to https://github.com/argoproj/argocd-example-apps.git, for some reason we’re using a GitHub repository acceleration address here https://github.91chi.fun/https://github.com/cnych/argocd-example-apps.git, set Revision to HEAD, and set the path to guestbook. Then in the Destination section below, set cluster to inCluster and namespace to default.

Repository URL

After filling in the above information, click Create at the top of the page to create the guestbook application, and you can see that the current application is in the OutOfSync state after the creation is complete.

OutOfSync

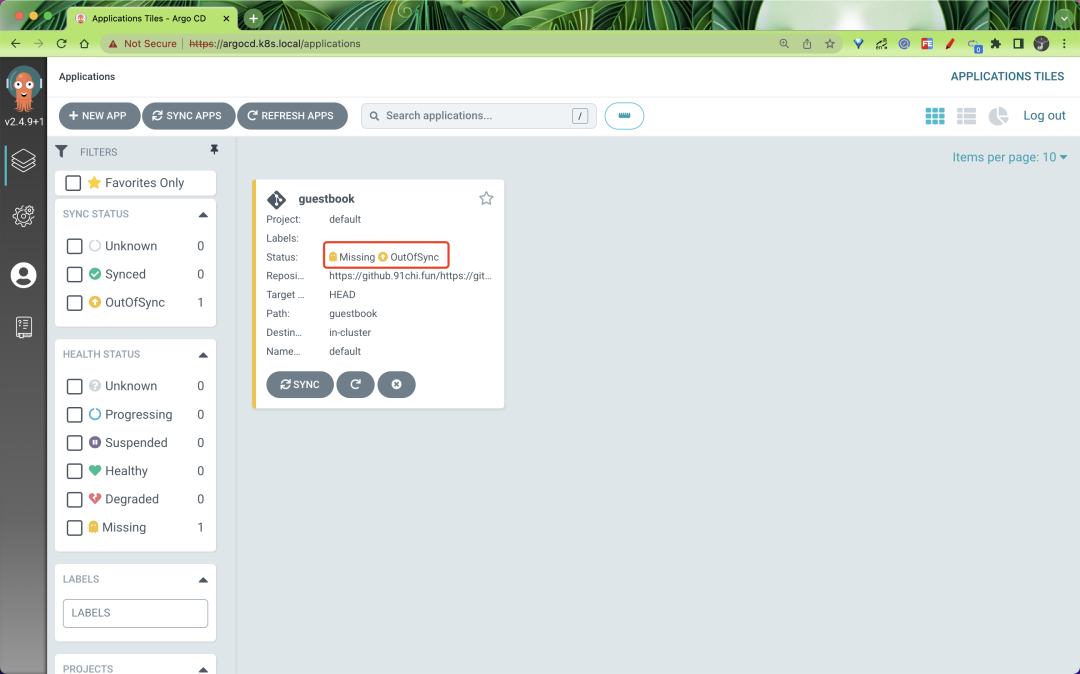
By default, the Argo CD checks the Git repository every 3 minutes to determine if the actual state of the application matches the expected state declared in Git, and if it doesn’t, the state is converted to OutOfSync. This does not trigger an update by default, unless you configure automatic synchronization via syncPolicy.

Creating via CRD

In addition to the CLI and Dashboard, you can also create an application directly by declaring an Application resource object, as follows.

 1
 2
 3
 4
 5
 6
 7
 8
 9
10
11
12
13
14
15
16
apiVersion: argoproj.io/v1alpha1
kind: Application
metadata:
  name: guestbook
spec:
  destination:
    name: ""
    namespace: default
    server: "https://kubernetes.default.svc"
  source:
    path: guestbook
    repoURL: "https://github.com/cnych/argocd-example-apps"
    targetRevision: HEAD
  project: default
  syncPolicy:
    automated: null

Deploy the application

Since the sync policy we used above when creating the application is Manual, the application is not automatically deployed after it is created, so we need to deploy the application manually. The same can be done with both CLI and UI interface.

Synchronization using CLI

Once the application is created, we can check its status with the following command.

 1
 2
 3
 4
 5
 6
 7
 8
 9
10
11
12
13
14
15
16
17
$ argocd app get guestbook
Name:               guestbook
Project:            default
Server:             https://kubernetes.default.svc
Namespace:          default
URL:                https://grpc.argocd.k8s.local/applications/guestbook
Repo:               https://github.91chi.fun/https://github.com/cnych/argocd-example-apps.git
Target:             HEAD
Path:               guestbook
SyncWindow:         Sync Allowed
Sync Policy:        <none>
Sync Status:        OutOfSync from HEAD (67bda3d)
Health Status:      Missing

GROUP  KIND        NAMESPACE  NAME          STATUS     HEALTH   HOOK  MESSAGE
       Service     default    guestbook-ui  OutOfSync  Missing
apps   Deployment  default    guestbook-ui  OutOfSync  Missing

The application state is the initial OutOfSync state because the application has not been deployed and no Kubernetes resources have been created. To synchronize (deploy) the application, you can execute the command shown below.

1
$ argocd app sync guestbook

This command retrieves the list of resources from the Git repository and executes kubectl apply to deploy the application. After executing the above command, the guestbook application is now running in the cluster and we can now view its resource components, logs, events, and evaluate its health.

Synchronization via UI

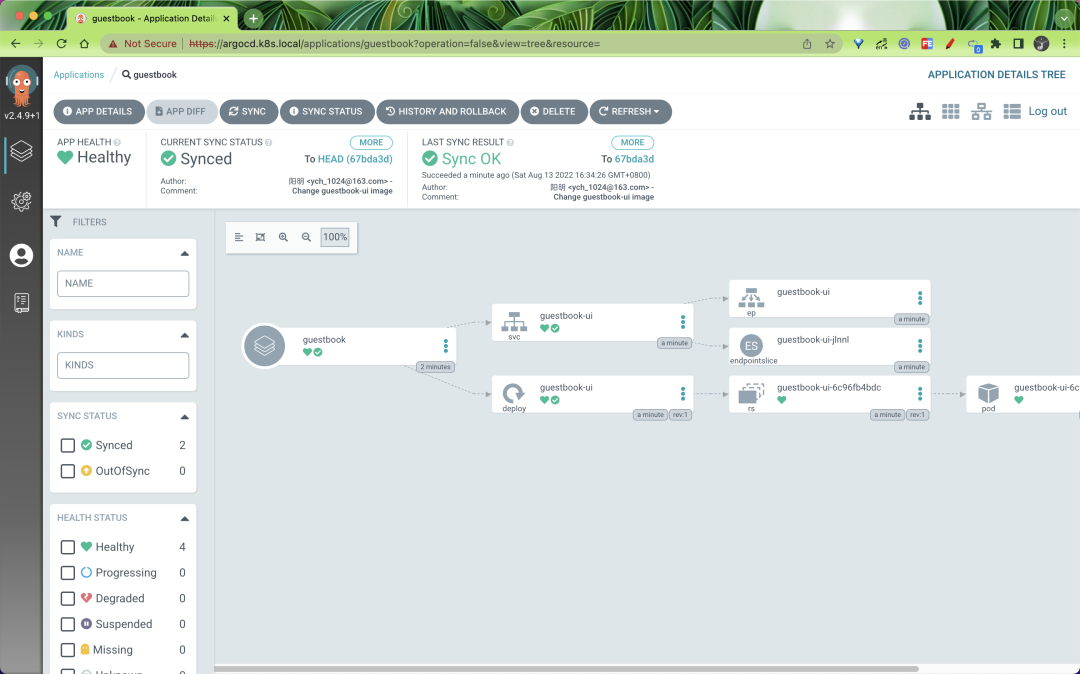
Add the Sync button directly to the application on the UI to start syncing.

Sync

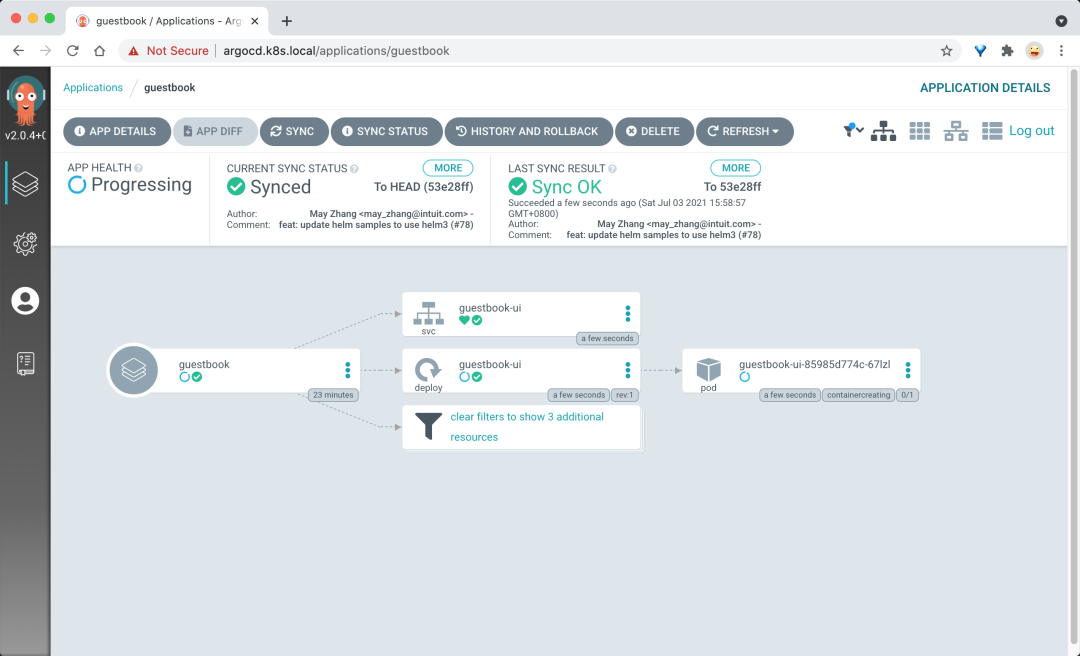
You can see the status of our resources after the sync is complete.

see the status of our resources

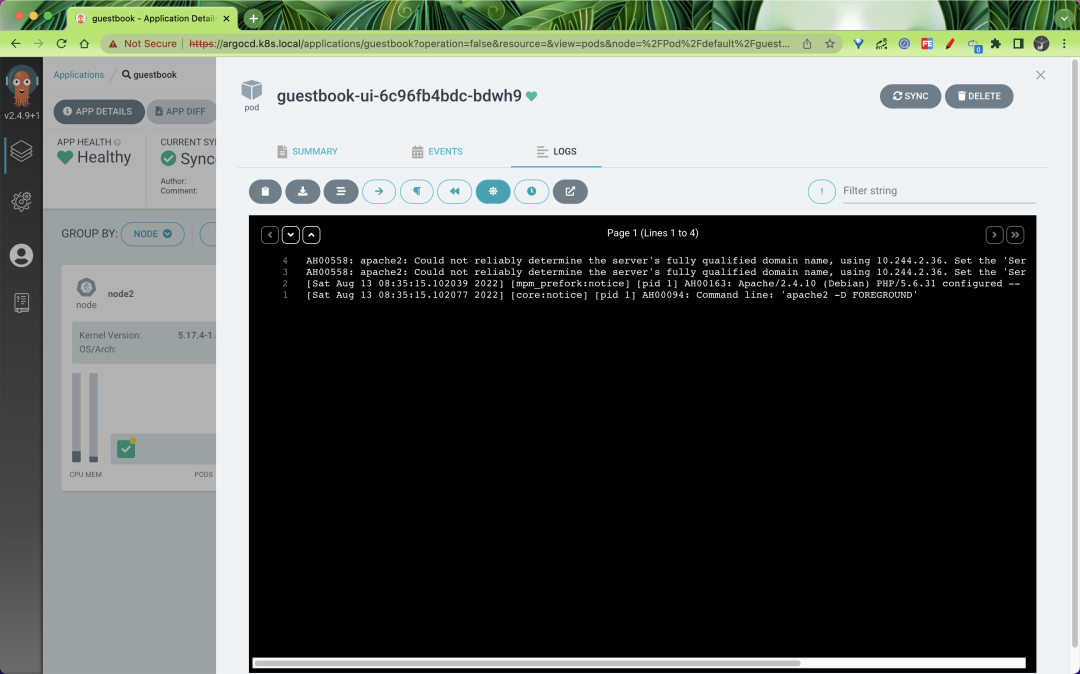
It is even possible to view the log information of the application directly.

log information of the application

It is also possible to view our deployed resources via kubectl.

1
2
3
4
5
6
7
➜  ~ kubectl get pods
NAME                                 READY   STATUS      RESTARTS       AGE
guestbook-ui-6c96fb4bdc-bdwh9        1/1     Running     0              3m3s
➜  ~ kubectl get svc
NAME                 TYPE           CLUSTER-IP       EXTERNAL-IP    PORT(S)                      AGE
guestbook-ui         ClusterIP      10.100.170.117   <none>         80/TCP                       3m16s
kubernetes           ClusterIP      10.96.0.1        <none>         443/TCP                      42d

The status of the resources under the guestbook directory is also synchronized with our synchronization from the Git repository, which proves that the synchronization was successful.

guestbook

Tekton combined with Argo CD

Previously we used Tekton to complete the CI/CD process for our application, but the CD was done in Tekton’s task. Now we’re using GitOps to revamp our pipeline and use Argo CD for the CD part.

Tekton combined with Argo CD

Here we have to review the previous Tekton practical part, the whole pipeline includes clone, test, build, docker, deploy, rollback several parts of the task, the last deploy and rollback belong to the CD part, we only need this part to use Argo CD to build can.

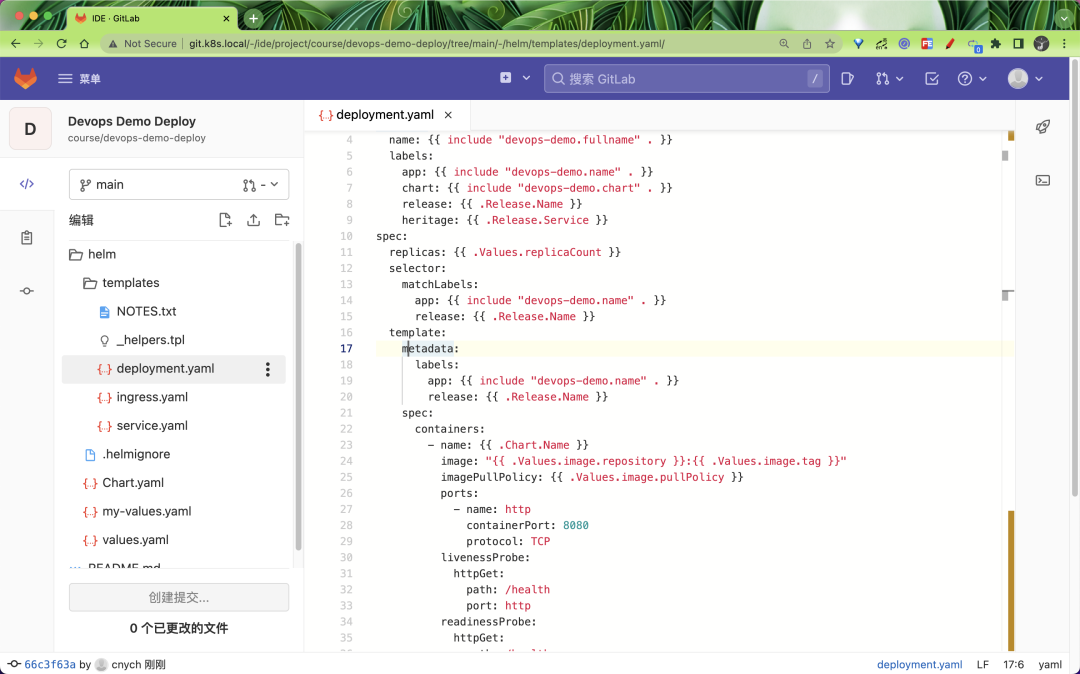
First, we extract the Helm Chart template from the project http://git.k8s.local/course/devops-demo.git repository into a separate repository http://git.k8s.local/course/devops-demo-deploy, so that it is easy to interface with the Argo CD, and only the Helm Chart templates for application deployment are available under the entire project.

Helm Chart

If you have multiple teams, each maintaining a large number of applications, you need to use another concept of Argo CD: Projects. projects in Argo CD can be used to group applications, with different teams using different projects, thus enabling a multi-tenant environment. Projects also support more granular access control.

  • Restrict deployment content (trusted Git repositories).
  • Restricting the target deployment environment (target cluster and namespace).
  • Restricting the types of resources deployed (e.g. RBAC, CRD, DaemonSets, NetworkPolicy, etc.).
  • Define project roles that provide RBAC for the Application (e.g. OIDC group or JWT token binding).

For example, if we create a project named demo here, creating the application under that project is as simple as creating an AppProject object as shown below.

 1
 2
 3
 4
 5
 6
 7
 8
 9
10
11
12
13
14
15
16
apiVersion: argoproj.io/v1alpha1
kind: AppProject
metadata:
  # Project Name
  name: demo
  namespace: argocd
spec:
  # Target
  destinations:
    # The services of this project allow the deployment of namespace, here are all
    - namespace: "*"
      # This project allows the deployment of clusters, here is the default cluster, which is the current cluster deployed by Argo CD
      server: https://kubernetes.default.svc
  # Allowed data sources
  sourceRepos:
    - http://git.k8s.local/course/devops-demo-deploy.git

There are several core properties in this object.

  • sourceRepos: repository references from which applications in the project can retrieve manifests
  • destinations: clusters and namespaces that applications in the project can deploy to
  • roles: roles defined for resource access within the project

Just create the object directly.

1
2
3
4
$ kubectl get AppProject -n argocd
NAME      AGE
default   79m
demo      24s

Then go to Argo CD to add the repository.

add the repository

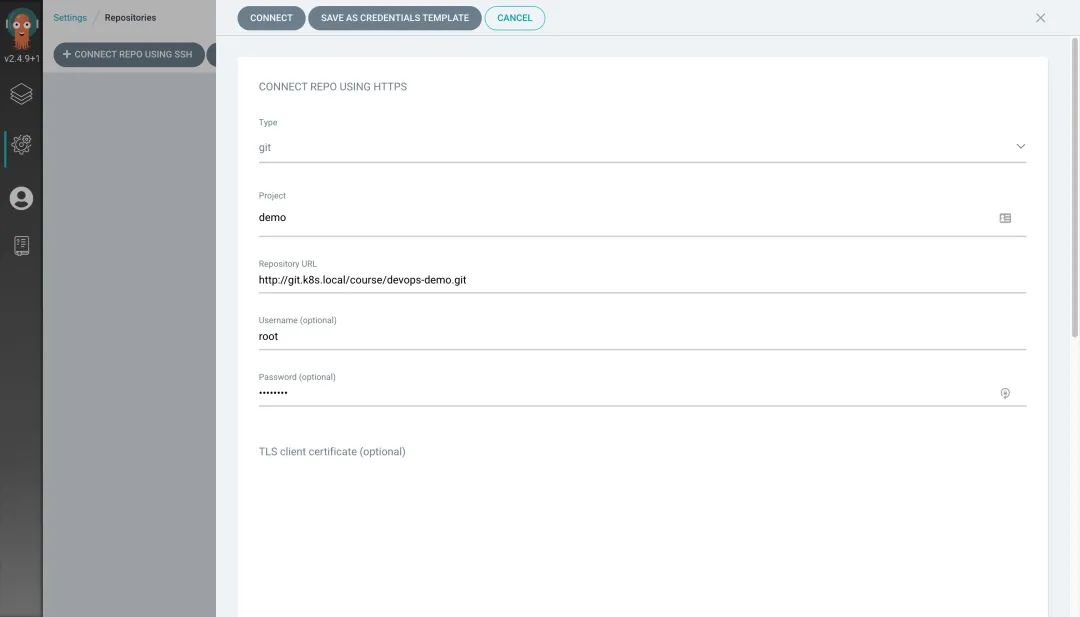
Note that the password here requires an AccessToken, which we can create by going to the GitLab page at http://git.k8s.local/-/profile/personal_access_tokens.

After the project is created, an Application is created under the project, representing the application instance deployed in the environment.

 1
 2
 3
 4
 5
 6
 7
 8
 9
10
11
12
13
14
15
16
17
18
19
20
apiVersion: argoproj.io/v1alpha1
kind: Application
metadata:
  name: devops-demo
  namespace: argocd
spec:
  destination:
    namespace: default
    server: "https://kubernetes.default.svc"
  project: demo
  source:
    path: helm # When creating an application from the Helm repository, the chart must specify the path
    repoURL: "http://git.k8s.local/course/devops-demo-deploy.git"
    targetRevision: HEAD
    helm:
      parameters:
        - name: replicaCount
          value: "2"
      valueFiles:
        - my-values.yaml

Here we define an application named devops-demo, the source of the application is from the helm path, using the my-values.yaml file, in addition to the source.helm.parameters to configure the parameters, the synchronization strategy we still choose to use the manual way, we can in Tekton We can trigger the synchronization manually in Tekton’s task. The application will be in the OutOfSync state after the above resource object is created, because the application is not yet deployed in the cluster.

devops-demo

Now let’s go ahead and modify the previous Tekton pipeline. The previous Pipeline flowline is shown below.

  1
  2
  3
  4
  5
  6
  7
  8
  9
 10
 11
 12
 13
 14
 15
 16
 17
 18
 19
 20
 21
 22
 23
 24
 25
 26
 27
 28
 29
 30
 31
 32
 33
 34
 35
 36
 37
 38
 39
 40
 41
 42
 43
 44
 45
 46
 47
 48
 49
 50
 51
 52
 53
 54
 55
 56
 57
 58
 59
 60
 61
 62
 63
 64
 65
 66
 67
 68
 69
 70
 71
 72
 73
 74
 75
 76
 77
 78
 79
 80
 81
 82
 83
 84
 85
 86
 87
 88
 89
 90
 91
 92
 93
 94
 95
 96
 97
 98
 99
100
101
102
103
# pipeline.yaml
apiVersion: tekton.dev/v1beta1
kind: Pipeline
metadata:
  name: pipeline
spec:
  workspaces: # 声明 workspaces
    - name: go-repo-pvc
  params:
    # 定义代码仓库
    - name: git_url
    - name: revision
      type: string
      default: "main"
    # 定义镜像参数
    - name: image
    - name: registry_url
      type: string
      default: "harbor.k8s.local"
    - name: registry_mirror
      type: string
      default: "https://dockerproxy.com"
    # 定义 helm charts 参数
    - name: charts_dir
    - name: release_name
    - name: release_namespace
      default: "default"
    - name: overwrite_values
      default: ""
    - name: values_file
      default: "values.yaml"
  tasks: # 添加task到流水线中
    - name: clone
      taskRef:
        name: git-clone
      workspaces:
        - name: output
          workspace: go-repo-pvc
      params:
        - name: url
          value: $(params.git_url)
        - name: revision
          value: $(params.revision)
    - name: test
      taskRef:
        name: test
      runAfter:
        - clone
    - name: build # 编译二进制程序
      taskRef:
        name: build
      runAfter: # 测试任务执行之后才执行 build task
        - test
        - clone
      workspaces: # 传递 workspaces
        - name: go-repo
          workspace: go-repo-pvc
    - name: docker # 构建并推送 Docker 镜像
      taskRef:
        name: docker
      runAfter:
        - build
      workspaces: # 传递 workspaces
        - name: go-repo
          workspace: go-repo-pvc
      params: # 传递参数
        - name: image
          value: $(params.image)
        - name: registry_url
          value: $(params.registry_url)
        - name: registry_mirror
          value: $(params.registry_mirror)
    - name: deploy # 部署应用
      taskRef:
        name: deploy
      runAfter:
        - docker
      workspaces:
        - name: source
          workspace: go-repo-pvc
      params:
        - name: charts_dir
          value: $(params.charts_dir)
        - name: release_name
          value: $(params.release_name)
        - name: release_namespace
          value: $(params.release_namespace)
        - name: overwrite_values
          value: $(params.overwrite_values)
        - name: values_file
          value: $(params.values_file)
    - name: rollback # 回滚
      taskRef:
        name: rollback
      when:
        - input: "$(tasks.deploy.results.helm-status)"
          operator: in
          values: ["failed"]
      params:
        - name: release_name
          value: $(params.release_name)
        - name: release_namespace
          value: $(params.release_namespace)

Now we need to remove the deploy and rollback tasks at the end. When the Docker image build is done, we just need to modify the values file in the deployment code repository and then manually trigger ArgoCD to synchronize the state (you can skip this step if you have automatic synchronization turned on), and the rollback operation is done by manipulating the Git repository You don’t need to define a separate Task to do this.

Define a Taks task as follows.

 1
 2
 3
 4
 5
 6
 7
 8
 9
10
11
12
13
14
15
16
17
18
19
20
21
22
23
24
25
26
27
28
29
30
31
32
33
34
35
apiVersion: tekton.dev/v1beta1
kind: Task
metadata:
  name: sync
spec:
  volumes:
    - name: argocd-secret
      secret:
        secretName: $(inputs.params.argocd_secret)
  params:
    - name: argocd_url
      description: "The URL of the ArgoCD server"
    - name: argocd_secret
      description: "The secret containing the username and password for the tekton task to connect to argo"
    - name: app_name
      description: "The name of the argo app to update"
    - name: app_revision
      default: "HEAD"
      description: "The revision of the argo app to update"
  steps:
    - name: deploy
      image: argoproj/argocd:v2.4.9
      volumeMounts:
        - name: argocd-secret
          mountPath: /var/secret
      command:
        - sh
      args:
        - -ce
        - |
          set -e
          echo "starting argocd sync app"
          argocd login --insecure $(params.argocd_url) --username $(/bin/cat /var/secret/username) --password $(/bin/cat /var/secret/password)
          argocd app sync $(params.app_name) --revision $(params.app_revision)
          argocd app wait $(params.app_name) --health          

Since we only need to modify the image.tag parameter in the Helm Chart’s Values file, the best way is to modify the values.yaml file in a Task and commit it to the Repo repository, but you can also configure the parameters directly on the application side of ArgoCD for simplicity, for example For example, you can use the argocd app set command to configure parameters for the application, and then use the argocd app sync command below to manually trigger the sync operation. .

Of course, in addition to configuring the parameters manually with argocd app set, it may be better to modify the values in the Repo repository directly, so that there is a version record in the source code repository and we can create a new task to modify the values as shown below.

 1
 2
 3
 4
 5
 6
 7
 8
 9
10
11
12
13
14
15
16
17
18
19
20
21
22
23
24
25
26
27
28
29
30
31
32
33
34
35
36
37
38
39
40
41
42
43
44
45
46
47
48
49
50
51
52
53
54
55
56
57
58
59
apiVersion: tekton.dev/v1beta1
kind: Task
metadata:
  name: change-manifests
spec:
  params:
    - name: git_url
      description: Git repository containing manifest files to update
    - name: git_email
      default: pipeline@k8s.local
    - name: git_name
      default: Tekton Pipeline
    - name: git_manifest_dir
      description: Manifests files dir
    - name: tool_image
      default: cnych/helm-kubectl-curl-git-jq-yq
    - name: image_tag
      description: Deploy docker image tag
  steps:
    - name: git-push
      image: $(params.tool_image)
      env:
        - name: GIT_USERNAME
          valueFrom:
            secretKeyRef:
              name: gitlab-auth
              key: username
              optional: true
        - name: GIT_PASSWORD
          valueFrom:
            secretKeyRef:
              name: gitlab-auth
              key: password
              optional: true
      command: ["/bin/bash"]
      args:
        - -c
        - |
          set -eu
          git config --global user.email "$(params.git_email)"
          git config --global user.name "$(params.git_name)"
          git clone --branch main --depth 1 http://${GIT_USERNAME}:${GIT_PASSWORD}@$(params.git_url) repo
          cd "repo/$(params.git_manifest_dir)"
          ls -l
          echo old value:
          cat my-values.yaml | yq r - 'image.tag'
          echo replacing with new value:
          echo $(params.image_tag)
          yq w --inplace my-values.yaml 'image.tag' "$(params.image_tag)"
          echo verifying new value
          yq r my-values.yaml 'image.tag'
          if ! git diff-index --quiet HEAD --; then
            git status
            git add .
            git commit -m "helm values updated by tekton pipeline in change-manifests task"
            git push
          else
              echo "no changes, git repository is up to date"
          fi          

Now our pipeline becomes the list shown below.

  1
  2
  3
  4
  5
  6
  7
  8
  9
 10
 11
 12
 13
 14
 15
 16
 17
 18
 19
 20
 21
 22
 23
 24
 25
 26
 27
 28
 29
 30
 31
 32
 33
 34
 35
 36
 37
 38
 39
 40
 41
 42
 43
 44
 45
 46
 47
 48
 49
 50
 51
 52
 53
 54
 55
 56
 57
 58
 59
 60
 61
 62
 63
 64
 65
 66
 67
 68
 69
 70
 71
 72
 73
 74
 75
 76
 77
 78
 79
 80
 81
 82
 83
 84
 85
 86
 87
 88
 89
 90
 91
 92
 93
 94
 95
 96
 97
 98
 99
100
# pipeline.yaml
apiVersion: tekton.dev/v1beta1
kind: Pipeline
metadata:
  name: pipeline
spec:
  workspaces: # 声明 workspaces
    - name: go-repo-pvc
  params:
    # 定义代码仓库
    - name: git_url
    - name: git_infra_url
    - name: revision
      type: string
      default: "main"
    # 定义镜像参数
    - name: image
    - name: image_tag
    - name: registry_url
      type: string
      default: "harbor.k8s.local"
    - name: registry_mirror
      type: string
      default: "https://ot2k4d59.mirror.aliyuncs.com/"
    - name: git_manifest_dir
      default: "helm"
    # 定义 argocd 参数
    - name: argocd_url
    - name: argocd_secret
    - name: app_name
    - name: app_revision
      type: string
      default: "HEAD"
  tasks: # 添加task到流水线中
    - name: clone
      taskRef:
        name: git-clone
      workspaces:
        - name: output
          workspace: go-repo-pvc
      params:
        - name: url
          value: $(params.git_url)
        - name: revision
          value: $(params.revision)
    - name: test
      taskRef:
        name: test
      runAfter:
        - clone
    - name: build # 编译二进制程序
      taskRef:
        name: build
      runAfter: # 测试任务执行之后才执行 build task
        - test
        - clone
      workspaces: # 传递 workspaces
        - name: go-repo
          workspace: go-repo-pvc
    - name: docker # 构建并推送 Docker 镜像
      taskRef:
        name: docker
      runAfter:
        - build
      workspaces: # 传递 workspaces
        - name: go-repo
          workspace: go-repo-pvc
      params: # 传递参数
        - name: image
          value: $(params.image):$(params.image_tag)
        - name: registry_url
          value: $(params.registry_url)
        - name: registry_mirror
          value: $(params.registry_mirror)
    - name: manifests
      taskRef:
        name: change-manifests
      runAfter:
        - docker
      params:
        - name: git_url
          value: $(params.git_infra_url)
        - name: git_manifest_dir
          value: $(params.git_manifest_dir)
        - name: image_tag
          value: $(params.image_tag)
    - name: sync
      taskRef:
        name: sync
      runAfter:
        - manifests
      params:
        - name: argocd_url
          value: $(params.argocd_url)
        - name: argocd_secret
          value: $(params.argocd_secret)
        - name: app_name
          value: $(params.app_name)
        - name: app_revision
          value: $(params.app_revision)

Finally, create the Secret object to be used for ArgoCD login.

1
2
3
4
5
6
7
8
apiVersion: v1
kind: Secret
metadata:
  name: argocd-auth
type: Opaque
stringData:
  username: admin
  password: admin321 # Password for argocd

Finally, modify the Template in Tekton Triggers as shown below.

 1
 2
 3
 4
 5
 6
 7
 8
 9
10
11
12
13
14
15
16
17
18
19
20
21
22
23
24
25
26
27
28
29
30
31
32
33
34
35
36
37
# gitlab-template.yaml
apiVersion: triggers.tekton.dev/v1alpha1
kind: TriggerTemplate
metadata:
  name: gitlab-template
spec:
  params: # 定义参数,和 TriggerBinding 中的保持一致
    - name: gitrevision
    - name: gitrepositoryurl
  resourcetemplates: # 定义资源模板
    - apiVersion: tekton.dev/v1beta1
      kind: PipelineRun # 定义 pipeline 模板
      metadata:
        generateName: gitlab-run- # TaskRun 名称前缀
      spec:
        serviceAccountName: tekton-build-sa
        pipelineRef:
          name: pipeline
        workspaces:
          - name: go-repo-pvc
            persistentVolumeClaim:
              claimName: go-repo-pvc
        params:
          - name: git_url
            value: $(tt.params.gitrepositoryurl)
          - name: git_infra_url
            value: git.k8s.local/course/devops-demo-deploy.git
          - name: image
            value: "harbor.k8s.local/course/devops-demo"
          - name: image_tag
            value: "$(tt.params.gitrevision)"
          - name: argocd_url
            value: argocd.k8s.local
          - name: argocd_secret
            value: argocd-auth
          - name: app_name
            value: devops-demo

Now our entire pipeline is even more streamlined. Now let’s go to the application repository and modify the source code and commit it to trigger our pipeline.

trigger pipeline

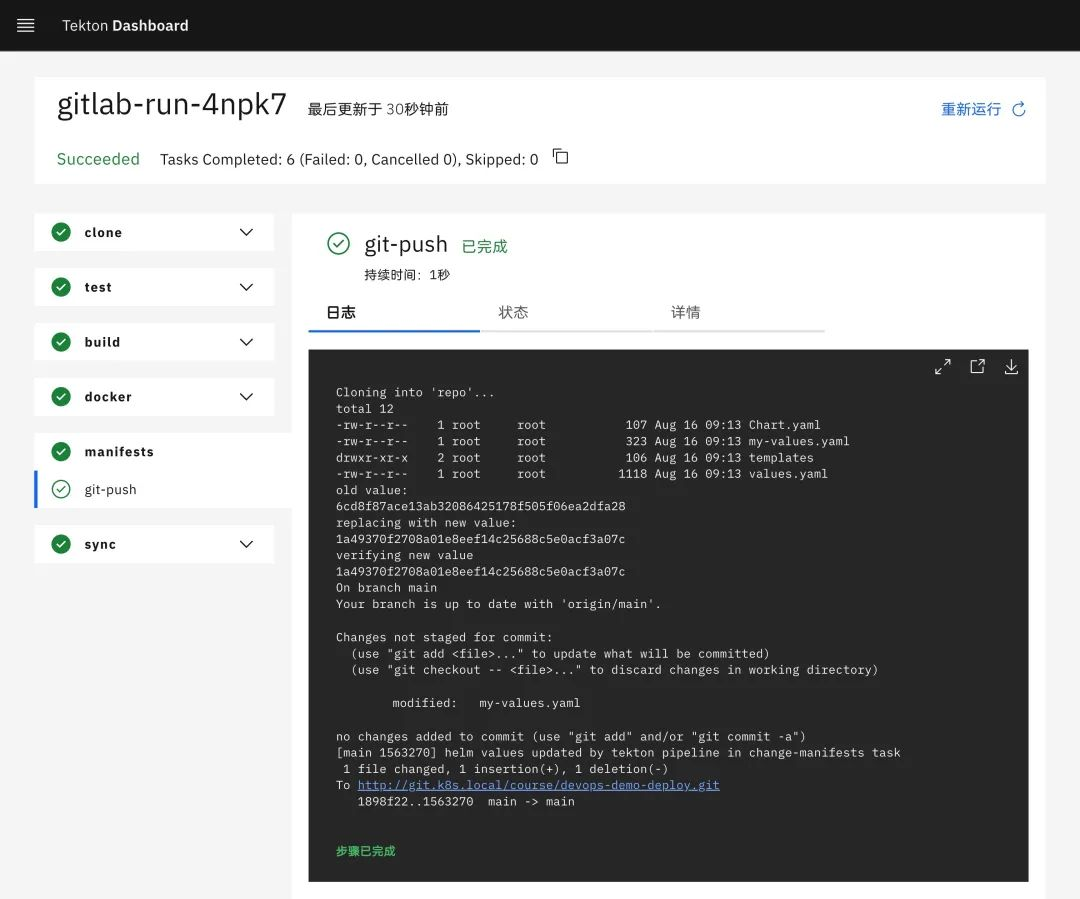
Again, you can request the application to verify that the results are correct.

1
2
$ curl devops-demo.k8s.local
{"msg":"Hello Tekton On GitLab With ArgoCD (GitOps)"}

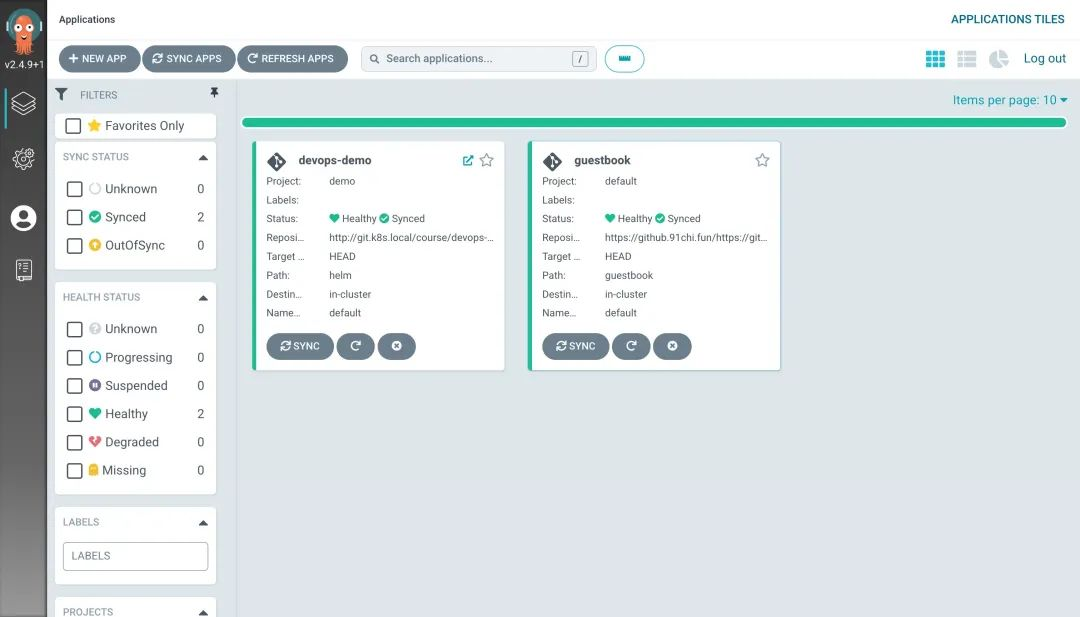
Now look at the applications in the Argo CD and you will see that they are all synchronized.

synchronized

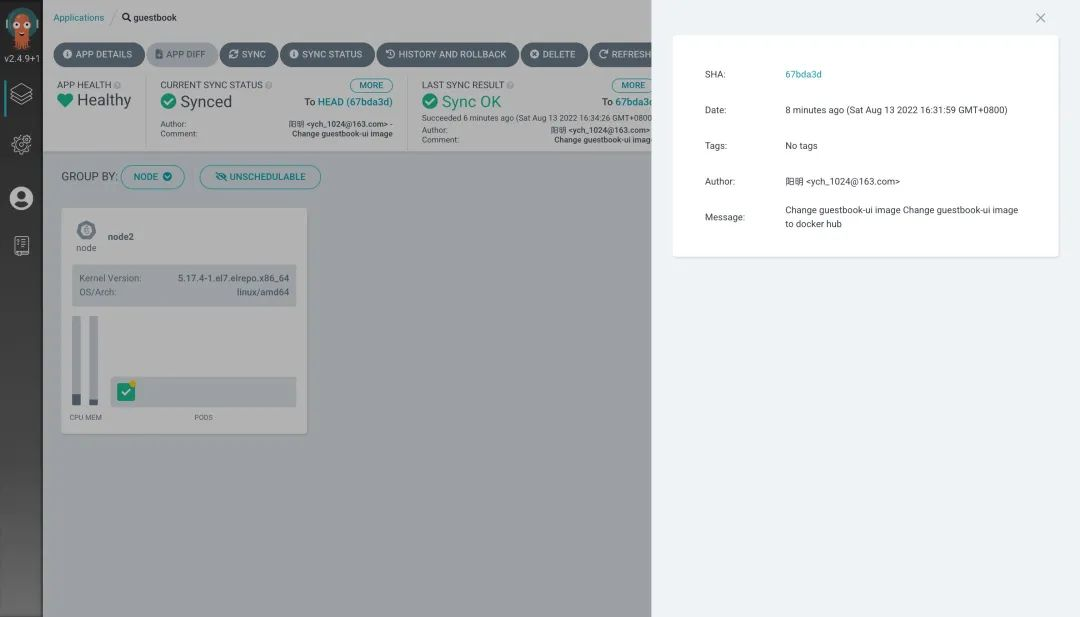
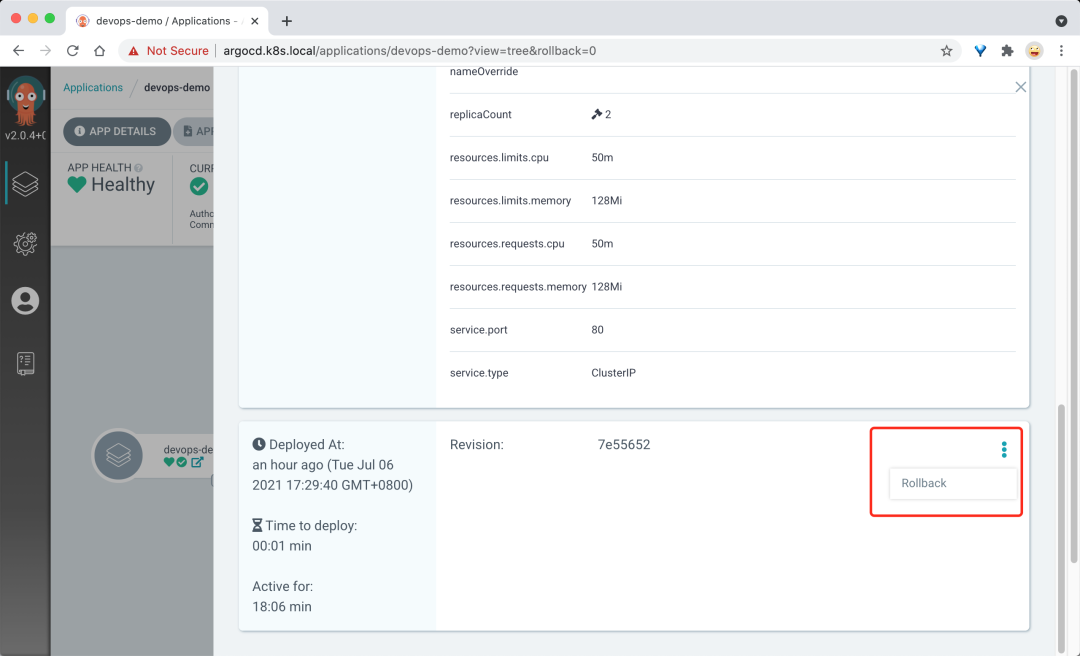
If you need to rollback, you can select the rollback version by clicking HISTORY AND ROLLBACK install on the Argo CD page to see the deployment history.

deployment history

You can view the status of the entire Tekton flow line.

 1
 2
 3
 4
 5
 6
 7
 8
 9
10
11
12
13
14
15
16
17
18
19
20
21
22
23
24
25
26
27
28
29
30
31
32
33
34
35
36
37
38
39
40
41
42
43
$ tkn pr describe gitlab-run-4npk7

Name:              gitlab-run-4npk7
Namespace:         default
Pipeline Ref:      pipeline
Service Account:   tekton-build-sa
Timeout:           1h0m0s
Labels:
 tekton.dev/pipeline=pipeline
 triggers.tekton.dev/eventlistener=gitlab-listener
 triggers.tekton.dev/trigger=gitlab-push-events-trigger
 triggers.tekton.dev/triggers-eventid=6e21e686-79dc-421c-951a-e1591dcfd2f8

🌡️  Status

STARTED          DURATION   STATUS
10 minutes ago   4m11s      Succeeded

⚓ Params

 NAME              VALUE
 ∙ git_url         http://git.k8s.local/course/devops-demo.git
 ∙ git_infra_url   git.k8s.local/course/devops-demo-deploy.git
 ∙ image           harbor.k8s.local/course/devops-demo
 ∙ image_tag       1a49370f2708a01e8eef14c25688c5e0acf3a07c
 ∙ argocd_url      grpc.argocd.k8s.local
 ∙ argocd_secret   argocd-auth
 ∙ app_name        devops-demo

📂 Workspaces

 NAME            SUB PATH   WORKSPACE BINDING
 ∙ go-repo-pvc   ---        PersistentVolumeClaim (claimName=go-repo-pvc)

🗂  Taskruns

 NAME                           TASK NAME   STARTED          DURATION   STATUS
 ∙ gitlab-run-4npk7-sync        sync        6 minutes ago    26s        Succeeded
 ∙ gitlab-run-4npk7-manifests   manifests   7 minutes ago    19s        Succeeded
 ∙ gitlab-run-4npk7-docker      docker      10 minutes ago   3m6s       Succeeded
 ∙ gitlab-run-4npk7-build       build       10 minutes ago   10s        Succeeded
 ∙ gitlab-run-4npk7-test        test        10 minutes ago   3s         Succeeded
 ∙ gitlab-run-4npk7-clone       clone       10 minutes ago   7s         Succeeded

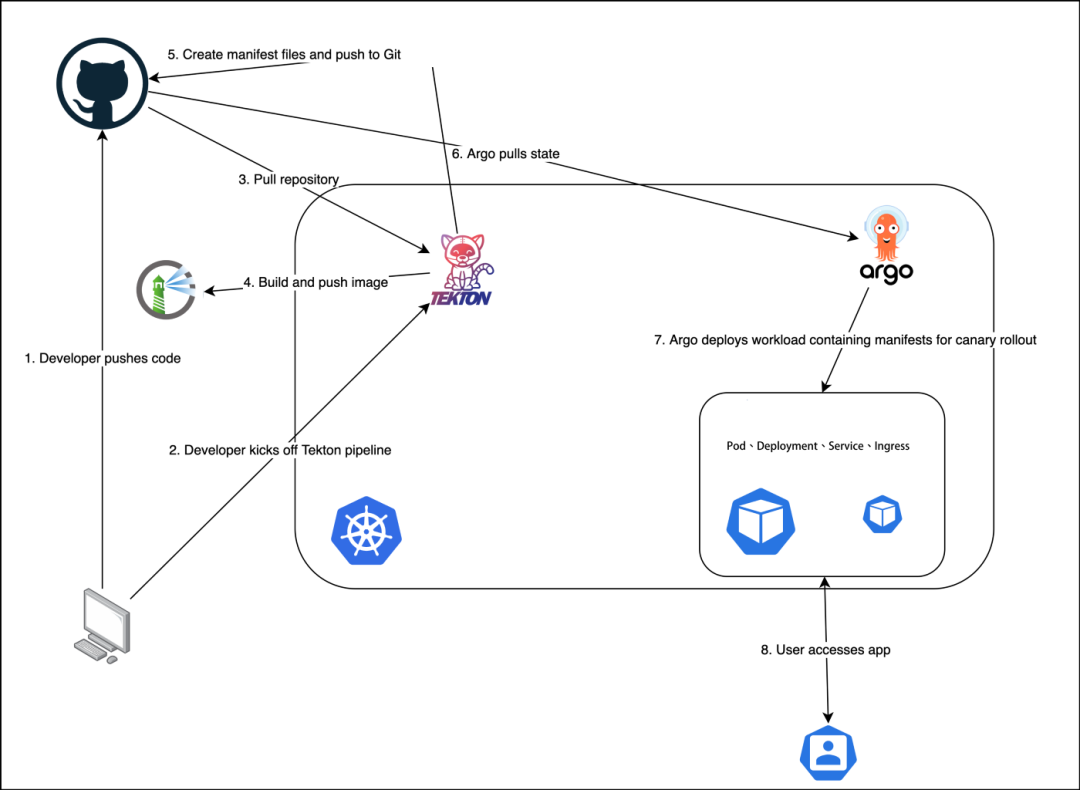
Finally, a diagram to summarize the workflow of our GitOps implementation using Tekton in combination with Argo CD.

the workflow of our GitOps implementation using Tekton in combination with Argo CD

In addition to this, another very important thing to do in GitOps is to be secure. Stay tuned for a follow-up article on how to implement Secure GitOps.