1 Pre-requisite knowledge
1.1 Introduction to Cilium
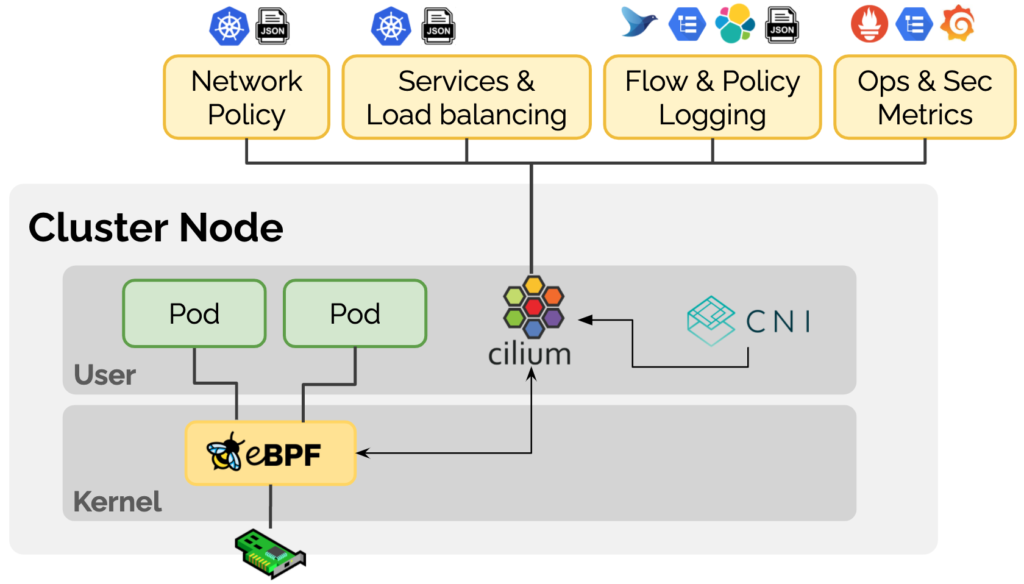
Cilium is a Kubernetes CNI plug-in based on eBPF technology, which Cilium positions on its official website as being dedicated to providing a range of eBPF-based networking, observability, and security solutions for container workloads. Cilium implements networking, observability and security related features by using eBPF technology to dynamically insert control logic inside Linux that can be applied and updated without modifying application code or container configuration.
1.2 Introduction to Cilium BGP
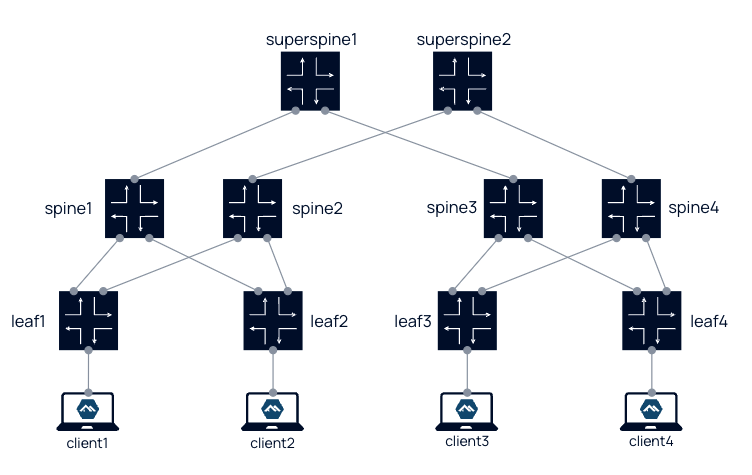
BGP (Border Gateway Protocol) is a dynamic routing protocol used between AS (Autonomous System), which provides rich and flexible routing control policies and was mainly used for interconnection between Internet AS in the early days. With the development of technology, BGP is now also widely used in data centers, where modern data center networks are usually based on Spine-Leaf architecture, where BGP can be used to propagate endpoint reachability information.

The Leaf layer consists of access switches that aggregate traffic from the servers and connect directly to the Spine or network core, which interconnects to all Leaf switches in a full-mesh topology.
As Kubernetes is increasingly used in the enterprise, these endpoints are likely to be Kubernetes Pods, and it was clear that Cilium should introduce support for the BGP protocol in order to allow networks outside of the Kubernetes cluster to dynamically obtain routes to the Pods they are accessing via the BGP protocol.
BGP was initially introduced in Cilium in version 1.10, by assigning LoadBalancer-type services to applications and combining them with MetalLB to announce routing information to BGP neighbors.
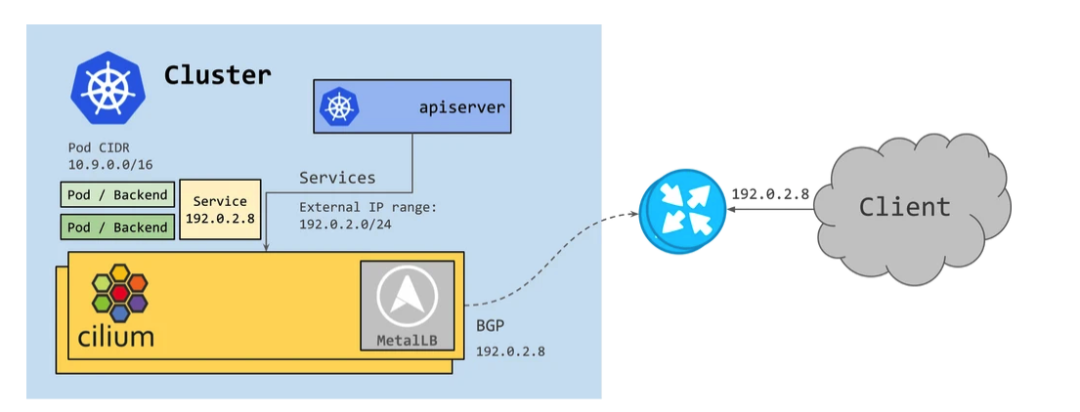
However, as IPv6 usage continued to grow, it became clear that Cilium needed BGP IPv6 functionality - including Segment Routing v6 (SRv6). metalLB currently has limited support for IPv6 via FRR and is still in the experimental phase. the Cilium team evaluated various options and decided to move to the more feature-rich GoBGP [1] .
In the latest Cilium 1.12 release, enabling support for BGP requires only setting the --enable-bgp-control-plane=true parameter and enables more granular and scalable configuration via a new CRD CiliumBGPPeeringPolicy.
- The same BGP configuration can be applied to multiple nodes by tag selection using the
nodeSelectorparameter. - When the
exportPodCIDRparameter is set to true, all Pod CIDRs can be declared dynamically, eliminating the need to manually specify which route prefixes need to be declared. - The
neighborsparameter is used to set BGP neighbor information, usually for network devices external to the cluster.
1.3 Introduction to Kind
Kind [2] (Kubernetes in Docker) is a tool for running local Kubernetes clusters using Docker containers as Node nodes. We just need to install Docker and we can quickly create one or more Kubernetes clusters in a few minutes. For the sake of experimentation, this article uses Kind to build a Kubernetes cluster environment.
1.4 Introduction to Containerlab
Containerlab [3] provides a simple, lightweight, container-based solution for orchestrating network experiments, supporting a variety of containerized network operating systems such as Cisco, Juniper, Nokia, Arista, etc. Containerlab can start containers based on user-defined configuration files and create virtual connections to build user-defined network topologies.
The management interface of the container is connected to a Docker network of bridge type called clab, and the business interface is connected via links rules defined in the configuration file. This is similar to the out-of-band and in-band management models for network management in the data center.
Containerlab also provides us with a rich set of experimental examples, which can be found in Lab examples[4]. We can even create a data center level network architecture with Containerlab (see 5-stage Clos fabric[5] )
2 Prerequisite preparation
Please choose the appropriate installation method according to the corresponding operating system version:
- Install Docker: https://docs.docker.com/engine/install/
- Install Containerlab: https://containerlab.dev/install/
- Install Kind: https://kind.sigs.k8s.io/docs/user/quick-start/#installing-with-a-package-manager
- Install Helm: https://helm.sh/docs/intro/install/
The configuration files used in this article are available at https://github.com/cr7258/kubernetes-guide/tree/master/containerlab/cilium-bgp.
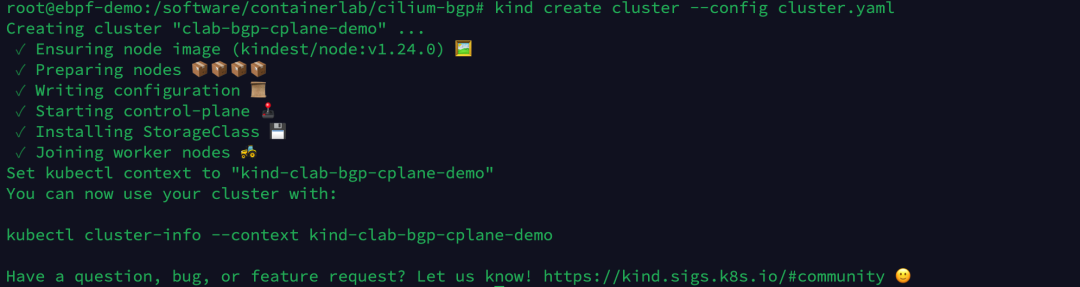
3 Starting a Kubernetes Cluster with Kind
Prepare a Kind configuration file to create a 4-node Kubernetes cluster.
|
|
Execute the following command to create a Kubernetes cluster via Kind.
|
|
Checking the cluster node status, the status of the node is NotReady as we do not have the CNI plugin installed yet.
|
|

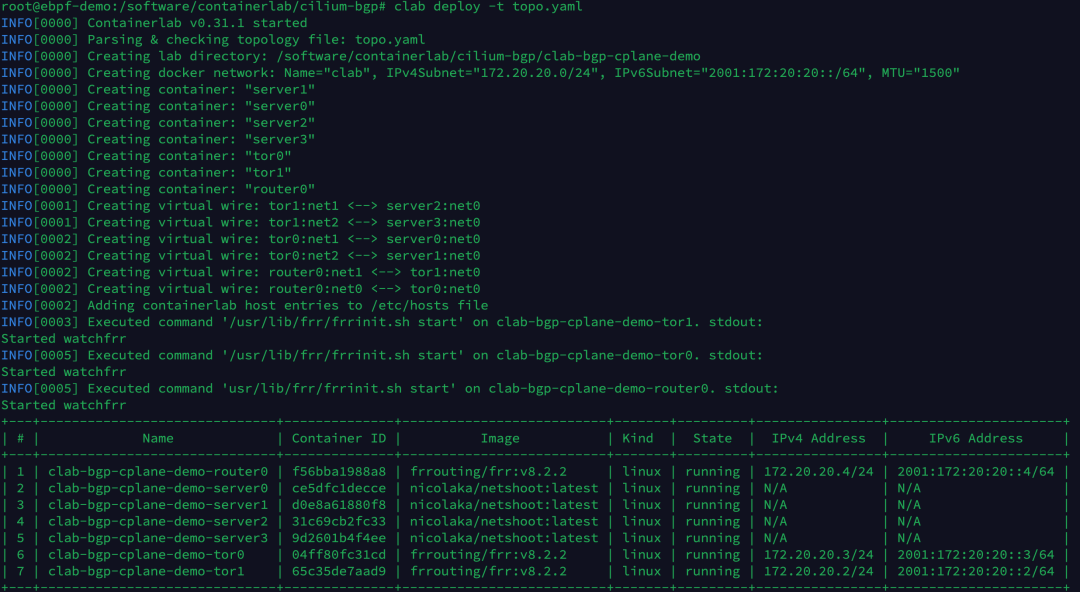
4 Start Containerlab
Define the Containerlab configuration file, create the network infrastructure and connect to the Kubernetes cluster created by Kind.
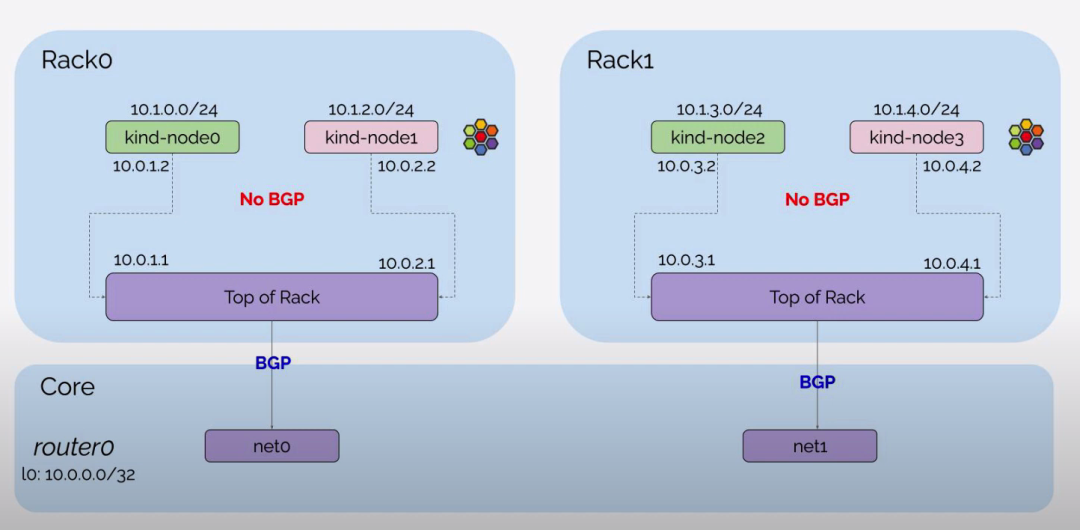
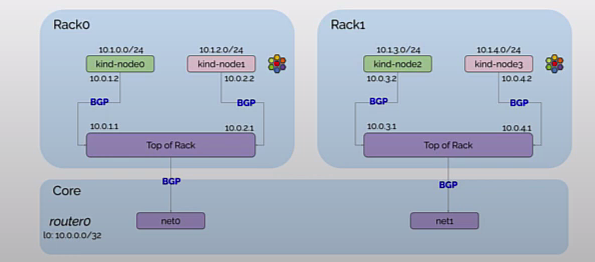
- router0, tor0, tor1 as network devices outside the Kubernetes cluster, set the network interface information and BGP configuration in the exec parameter. router0 establishes BGP neighbors with tor0, tor1, tor0 with server0, server1, router0, tor1 with server2, server3, router0.
- Setting
network-mode: container:<container-name>allows Containerlab to share the network namespace of containers started outside of Containerlab, setting server0, server1, server2, server3 containers to connect to the Kubernetes cluster created with Kind in subsection 3. in Section 3.
|
|
Execute the following command to create the Containerlab experimental environment.
|
|
The created topology is shown below. Currently, only the BGP connections between tor0, tor1 and router0 devices have been established. The BGP connections between tor0, tor1 and Kubernetes Nodes have not yet been established because we have not yet set the BGP configuration of the Kubernetes cluster via CiliumBGPPeeringPolicy.
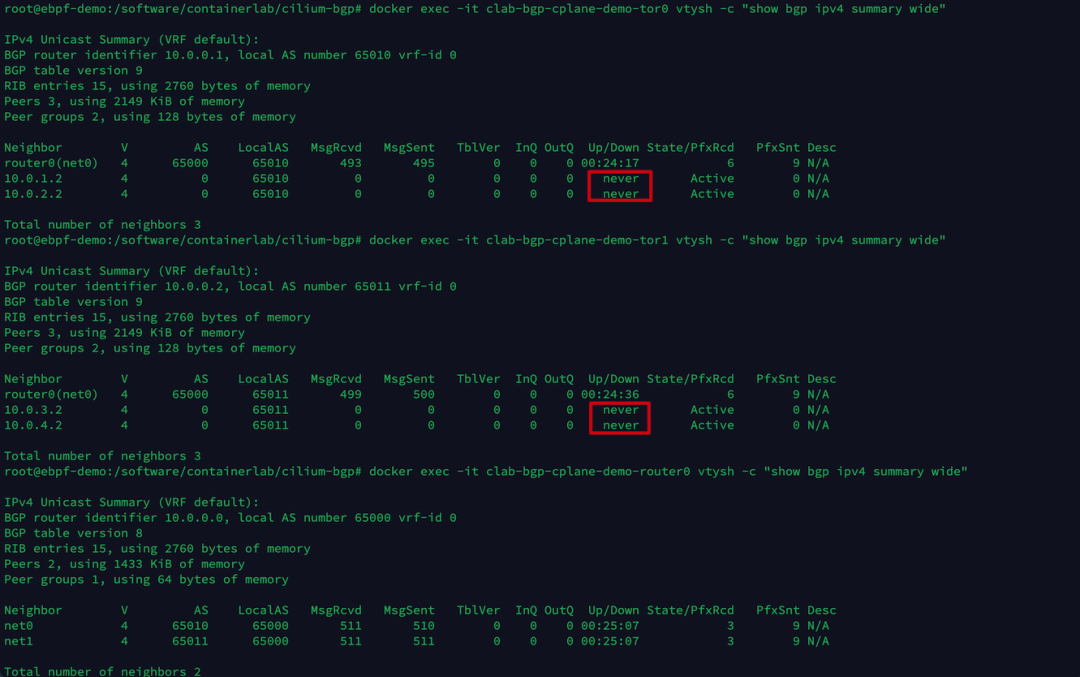
Execute the following commands separately to view the current BGP neighbor establishment status of tor0, tor1, router0.
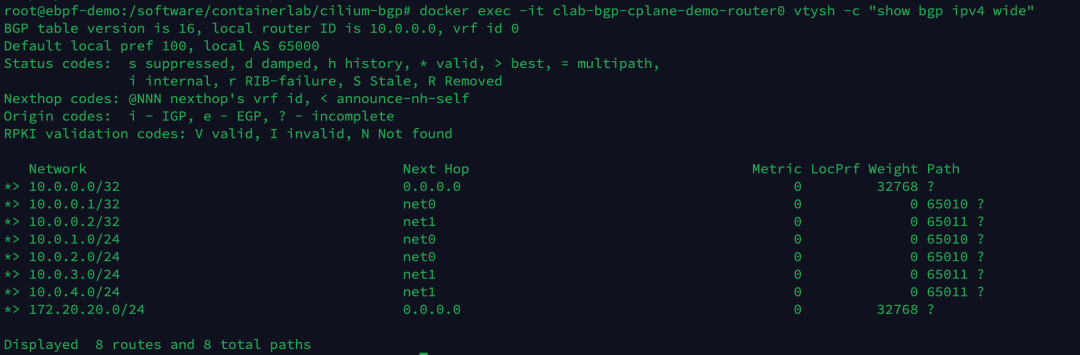
Execute the following command to view the BGP routing entries now learned by the router0 device.
|
|
There are currently a total of 8 route entries, and no Pod-related routes have been learned at this point.
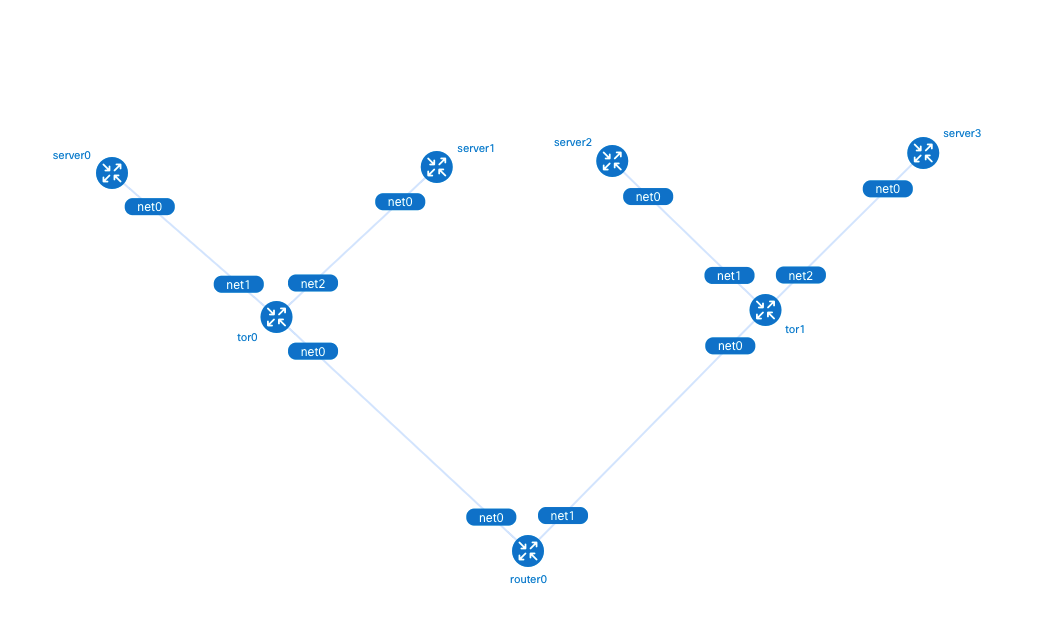
To make it easier for users to visualize the network structure of the experiment, Containerlab provides the graph command to generate the network topology.
|
|

Enter http://<host IP>:50080 in your browser to view the Containerlab-generated topology diagram.
In this example, we use Helm to install Cilium and set the Cilium configuration parameters we need to adjust in the values.yaml configuration file.
Execute the following command to install Cilium version 1.12 and enable BGP feature support.
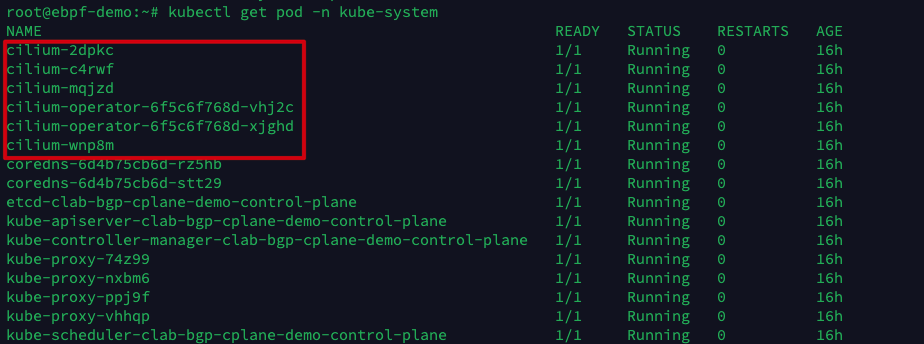
Once all the Cilium Pods are started, check the Kubernetes Node status again and see that all the Nodes are in Ready state.

6 Configuring BGP on Cilium Nodes
Next, configure the CiliumBGPPeeringPolicy for the Kubernetes Nodes on rack0 and rack1 respectively. rack0 and rack1 correspond to the labels of the Nodes, which were set in the configuration file of Kind in Subsection 3.
The Node on rack0 establishes a BGP neighbor with tor0, and the Node on rack1 establishes a BGP neighbor with tor1 and automatically declares a Pod CIDR to the BGP neighbor.
|
|
Execute the following command to apply the CiliumBGPPeeringPolicy.
|
|
The created topology is shown below. tor0 and tor1 have now also established BGP neighbors with the Kubernetes Node.
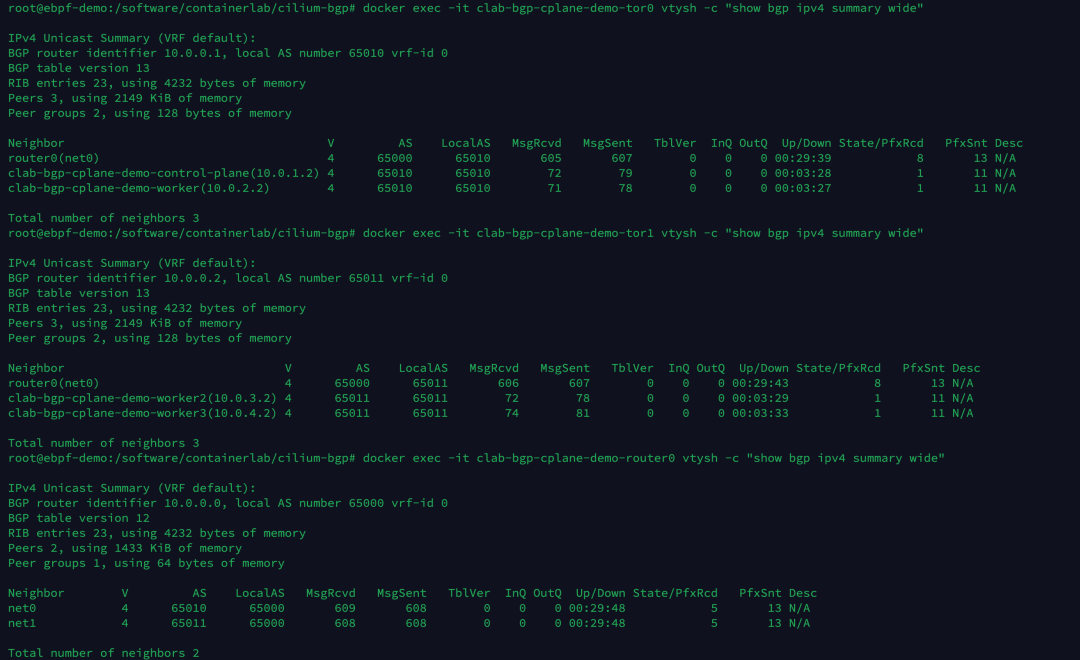
Execute the following commands separately to view the current BGP neighbor establishment status of tor0, tor1, router0.
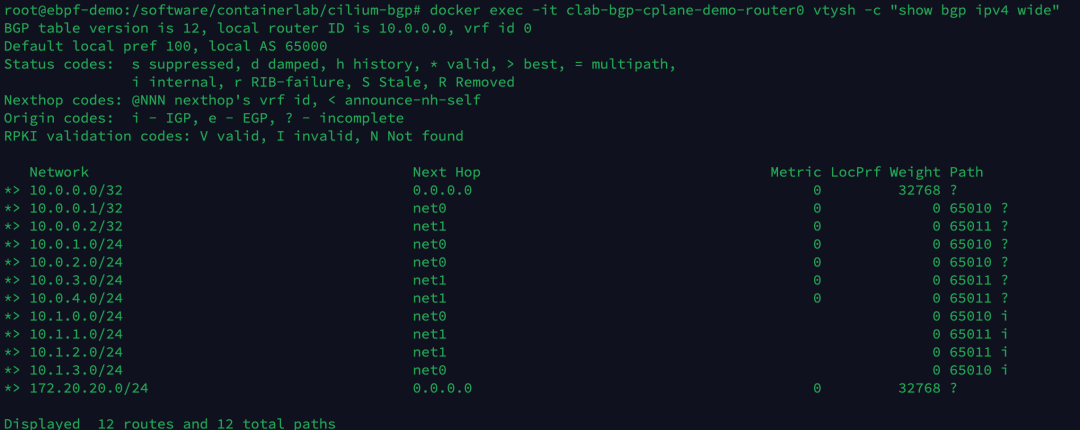
Execute the following command to view the BGP routing entries now learned by the router0 device.
|
|
There are currently a total of 12 route entries, of which 4 extra routes are learned from the 4 Kubernetes Nodes on the 10.1.x.0/24 network segment.
7 Verification
Create 1 Pod on the node where rack0 and rack1 are located to test the connectivity of the network.
|
|
Execute the following command to create 2 test Pods.
|
|
View the IP address of the Pod.
|
|
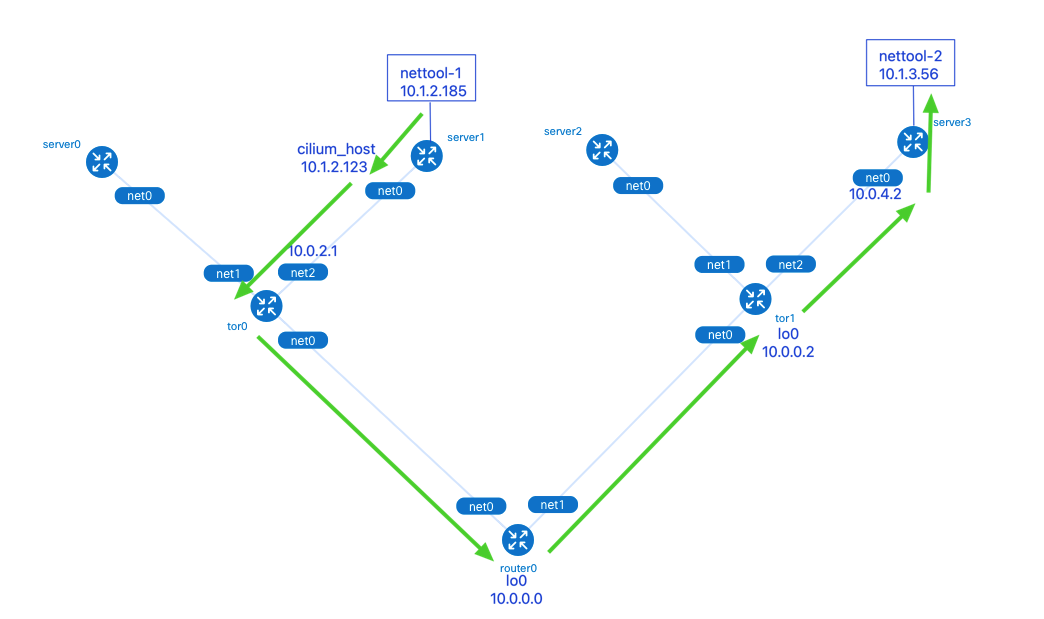
The nettool-1 Pod is located on clab-bgp-cplane-demo-worker (server1, rack0) with IP address 10.1.2.185; the nettool-2 Pod is located on clab-bgp-cplane-demo-worker3 (server3, rack1 ) with an IP address of 10.1.3.56.

Execute the following command to try pinging nettool-2 Pod in the nettool-1 Pod.
|
|
You can see that the nettool-1 Pod can access the nettool-2 Pod normally.

Next, use the traceroute command to observe the direction of the network packets.
|
|

The packets are sent from the nettool-1 Pod and go through the following in order.
-
server1’s cilium_host interface: the default route for Pods in the Cilium network points to the local cilium_host. cilium_host and cilium_net are a pair of veth pair devices. cilium forces the Pod traffic’s Cilium uses the hardcode ARP table to force the next hop of Pod traffic to be hijacked to the host side of the veth pair.


-
tor0’s net2 interface.
-
router0’s lo0 interface: tor0, tor1 and router0 establish BGP neighbors through the local loopback port lo0, which improves the robustness of BGP neighbors when there are multiple physical link backups, and does not affect the neighbor relationship when a physical interface fails.
-
tor1’s lo0 interface.
-
server3’s net0 interface.
8 Clean up the environment
Execute the following command to clean up the experimental environment created by Containerlab and Kind.
9 References
- [0]
https://mp.weixin.qq.com/s?__biz=MzkxOTIwMDgxMg==&mid=2247486133&idx=1&sn=ae1dddc04ac194ff34f6eab670e72edb - [1]
GoBGP: https://osrg.github.io/gobgp/ - [2]
Kind: https://kind.sigs.k8s.io/ - [3]
containerlab: https://containerlab.dev/ - [4]
Lab examples: https://containerlab.dev/lab-examples/lab-examples/ - [5]
5-stage Clos fabric: https://containerlab.dev/lab-examples/min-5clos/ - [6]
BGP WITH CILIUM: https://nicovibert.com/2022/07/21/bgp-with-cilium/ - [7]
https://www.bilibili.com/video/BV1Qa411d7wm?spm_id_from=333.337.search-card.all.click&vd_source=1c0f4059dae237b29416579c3a5d326e - [8]
https://www.koenli.com/fcdddb4a.html - [9]
Cilium BGP Control Plane: https://docs.cilium.io/en/stable/gettingstarted/bgp-control-plane/#cilium-bgp-control-plane - [10]
Cilium 1.12 - Ingress, Multi-Cluster, Service Mesh, External Workloads, and much more: https://isovalent.com/blog/post/cilium-release-112/#vtep-support - [11]
Cilium 1.10: WireGuard, BGP Support, Egress IP Gateway, New Cilium CLI, XDP Load Balancer, Alibaba Cloud Integration and more: https://cilium.io/blog/2021/05/20/cilium-110/ - [12]
https://arthurchiao.art/blog/cilium-life-of-a-packet-pod-to-service-zh/