There are many articles on the web about k8s flattening network construction, mostly for large-scale clusters. But now there are many people also use Docker deployment service in NAS or home server. This article focuses on how to use Docker to build a flat network and provide cross-host interoperability of containers.
With the release of Docker in 2013, container technology started to come into major Internet companies. Container technology not only serves the online business of Internet companies, but also provides great convenience for developers to build test environments and three-party dependency services. In addition to the application in the enterprise, containers with the advantage of non-dependent one-click start is also increasingly used in the deployment of services in the home NAS or home server, basically a must-have software.
Most of the containers used in home NAS or home server use Bridge network provided by Docker to expose the services deployed by containers to the LAN through port forwarding, which is mainly implemented as follows:
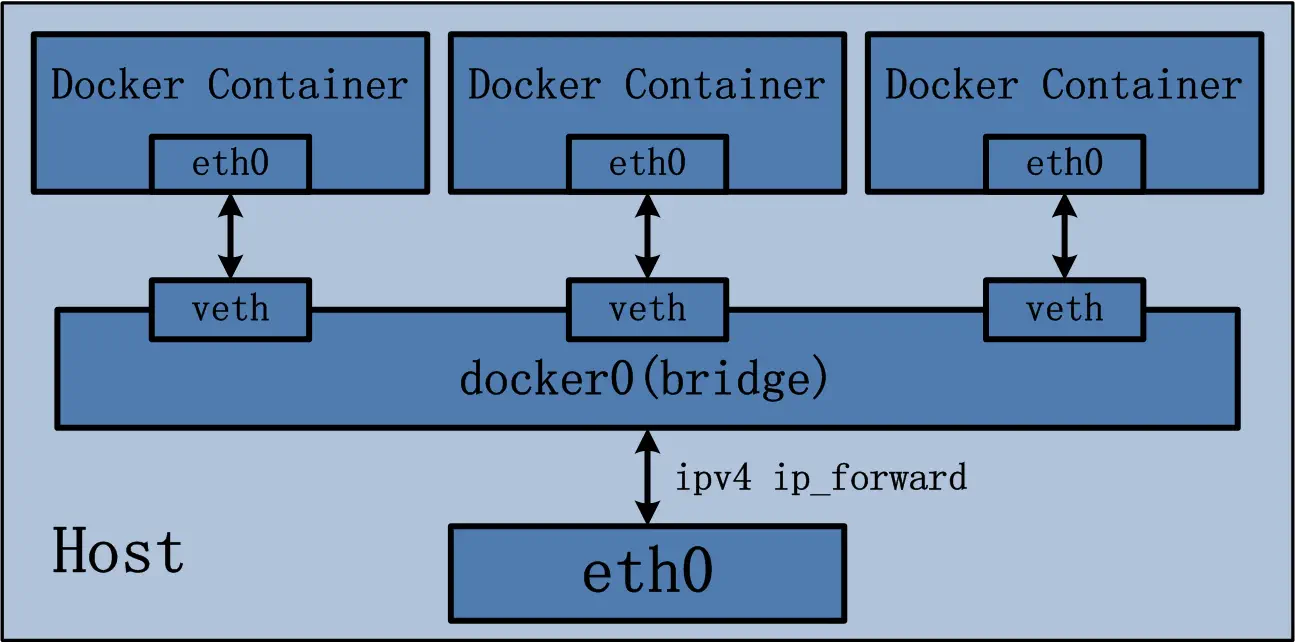
You can simply think of docker0 as a switch to which the container connects via veth-pair, and the host connects via the docker0 interface, and the packets from the container flow out of the eth0 port of the host after NAT by the host.
If eth0 were added directly to this bridge, it would also be possible to use a flattened network, but Docker doesn’t provide this functionality, so the bridge plugin in cni is used to implement https://www.cni.dev/plugins/current/main/bridge/
When using Bridge network, containers have their own private network segment due to a layer of NAT forwarding. Access to container services on other hosts can only be accessed through port forwarding. So is there any way to let containers use independent IP in our LAN? There are many practical ways to do this, but here is the simplest macvlan mode.
macvlan
macvlan, as the name implies, is a way to differentiate vlan based on mac addresses. A normal 802.1Q vlan creates multiple virtual interfaces on top of a single physical interface by adding a specific 802.1Q tag to the frame to differentiate the traffic on each interface by tag. macvlan can also create multiple virtual interfaces on top of a single physical interface, but it differentiates the traffic by mac address. macvlan can also create multiple virtual interfaces on top of a single physical interface, but the traffic is differentiated by mac address.
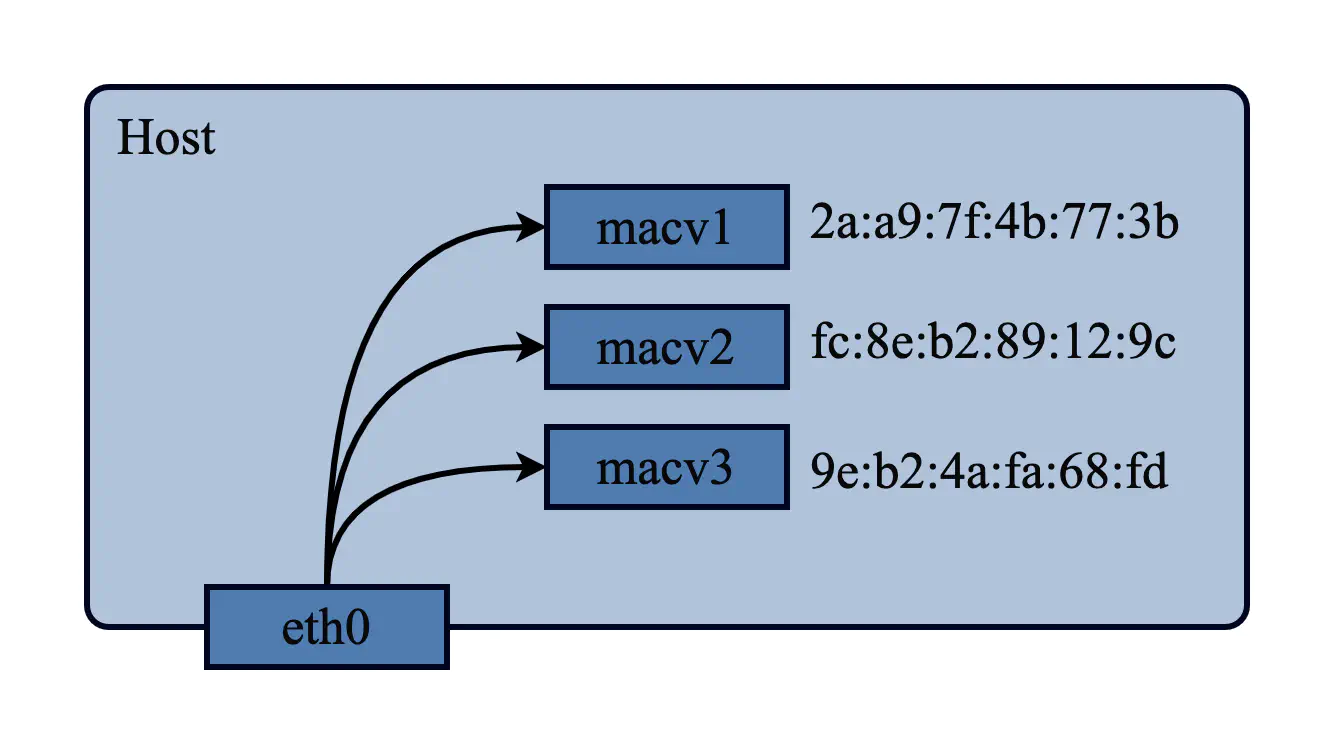
Three modes can be set for direct communication between sub-interfaces in macvlan
- Private: Sub-interfaces are not allowed to communicate with each other and are completely isolated.
- VEPA: Intercommunication between subinterfaces needs to be handled by external switches or routing
- Bridge: sub-interfaces can communicate with each other, macvlan networks created in docker can only use bridge mode
Details can be found in https://developers.redhat.com/blog/2018/10/22/introduction-to-linux-interfaces-for-virtual-networking#macvlan
Using macvlan in Docker
Creating a macvlan network
Creating a macvlan in Docker is very simple. Take my current network environment as an example and create a macvlan network under the enp3s0 interface.
|
|
The network segment where enp3s0 is located is 192.168.88.0/24
subnet
Subnet network segment, here the same as the interface network segment can be
ip-range
IP range available for the container, as the container does not use dhcp to obtain an IP address, so the specified ip-range should be staggered with the dhcp IP range in the router, such as my dhcp server here will only allocate 192.168.88.64-192.168.88.127 a total of 64 IPs, here let the container use 192.168. 88.192-192.168.88.192.223
gateway
Gateway address, the same as the interface network segment can be
aux-address
Auxiliary address, equivalent to a reserved address, will be assigned to avoid the relevant IP address
Use docker network ls to see the created networks
Creating a container using macvlan
Once you have created a macvlan network, you can create a container using the macvlan network, using --network to specify the network.
|
|
|
|
At this point, the container has acquired a separate LAN IP, which is equivalent to a separate machine on the LAN. It can be accessed directly from other machines on the LAN.
|
|
But then there is no way to access the container on the current host (i.e. the machine where the container is located), because the packets from the host will flow out directly through the physical interface enp3s0 without the bridge inside the macvlan, and cannot be accessed unless the external switch or router supports hairpin mode when it reaches the external network device. So we need to add a macvlan interface to the host for accessing the container.
|
|
At this point, we can access the container in the host without any problems.
|
|
macvlan with 802.1q VLAN
The parent interface of macvlan does not have to be a physical interface, it can be a vlan interface, here Docker does a little syntax sugar if the parent interface contains . If the parent interface contains . then the corresponding vlan interface is created, for example, the following macvlan network is created
- vlan id 200
- network segment 192.168.200.0/24
- gateway 192.168.200.1
docker will automatically create the corresponding vlan interface.
|
|
The use of vlan also requires the corresponding configuration and firewall rules in the router.
Take the RouterOS of the current network as an example, you need to add vlan interface and set IP for the corresponding interface
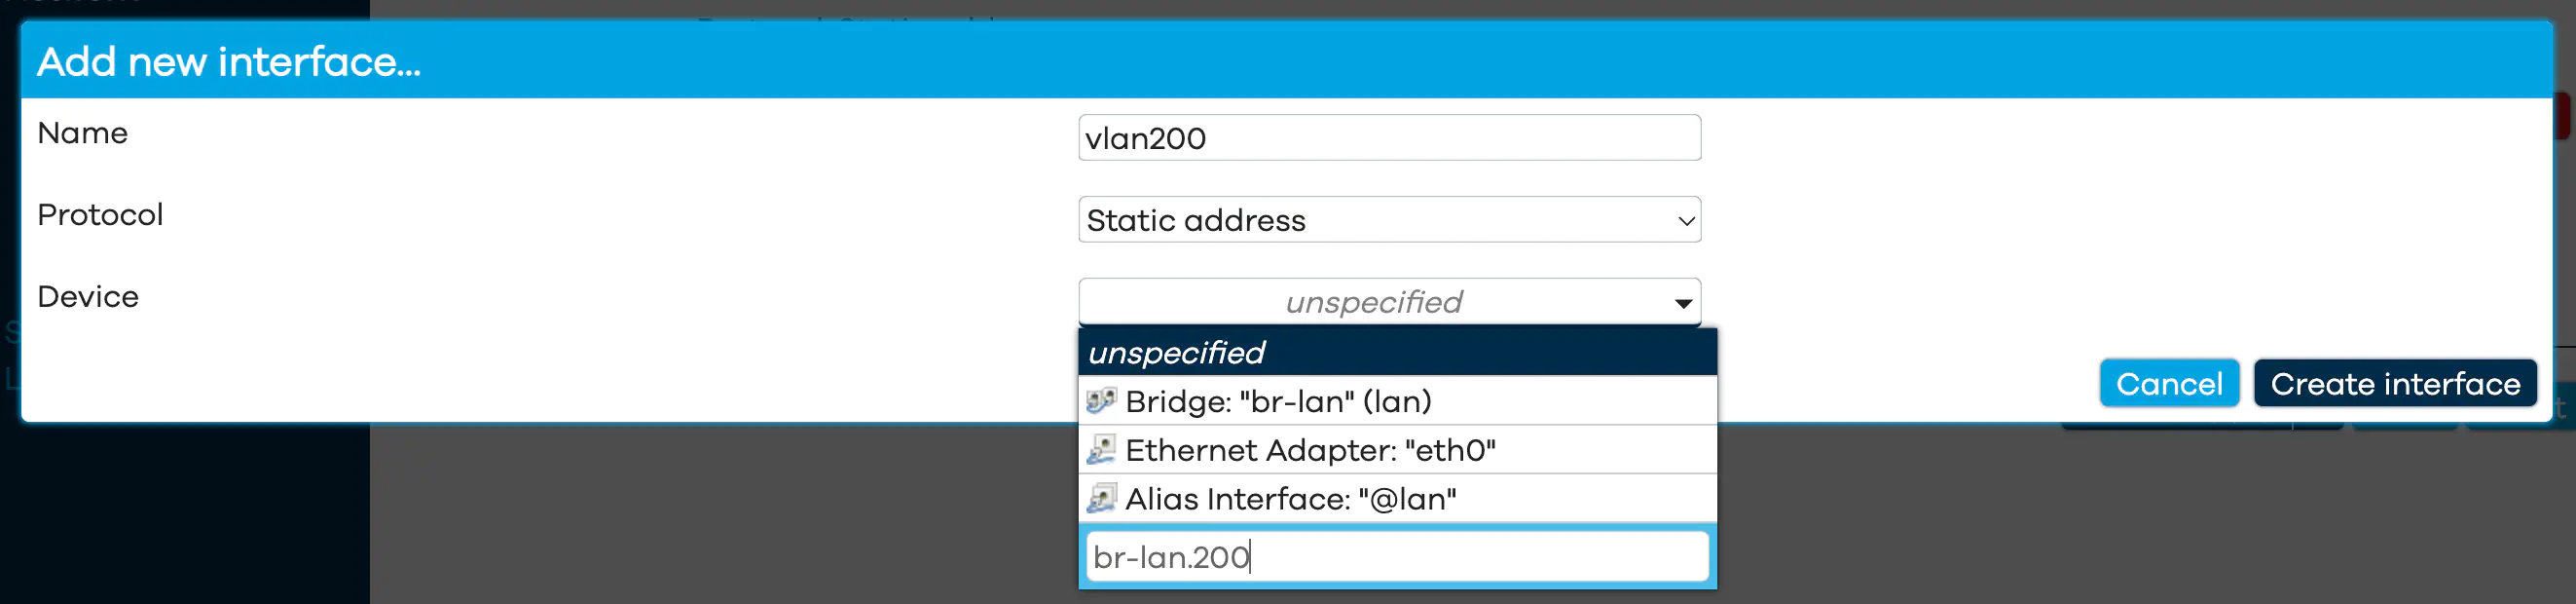
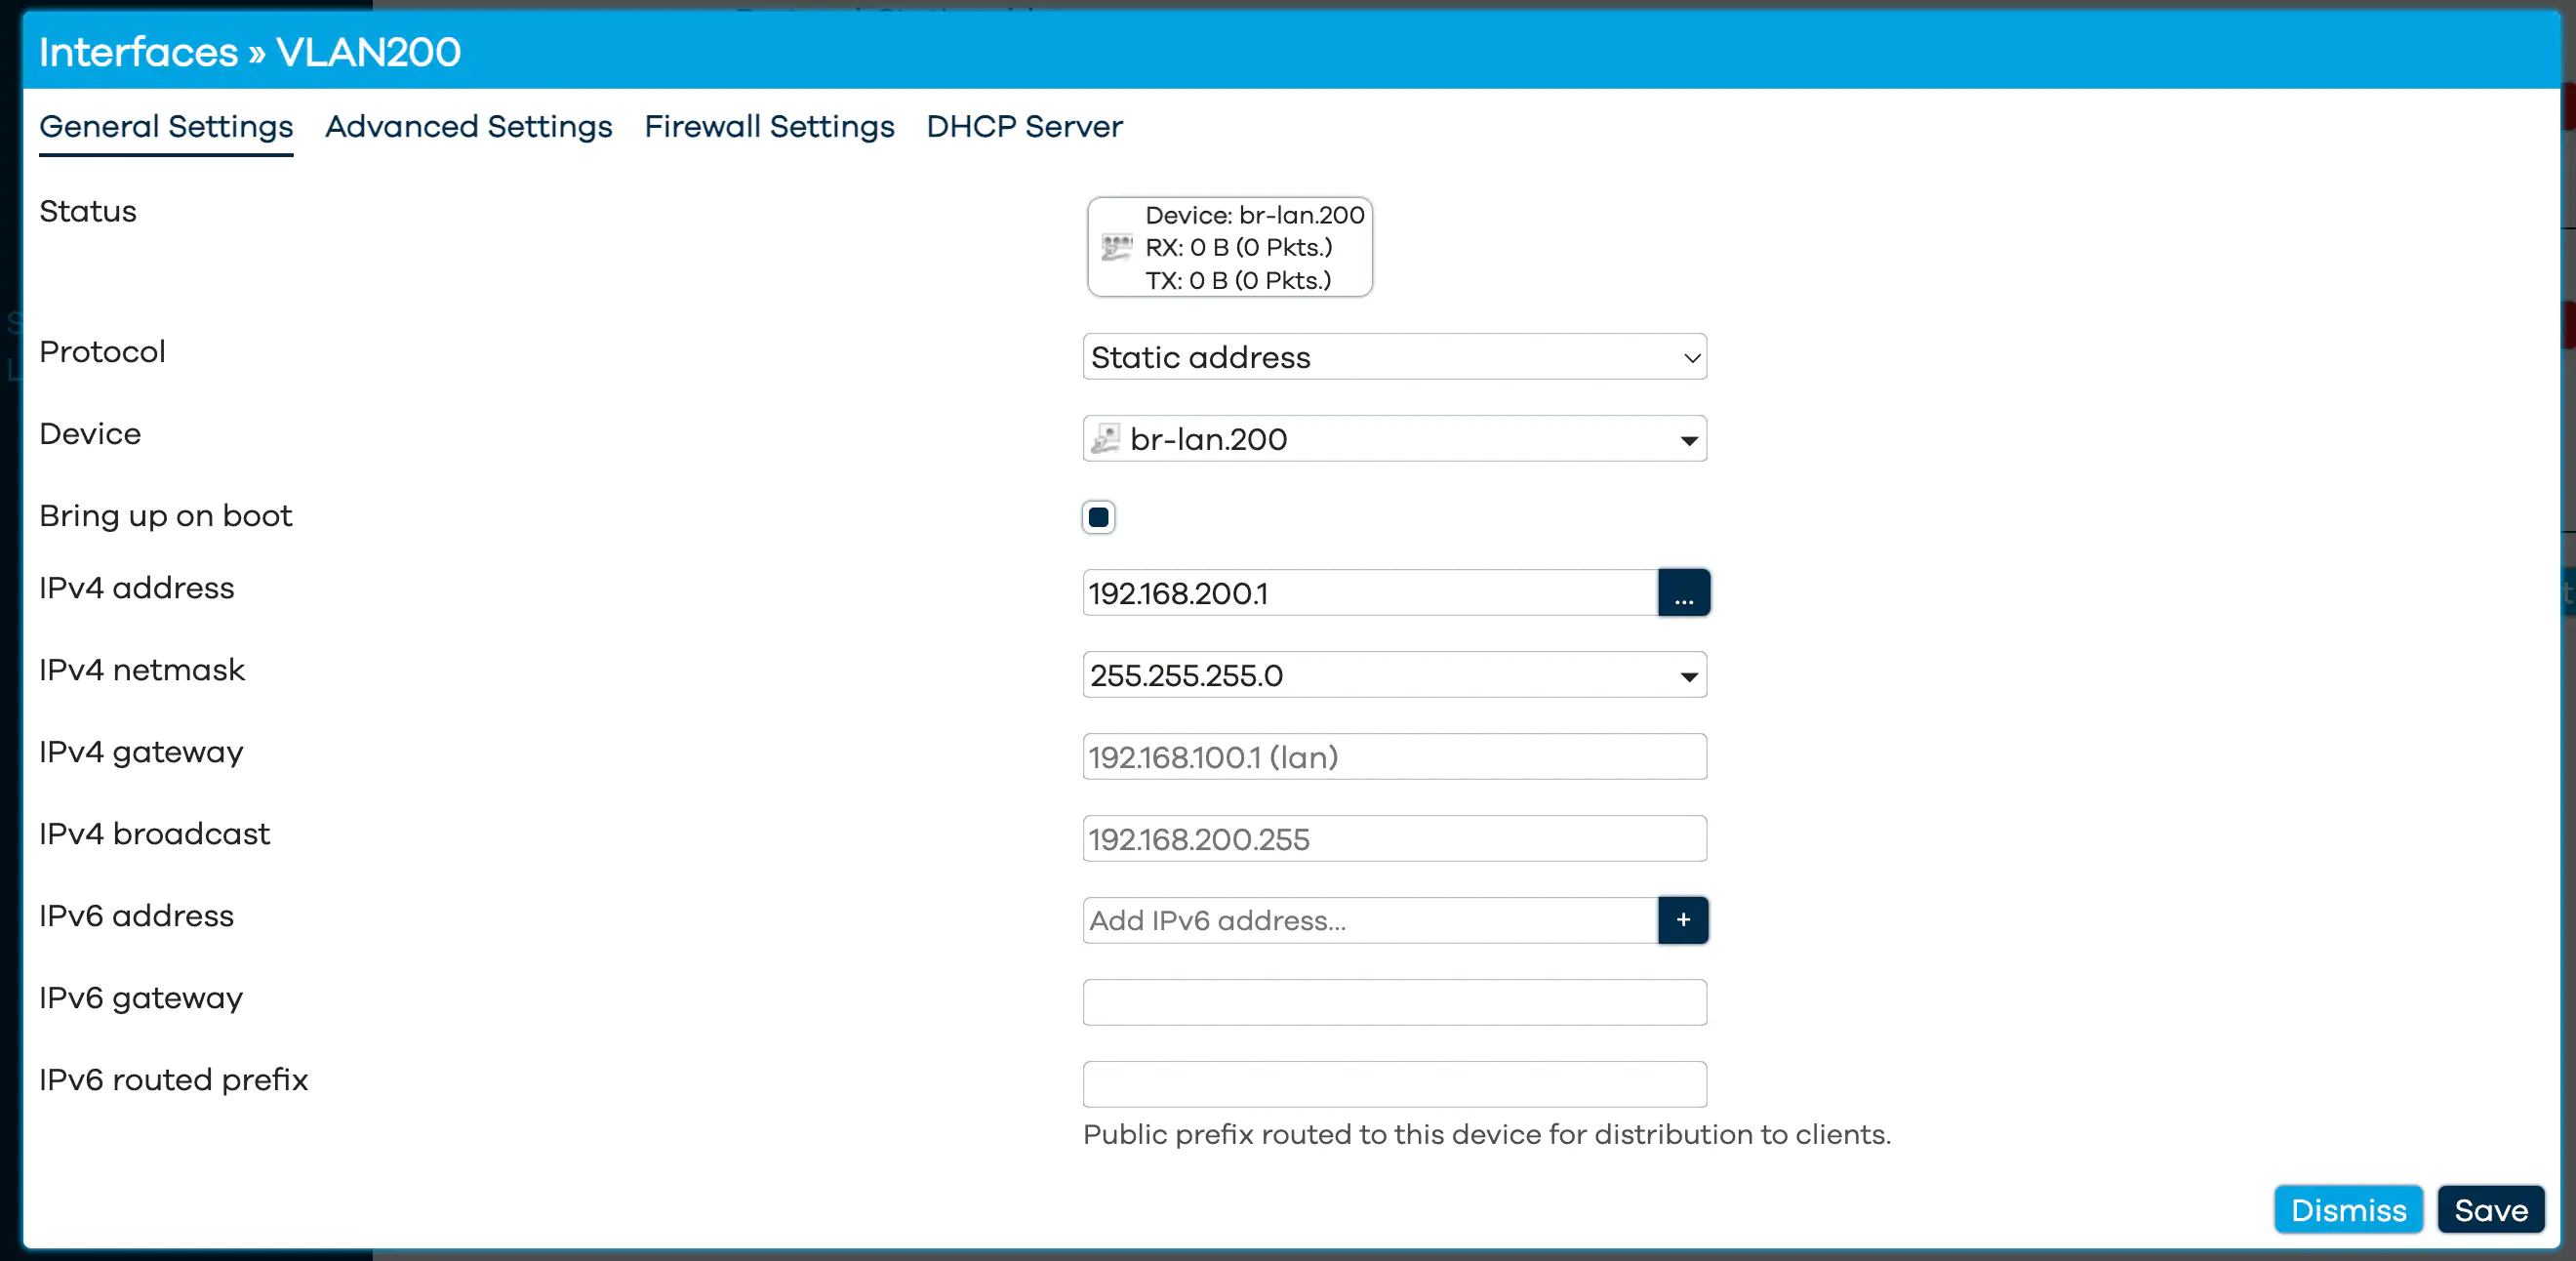
Most of you probably have openwrt router system, in openwrt environment you can add new interface directly through UI, under Network / interface. protocol select static address, device select custom device name format is interface.vlanid For example, if you use br-lan interface with vlan 200, the device name is br-lan.200.
Then just set the IP for the interface.
If the host is not directly connected to the router, there are also switches, etc., then you also need to carry out the corresponding vlan settings, not to be repeated here
Others
The above is mainly an example of docker, but other functions such as podman can be similar. Flattening the container network allows our containers to have a “name” (IP) on the LAN, so we don’t need to think about whether there are enough ports, which ports should be exposed, etc. compared to a bridge network, and it also makes the host’s iptables much cleaner.