Introduction to HAProxy
HAProxy is a proxy software that provides high availability, load balancing and proxy software for TCP (Layer 4) and HTTP (Layer 7) based applications, HAProxy is completely free and provides fast and reliable proxy solutions for TCP and HTTP based applications with the help of HAProxy. HAProxy stability is also very good, comparable to hardware-grade F5, according to the official documentation, HAProxy can run at 10 Gbps - New benchmark of HAProxy at 10 Gbps using Myricom’s 10GbE NICs (Myri- 10G PCI-Express), a value that is quite impressive for a software-level load balancer.
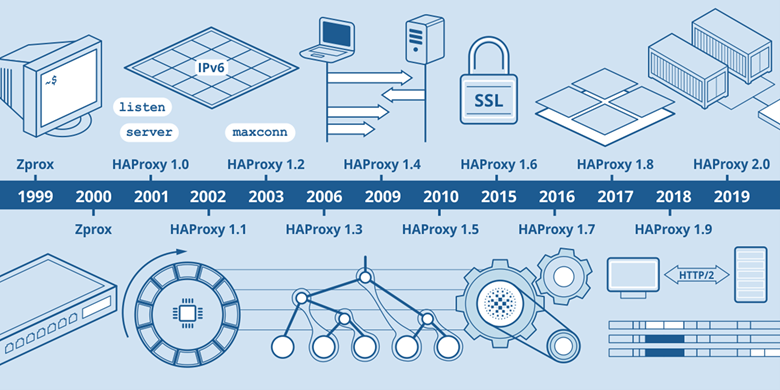
Its configuration is simple, and has a good health check of the server nodes (equivalent to keepalived health check), when its proxy back-end server failure, HAProxy will automatically remove the failure server, when the server failure recovery HAProxy will automatically re-add back to the server host.
Types of load balancing
No Load Balancing
A simple web application environment without load balancing might look like the following.
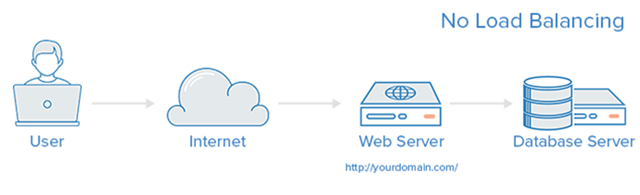
In this example, users are connecting directly to your web server on yourdomain.com and there is no load balancing. If your single web server goes down, users will no longer be able to access your web server. In addition, if many users try to access your server at the same time and are unable to handle the load, they may experience a slow experience or may not be able to connect at all.
Layer 4 Load Balancing
The easiest way to load balance network traffic to multiple servers is to use Layer 4 (transport layer) load balancing. Load balancing in this manner will forward user traffic based on IP ranges and ports.
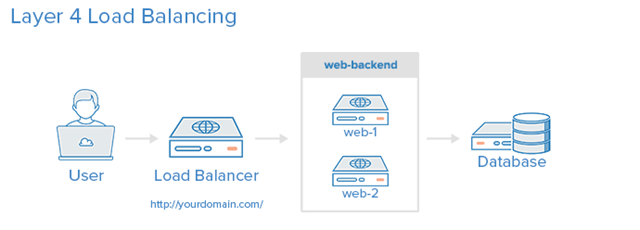
The user accesses the load balancer and the load balancer forwards the user’s request to the web backend group of backend servers. Whichever backend server is selected will respond directly to the user’s request. Typically, all servers in the Web backend should serve the same content - otherwise users may receive inconsistent content.
The so-called four layers are the fourth layer in the ISO reference model. Layer 4 load balancing, also known as quad switches, is primarily an IP-plus-port-based load balancing implemented by analyzing traffic at the IP and TCP/UDP layers. Common Layer 4 based load balancers include LVS, F5, etc.
Take a common TCP application as an example, when the load balancer receives the first SYN request from the client, it will select the best back-end server through the set load balancing algorithm and modify the target IP address in the message to the back-end server IP, and then forward it directly to that back-end server, so that a load balancing request is completed. From this process, a TCP connection is established directly between the client and the server, and the load balancer merely completes a router-like forwarding action. In some load balancing policies, the original source address of the message may be modified while forwarding the message to ensure that the message returned by the back-end server can be delivered to the load balancer correctly.
Layer 7 Load Balancing
Layer 7 load balancing is a more sophisticated approach to load balancing network traffic is to use Layer 7 (application layer) load balancing. Using Layer 7 allows the load balancer to forward requests to different back-end servers depending on what the user is requesting. This load balancing model allows you to run multiple web application servers under the same domain and port.
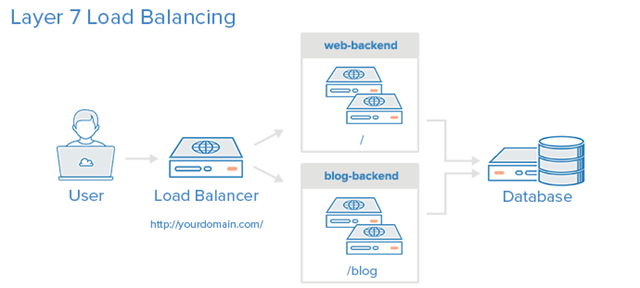
In the example, if a user requests yourdomain.com/blog, it is forwarded to the blog-backend, which is a set of servers running a blog application. Other requests are forwarded to the web-backend, which may be running another application.
Layer 7 load balancer, also known as a Layer 7 switch, is located at the highest layer of OSI, i.e. the application layer, where the load balancer supports a variety of application protocols, such as HTTP, FTP, SMTP, etc. The seven-layer load balancer can select the back-end server based on the content of the message and then with the load balancing algorithm, so it is also called a “content switch”. For example, for the load balancing of web servers, the seven-layer load balancer can not only divide the load according to “IP+Port”, but also decide the load balancing policy according to the URL of the website, access domain name, browser category, language and so on. For example, there are two web servers corresponding to two websites in Chinese and English, and the two domain names are A and B. To realize that when accessing the A domain name, you can enter the Chinese website, and when accessing the B domain name, you can enter the English website, which is almost impossible to achieve in a four-tier load balancer, but the seven-tier load balancer can select the corresponding web pages for load balancing according to the different domain names accessed by clients. Common seven-tier load balancers include HAproxy, Nginx, etc.
Here, we still take a common TCP application as an example. Since the load balancer has to get the content of the message, it can only establish a connection with the client instead of the back-end server, then, it can receive the content of the message sent by the client, and then decide the final choice of the internal server based on the specific fields in that message plus the load balancing algorithm set in the load balancer. Throughout the process, the seven-tier load balancer is similar to a proxy server in this case.
Comparing the whole process of four-tier load balancing and seven-tier load balancing operation, we can see that in seven-tier load balancing mode, the load balancer establishes a TCP connection with the client and the back-end server respectively, while in four-tier load balancing mode, only one TCP connection is established. From this, we can see that seven-tier load balancing requires more load balancing devices, and the processing power of seven-tier load balancing is necessarily lower than that of four-tier load balancing mode.
Core features of HAProxy
- Load balancing: L4 and L7 modes, support RR/Static RR/LC/IP Hash/URI Hash/URL_PARAM Hash/HTTP_HEADER Hash and other rich load balancing algorithms
- Health Check: Supports both TCP and HTTP health check modes
- Session Hold: For application clusters without session sharing, session hold can be achieved through Insert Cookie/Rewrite Cookie/Prefix Cookie, and the above-mentioned Hash methods.
- SSL: HAProxy can parse the HTTPS protocol and decrypt requests into HTTP for transmission to the backend
- HTTP request rewriting and redirection
- Monitoring and statistics: HAProxy provides a web-based statistics page to show the health status and traffic data. Based on this feature, users can develop monitoring applications to monitor the status of HAProxy
Key Features of HAProxy
Performance
HAProxy leverages several common techniques on the OS to maximize performance.
- Single-process, event-driven model significantly reduces the overhead of context switching and memory usage.
- O(1) event checker allows for immediate detection of any event on any connection in a highly concurrent connection.
- Single buffering mechanism can complete read and write operations without copying any data in any available case, which saves a lot of CPU clock cycles and memory bandwidth.
- HAProxy enables zero-copy forwarding with the help of the split() system call on Linux 2.6 (>= 2.6.27.19), and zero-starting on Linux 3.5 and above.
- The MRU memory allocator enables instant memory allocation in a fixed-size memory pool, which can significantly reduce the length of time it takes to create a session.
- Tree storage: focusing on the use of a resilient binary tree developed by the authors many years ago, implemented with a low overhead of O(log(N)) to hold timer commands, hold run queue commands and manage polling and least connected queues.
- Optimized HTTP first-pass analysis: optimized first-pass analysis features avoid re-reading any memory areas during HTTP first-pass analysis.
- Carefully reduced expensive system calls, with most of the work done in user space, such as time reading, buffer aggregation and file descriptor enabling and disabling.
All these subtle optimizations achieve a fairly low CPU load on top of a medium-sized load, and even in very high load scenarios, a 5% user space footprint and 95% system space footprint is very common, which means that HAProxy processes consume more than 20 times less than system space. Therefore, performance tuning of the OS is very important. Even if the user space footprint is doubled, the CPU footprint is only 10%, which explains the limited performance impact of Layer 7 processing. As a result, HAProxy’s Layer 7 performance can easily outperform hardware load balancing appliances on high-end systems.
Stability
-
As a program that is recommended to run in single-process mode, HAProxy has very stringent stability requirements. According to the author, HAProxy has never had a single bug that would cause it to crash in 13 years, and once HAProxy is successfully started, it will not crash unless the operating system or hardware fails (which I think may still be more or less exaggerated).
-
Most of HAProxy’s work is done in the OS kernel, so HAProxy’s stability is largely dependent on the OS. The authors recommend using a 6 or 3.x Linux kernel, fine-tuning the sysctls parameter, and making sure the host has enough memory. This way HAProxy will be able to run consistently and stably at full load for years.
Load Balancing Algorithms
The load balancing algorithm is used to detect which set of servers in the backend are selected by the load balancing mechanism to respond to requests. haproxy provides several algorithm options. In addition to the load balancing algorithm, we can also assign a weight parameter to a server to specify how often that server is selected. Since HAProxy provides several load balancing algorithms, a few common ones are described below.
- roundrobin. denotes simple polling where each server is rotated based on the weights, which is the smoothest and fairest algorithm in case the processing time of the servers is equally distributed. The algorithm is dynamic, and the weights are adjusted on the fly for servers with slow instance starts.
- leastconn. The server with the lowest number of connections receives connections first. lastconn is recommended for long session services such as LDAP, SQL, TSE, etc., and not for short session protocols. If this algorithm is dynamic, the server weights are adjusted on the fly for servers with slow instance startup.
- static-rr. Each server is rotated based on the weight, similar to roundrobin, but it is static, meaning that runtime modification of permissions is invalid. Also, it has no limit on the number of servers. (This algorithm is generally not used)
- source. Hash the request source IP address, divide the total number of available server weights by the hash value, and assign it based on the result. The same client IP address always accesses the same server as long as the server is normal. If the result of the hash varies with the number of available servers, then the client is directed to a different server. (The algorithm is generally used in Tcp mode where cookies cannot be inserted. It can also be used on WANs to provide the most efficient sticky connection for clients that refuse to use session cookies) The algorithm is static by default, so modifying the server weights at runtime is not effective, but the algorithm will adjust to changes in “hash-type”.
- uri. means that the request is hashed according to the left end of the URI (before the question mark), and the hash value is divided by the total number of available server weights and assigned according to the result. The same URI address always accesses the same server as long as the server is normal. It is generally used for proxy caching and anti-virus proxies to maximize the hit rate of the cache. This algorithm can only be used for HTTP backends. (The algorithm is typically used for backends that are caching servers). The algorithm is static by default, so it is not valid to change the server weight at runtime, but the algorithm will be adjusted according to the change of “hash-type”.
- url_param. looks for the URL parameter specified in
<param>in the query string of an HTTP GET request, essentially locking in the requirement to use a specially crafted URL to a specific load balancer node. (This algorithm is typically used to send information about the same user to the same back-end server.) The algorithm is static by default, so changing the server’s weight at runtime is not valid, but the algorithm will adjust to changes in the “hash-type”. - hdr(name). Look for HTTP header
<name>in each HTTP request. HTTP header<name>will be seen in each HTTP request and is specific to the node. (If the header is missing or if the header does not have any value, roundrobin is used instead). The algorithm is static by default, so changing the server’s weight at runtime is not valid, but the algorithm will adjust to changes in the “hash-type”. rdp-cookie <name>. Query and hash the RDPcookie<name> for each incoming TCP request. (This mechanism is used in degenerate persistent mode, so that the same user or session ID is always sent to the same server. If a cookie is not available, the roundrobin algorithm is used instead). The algorithm is static by default, so changing the server’s weight at runtime is not effective, but the algorithm will adjust to changes in the “hash-type”. Commonly used load balancing algorithms
How HAProxy works
HAProxy provides high availability, load balancing and proxy for TCP (Layer 4) and HTTP (Layer 7) based applications with virtual hosting support, and is a free, fast and reliable solution.
HAProxy is particularly suitable for web sites that are particularly heavily loaded and often require session-holding or Layer 7 processing, and runs on current hardware that can fully support tens of thousands of concurrent connections, and its mode of operation makes it easy to securely integrate into your current architecture while protecting your web server from being exposed to the network. .
HAProxy implements an event-driven, single-process model that supports a very large number of concurrent connections. Multi-process or multi-threaded models are limited by memory constraints, system scheduler limitations, and ubiquitous locks and can rarely handle thousands of concurrent links. The event-driven model does not have these problems because it implements all these tasks on the user-side (user-space) where there is better resource and time management. The disadvantage of this model is that these programs are usually less scalable on multicore systems. That’s why they have to be optimized as well as make each CPU time slice (Cycle) do more work.
The Haproxy software introduces the function of frontend, backend. frontend (acl rule matching) can do rule matching based on any HTTP request header and then direct the request to the relevant backend (server pools waiting for the front end to turn the request over to the server group). Through frontend and backend, it is easy to implement Haproxy’s 7-tier load balancing proxy function.
Access Control Lists (ACLs)
In load balancing, ACLs are used to test certain conditions and perform certain actions (such as selecting a set of servers or blocking a request) based on the results of the test, as in the following ACL example
acl url_blog path_beg /blog
This ACL is matched if the path requested by the user starts with /blog. For example, the http://www.cnblogs.com/blog/blog-entry-1 request matches this condition.
Backend
A backend is a set of servers responsible for receiving each forwarded request. backend is defined in the backend section of the HAProxy configuration. Generally speaking, the definition of backend mainly includes.
- Which load balancing algorithm to use
- A list of servers and ports
A backend can accommodate one or more sets of servers, and in general adding more servers to the backend will spread the load to more servers, thus increasing the potential load capacity. This approach also improves reliability in the event of a server failure.
Here is an example of a dual-backend configuration, web-backend and blog-backend, each containing two sets of web servers and listening on port 80.
where.
- balance roundrobin line specifies the load balancing algorithm, for details refer to the Load Balancing Algorithms section
- mode http specifies the 7-tier proxy mechanism to be used, refer to the load balancing type section.
- The check option at the end specifies that a running status check is performed on these back-end servers
Frontend
A frontend is responsible for defining how requests are forwarded to the backend. frontend is in the frontend section of the HAProxy configuration. Its definition consists of the following parts.
- a set of IP addresses with a port (e.g. 1.1.2:80, *:443, etc.)
- an ACL
- the use_backend rule, which is responsible for defining which backend to use based on the current ACL conditions, and the default_backend rule, which handles all other cases
The same frontend can be configured to multiple different network traffic types!
Three options for HAProxy to maintain sessions when the same client accesses the server.
- HAProxy hashes and saves the client IPs, thus ensuring that the same IPs are forwarded to the same real server when they come to visit.
- HAProxy relies on cookie information sent from the real server to the client for session retention.
- HAProxy saves the session and server identifier of the real server to achieve session retention.
HAProxy installation and configuration
The following content from the network, the installation of a lower version, but the content is not called comprehensive, but still has a very reference significance.
HAProxy installation
Create a user and user group for HAProxy, in this case the user and user group is “ha”. Note that if you want HAProxy to listen on ports below 1024, you need to start it as root.
PREFIX is the specified installation path, and TARGET is specified according to the current OS kernel version.
- linux22 for Linux 2.2
- linux24 for Linux 2.4 and above (default)
- linux24e for Linux 2.4 with support for a working epoll (> 0.21)
- linux26 for Linux 2.6 and above
- linux2628 for Linux 2.6.28, 3.x, and above (enables splice and tproxy)
In this example, our OS kernel version is 3.10.0, so TARGET is specified as linux2628.
Create HAProxy configuration file
We start by creating the simplest configuration file.
|
|
Note: HAProxy requires the system ulimit -n parameter to be greater than [maxconn*2+18], so when setting a larger maxconn, be careful to check and modify the ulimit -n parameter
Register HAProxy as a system service
Add a start/stop script for the HAProxy service in the /etc/init.d directory.
|
|
Start, stop and restart
Logging
HAProxy does not output file logs directly, so we have to use Linux’s rsyslog to make HAProxy output logs.
Modify haproxy.cfg and add the following to the global and defaults fields.
This means that info-level (and above) logs are pushed to the local0 interface of rsyslog, and warn-level (and above) logs are pushed to the local1 interface of rsyslog, and all frontend uses the log configuration in global by default.
Note: The info-level log will print every request processed by HAProxy, which will take up a lot of disk space. In a production environment, it is recommended to adjust the log level to notice.
Configure haproxy logging for rsyslog
|
|
Modify the startup parameters of rsyslog
Restart rsyslog and HAProxy
At this point, you should see the haproxy log file in the /var/log directory
Splitting logs with logrotate
Logs exported via rsyslog are not sliced, so you need to rely on the Linux logrotate (Introduction to Logrotate Service for Linux) to do the slicing
Using the root user, create the haproxy log slice configuration file.
|
|
and configure it in crontab to run regularly.
|
|
HAProxy build L7 load balancer
Overall Solution
In this section, we will build an L7 load balancer using HAProxy to apply the following functions: load balancing, session holding, health checking, forwarding to different back-end clusters based on URI prefixes, and monitoring pages. The architecture is as follows.
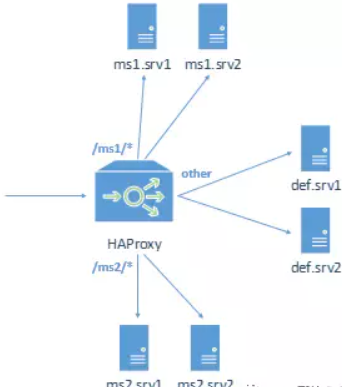
There are 6 back-end services in the architecture, divided into 3 groups, 2 services in each group.
- ms1: Serving requests with URI prefix ms1/
- ms2: Serving requests with URI prefix ms2/
- def: serving other requests
Build backend services
Deploy six back-end services, you can use any Web service, such as Nginx, Apache HTTPD, Tomcat, Jetty, etc., the installation process of specific Web services omitted.
In this example, we installed three Nginx on 192.168.8.111 and 192.168.8.112 hosts, respectively.
- srv1 - 192.168.8.111:8080
- srv2 - 192.168.8.112:8080
- srv1 - 192.168.8.111:8081
- srv2 - 192.168.8.112:8081
- srv1 - 192.168.8.111:8082
- srv2 - 192.168.8.112:8082
Deploy the health check page healthCheck.html to each of the six Nginx services with arbitrary content. Make sure that the page is accessible via http://ip:port/healthCheck.html.
Next, deploy the service pages in the six Nginx services.
- deploy ms1/demo.html in the first group
- deploy ms2/demo.html in the second group
- deploy def/demo.html in the third group
The content of demo.html, deployed on 192.168.8.111:8080 for example: “Hello! This is ms1.srv1! "
Deployed on 192.168.8.112:8080 should be “Hello! This is ms1.srv2!”
and so on.
Building HAProxy
Install HAProxy on 192.168.8.110 host, HAProxy installation and configuration steps as described in the previous chapter, omitted here.
HAProxy configuration file.
|
|
After the modification is complete, start HAProxy.
|
|
Test
First, visit the monitoring page at http://192.168.8.110:1080/stats and enter your username and password as prompted to see the monitoring page.
The monitoring page lists all the frontend and backend services we have configured, along with their detailed metrics. Such as the number of connections, queue status, session rate, traffic, backend service health status, etc.
Next, we test the features configured in HAProxy one by one
health check
From the monitoring page, we can directly see whether the health check is configured correctly. In the above figure, we can see that the status of the 6 backend services under backend ms1, ms2 and default_servers are all 20h28m UP, which means the health status has lasted for 20 hours and 28 minutes, while LastChk shows L7OK/200 in 1ms means that the L7 health check (i.e. HTTP request health check) was performed 1ms ago, and the status code returned is 200.
At this point, we rename the healthCheck.html in ms1.srv1 to mv healthCheck.html healthCheck.html.bak, and then go to the monitoring page. ms1.srv1’s status becomes 2s DOWN, and LastChk is L7STS/404 in 2ms, which means The last health check returned 404, then restore healthCheck.html, and you will soon see ms1.srv1 revert to UP status.
Load balancing and session retention policies
After visiting ms1/demo.html, ms2/demo.html and m3/demo.html respectively, we can see that HAProxy has written back three cookies for session retention, and if we refresh these three pages repeatedly, we will find that they are always redirected to *.srv1. Next, we delete the HA_STICKY_ms1 cookie, and then visit ms1/demo.html again to see that a new cookie has been written at the same time. If we find that we are still being directed to ms1.srv1 and no new HA_STICKY_ms1 cookie has been written, then it is possible that the browser is caching the ms1/demo.html page and the request is not reaching HAProxy. a F5 refresh should do the trick.
HAProxy build L4 load balancer
When HAProxy works as an L4 load balancer, it does not parse anything related to the HTTP protocol and only processes the packets at the transport layer. In other words, HAProxy running in L4 mode can’t implement features such as forwarding to different backends based on URLs and session retention via cookies. Also, HAProxy working in L4 mode cannot provide monitoring pages. However, HAProxy as an L4 load balancer can provide higher performance and is suitable for socket-based services (such as databases, message queues, RPC, mail services, Redis, etc.), or HTTP services that do not require logical rule judgments and have implemented session sharing.
Overall solution
In this example, we use HAProxy to proxy two HTTP services in an L4 fashion, without providing session hold.
|
|
Session hold in L4 mode
Although HAProxy in TCP mode cannot implement session hold via HTTP cookies, it is easy to implement session hold based on client IP. Simply change the balance roundrobin to balance source.
In addition, HAProxy provides a powerful stick-table feature, which allows HAProxy to sample a large number of attributes from transport layer packets and write these attributes into the stick-table as a policy for session hold.
HAProxy key configuration details
The HAProxy configuration file has five fields
- global: to configure global parameters
- default: to configure all default properties of frontend and backend
- frontend: to configure the frontend service (i.e., the service provided by HAProxy itself) instance
- backend: used to configure the backend service (that is, the service behind HAProxy) instance group
- listen: the combination of frontend + backend configuration, can be understood as a more concise configuration method
Key configurations for the global domain
- daemon: Specify that HAProxy runs in background mode, which should normally be used
- user [username] : Specify the user to which the HAProxy process belongs
- group [groupname] : Specify the user group to which the HAProxy process belongs
- log [address] [device] [maxlevel] [minlevel]: the log output configuration, such as log 127.0.0.1 local0 info warning, that is, to the local rsyslog or syslog local0 output info to warning level log. There are 8 levels of HAProxy logs, from high to low: emerg/alert/crit/err/warning/notice/info/debug
- pidfile : Specify the absolute path to the file that records the HAProxy process number. It is mainly used for stopping and restarting HAProxy processes.
- maxconn : The number of simultaneous connections handled by the HAProxy process. When the number of connections reaches this value, HAProxy will stop receiving connection requests.
Key configuration of the frontend domain
- acl [name] [criterion] [flags] [operator] [value]: defines an ACL, which is a true/false value calculated with the specified expression based on the specified attributes of the packet. For example, “acl url_ms1 path_beg -i /ms1/” defines an ACL named url_ms1, which is true when the request uri starts with /ms1/ (ignoring case)
- bind [ip]:[port]: the port the frontend service is listening on
- default_backend [name]: the default backend for frontend
- disabled: disable this frontend
- http-request [operation] [condition]: the policy to be applied to all HTTP requests arriving at this frontend, such as rejecting, requiring authentication, adding header, replacing header, defining ACL, etc. * http-response [operation] [condition]: the policy to be applied to all HTTP requests arriving at this frontend.
- http-response [operation] [condition]: the policy applied to all HTTP responses returned from this frontend, roughly the same as above
- If you want to follow the log configuration of the global domain, then log global is configured here.
- maxconn: maxconn of the same global domain, only applied to this frontend
- mode: the working mode of this frontend, mainly http and tcp, corresponding to L7 and L4 two load balancing modes
- option forwardfor: add X-Forwarded-For Header to the request, record the client ip
- option http-keep-alive: provide service in KeepAlive mode
- option httpclose: corresponds to http-keep-alive and turns off KeepAlive mode. If HAProxy mainly provides interface type services, consider using httpclose mode to save connection count resources. However, if this is done, the calling side of the interface will not be able to use HTTP connection pooling
- option httplog: If httplog is enabled, HAProxy will log requests in a format similar to Apache HTTP or Nginx.
- option tcplog: if tcplog is enabled, HAProxy will log more properties of the packet in the transport layer
- stats uri [uri]: enable monitoring page on this frontend, accessible via [uri]
- stats refresh [time]: monitoring data refresh period
- stats auth [user]:[password]: the authentication username password for the monitoring page
- timeout client [time]: the timeout period after the connection is created and the client continues not to send data
- timeout http-request [time]: the timeout when the client fails to send a complete HTTP request after the connection is created, mainly used to prevent DoS-type attacks, i.e., after the connection is created, the request packet is sent at a very slow rate, resulting in the HAProxy connection being occupied for a long time
- use_backend [backend] if|unless [acl]: used with ACL to forward to the specified backend when ACL is met/not met
backend domain key configuration
-
acl: same as frontend domain
-
balance [algorithm]: load balancing algorithm between all servers in this backend, commonly used are roundrobin and source, see the official document html#4.2-balance for a complete description of the algorithm
-
cookie: enable cookie-based session retention policy between backend servers, the most common way is insert, such as cookie HA_STICKY_ms1 insert indirect nocache, means that HAProxy will insert a cookie named HA_STICKY_ms1 in the response The value of the cookie is the value specified in the definition of the corresponding server, and the value of the cookie in the request determines which server to forward it to. insert means that if the request already has a legitimate HA_STICK_ms1 cookie, HAProxy will not insert the cookie again in the response, nocache means that all gateways and caching servers on the link are prohibited from caching responses with the Set-Cookie header.
-
default-server: Used to specify the default settings for all servers under this backend. See the server configuration below for details.
-
disabled: Disable this backend.
-
http-request/http-response: same as frontend
-
log: same as frontend
-
mode: same as frontend domain
-
option forwardfor: same as frontend domain
-
option http-keep-alive: same as frontend
-
option httpclose: same as frontend domain
-
option httpchk [METHOD] [URL] [VERSION]: defines the health check policy to be performed by http. For example option httpchk GET /healthCheck.html HTTP/1.1
-
option httplog: same as frontend domain
-
option tcplog: same as frontend domain
-
server [name] [ip]:[port] [params]: defines a backend in the backend server, [params] is used to specify the parameters of this server, the common ones include.
-
check: When this parameter is specified, HAProxy will perform a health check on this server, and the check method is configured in option httpchk. You can also specify inter, rise, fall parameters after check, which represent the period of health check, server UP for several consecutive successes, and server DOWN for several consecutive failures.
-
cookie [value]: used to match the cookie-based session hold, such as cookie ms1.srv1 means that the request handed over to this server will write a cookie with the value of srv1 in the response (the specific cookie name is specified in the cookie settings in the backend field)
-
maxconn: The maximum number of connections that HAProxy can initiate to this server at the same time. When the number of connections reaches maxconn, new connections to this server will enter the waiting queue. Default is 0, i.e. infinite
-
maxqueue: the length of the waiting queue, when the queue is full, subsequent requests will be sent to other servers under this backend, the default is 0, i.e. infinite.
-
weight: weight of the server, 0-256, the higher the weight, the more requests will be assigned to this server. weight 0 will not be assigned any new connections. The default weight for all servers is 1.
-
timeout connect [time]: the timeout for HAProxy to try to create a connection with the backend server
-
timeout check [time]: by default, the connection+response timeout for the health check is the inter value specified in the server command. If timeout check is configured, HAProxy will use inter as the connection timeout for health check requests and the value of timeout check as the health check The response timeout of the request
-
timeout server [time]: the timeout time of the backend server to respond to HAProxy requests
default domain
Among the key configurations of the frontend and backend domains above, all of them can be configured in the default domain except for acl, bind, http-request, http-response, and use_backend. items configured in the default domain, if they are not configured in the frontend or backend domain, the configuration in the default domain will be used.
listen domain
listen domain is a combination of frontend domain and backend domain, all configurations in frontend domain and backend domain can be configured under listen domain.
Implementing HAProxy High Availability with Keepalived
Although HAProxy is very stable, it is still not immune to the risks associated with operating system failures, host hardware failures, network failures, and even power outages. Therefore, you must implement a high availability solution for HAProxy. The following section describes the HAProxy hot standby solution implemented using Keepalived. In other words, two HAProxy instances on two hosts are online at the same time, and the instance with higher weight is MASTER, and when MASTER fails, the other instance automatically takes over all the traffic.
Principle
There is a Keepalived instance running on each of the two HAProxy hosts, and the two Keepaliveds are competing for the same virtual IP address, and the two HAProxyes are trying to bind the ports on the same virtual IP address. Obviously, only one Keepalived can grab the virtual IP at the same time, and the HAProxy on the Keepalived host that has grabbed the virtual IP is the current MASTER. Keepalived periodically checks the status of the HAProxy on this host, and the weight value increases when the status is OK.
Build a HAProxy primary and secondary cluster
Install and configure HAProxy on two physical machines, in this example, two identical sets of HAProxy will be installed on two hosts 192.168.8.110 and 192.168.8.111, the specific steps are omitted, please refer to the section “Using HAProxy to build L7 load balancer”. section.
Install Keepalived
Download, unpack, compile, and install.
Register as a system service.
Note: Keepalived requires the root user for installation and configuration
Configure Keepalived
Create and edit the configuration file
Configuration file contents.
|
|
If the host does not have the killall command, the psmisc package needs to be installed.
|
|
Start two Keepalived separately.
|
|
Verify
After booting, first check who holds the dummy IP 192.168.8.201 on each of the two hosts by executing the command: ip addr sh enp0s25 (replace enp0s25 with the host’s NIC name)
If you start the backup machine Keepalived first, then it is likely that the virtual IP will be grabbed by the backup machine, because the backup machine weight configuration is only 1 lower than the host, as long as the implementation of a health check will be able to increase the weight to 102, higher than the host’s 101. At this time visit http://192.168.8.201:9001/ms1/demo.html, you can See the page we deployed earlier. At this point, check /var/log/haproxy.log to see that the request landed on the host that grabbed the virtual IP. Next, we disable the HAProxy instance on the current MASTER host (or Keepalive instance, which has the same effect)
|
|
Visit http://192.168.8.201:9001/ms1/demo.html again and check the /var/log/haproxy.log of the standby machine, you will see that the request fell on the standby machine and the master/standby switchover was successful automatically. You can also execute the ip addr sh enp0s25 command again and you will see that the virtual IP has been taken by the standby machine. In /var/log/message, you can also see the switchover log output by keepalived.