Divide and conquer is an important idea in the field of software engineering, and the same applies to the increasing complexity of the front-end. Generally, after choosing the right framework, front-end teams should start to consider the efficiency of development and maintenance. Modularization is a popular means to divide and conquer in the front-end field.
There are already many specifications and tools for javascript modularity, such as CommonJS/AMD/requireJS/CMD/ES6 Module, which were described in detail in the previous article. CSS modularity basically relies on Less, Sass, and Stylus, which are the import/minxin features of the processor. And how to handle html and html templates and other resources such as images modularity?
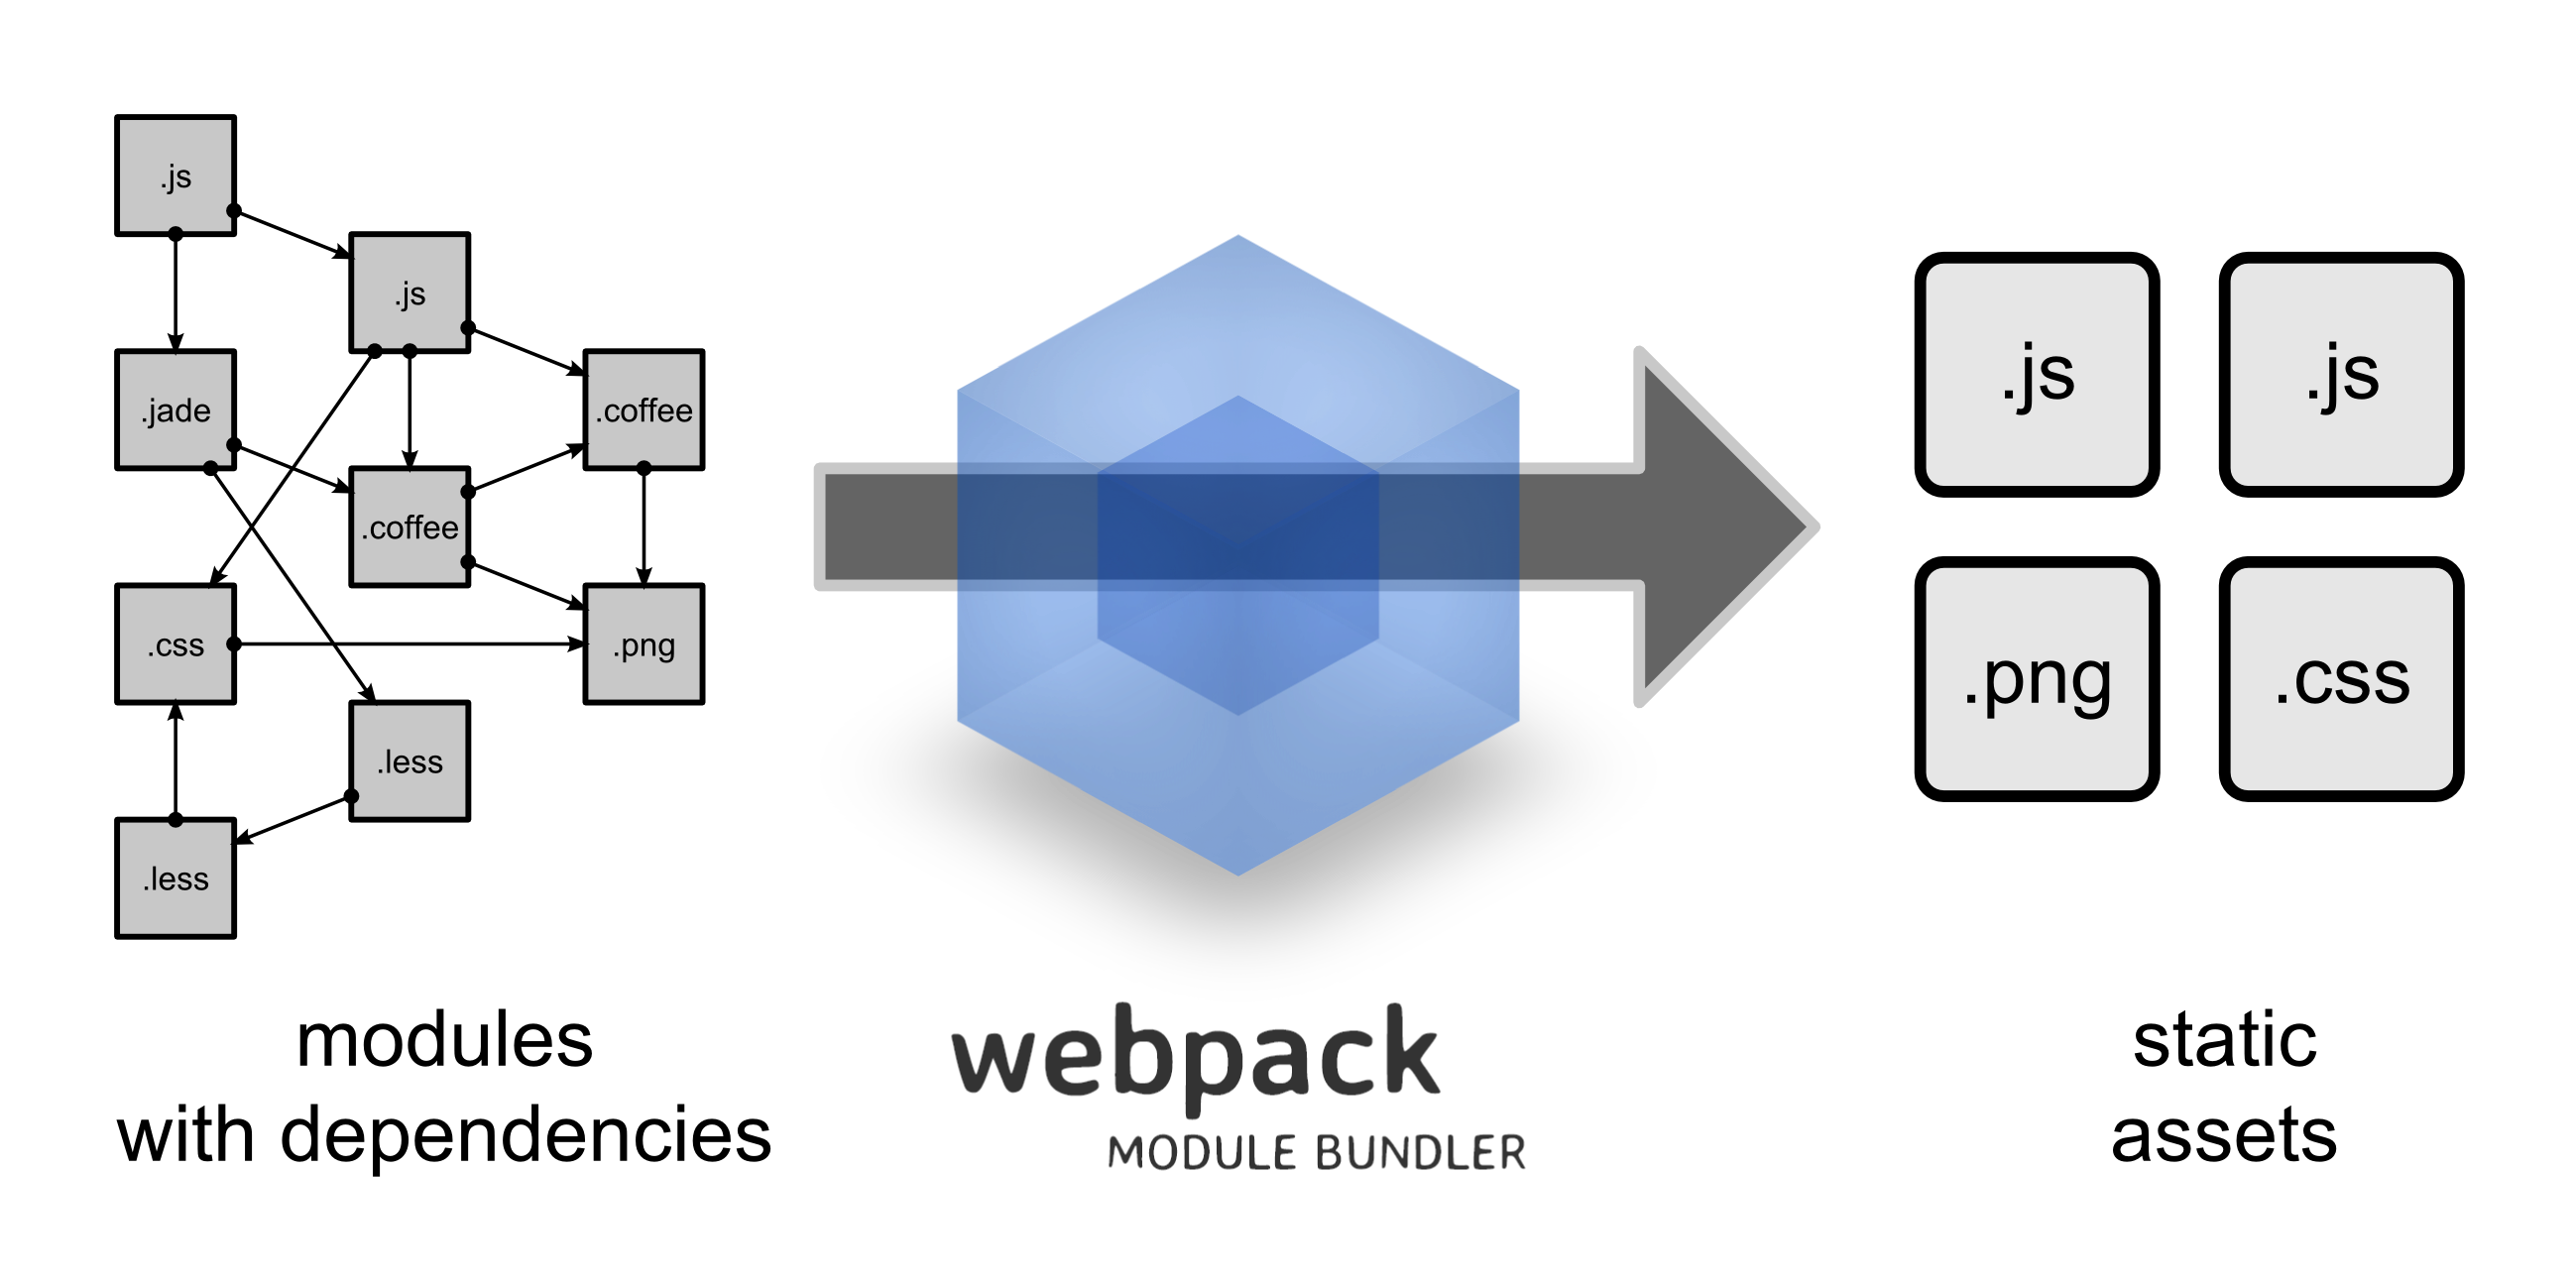
This is one of the problems that webpack is designed to solve. Strictly speaking, webpack is a module packaging tool. It’s not a module loader like requireJS or seaJS, nor a build tool like grunt or gulp to optimize the front-end development process, but a collection of both types of tools and much more.
In a nutshell, Webpack is a module packaging tool that treats js, css, html and images as module resources, which must have some kind of dependencies. webpack is a tool that statically analyzes the dependencies between various module files and packages all modules together with different kinds of loader.
webpack vs gulp
Strictly speaking, gulp and webpack are not comparable. gulp should be in the same category as grunt, which can optimize front-end workflows, such as compressing and merging js and css, precompiling typescript and sass, and so on. In other words, we can configure plugins as needed to automate tasks that previously needed to be done manually. As a module packaging tool, webpack can be compared to browserify, both are pre-compiled modular solutions. Both are precompiled modular solutions, but they are much smarter than “online” modular solutions like requireJS and seaJS. Because it is “pre-compiled”, there is no need to load the interpreter in the browser. In addition, you can write js directly locally, regardless of AMD/CMD/ES6 style modularity, and compile it into browser-aware js.
In short, gulp is just a process builder, while webpack, browserify, etc. are modular solutions. gulp can also be configured with seaJS, requireJS, and even webpack plugins.
Avoiding multiple configuration files
When I first got started with webpack, whether I was browsing GitHub for webpack projects with a high star count or searching stack overflow for answers with a high number of comments, I found that many people advocate having different configuration files for development and product releases in a project, such as webpack.dev.config. js and webpack.prod.config.js. This seems clear and allows newcomers to quickly get up to speed with older projects, but a closer look reveals that most of the configuration items in the configuration files for the unlikely environments are basically the same. This is contrary to the DRY (Don’t Repeat Yourself) principle that has been advocated in the engineering field, so another approach was created, which is to create a common webpack.common.config.js and then inherit (actually require) the common configuration file for different environments. But either way, it’s actually generating multiple different configuration files. If you think about it another way, these configuration files are different, but they all follow the logic of nodejs, so it’s perfectly possible to maintain one configuration file and pass in different parameters for different environments. If you are using npm, you can write this in the package.json file.
where cross-env is a cross-platform environment variable setting tool that allows unix-style environment variable settings to be common to the window platform.
This maintains only a webpack.config.js configuration file, and then handles custom parameters in the configuration file. How do you handle custom parameters? Here we use the webpack plugin definePlugin to provide magic globals to handle.
Then in other parts of the configuration file can be more targeted according to the set environment variables to configure different plug-ins and so on. Even in the business logic, you can also do targeted debugging for different environments, such as ajax in the development environment to debug local mock data, and then in the release time, you can access the server-side data normally.
Locating webpack packaging performance
How can we quickly pinpoint the cause of webpack’s slow packaging speed? webpack provides a handy command line tool that allows us to see the time spent on each packaging step in the command line output, and to mark long steps with special colors, or even configure to show or hide parts of the module packaging output. The following three parameters of the webpack command line tool are described.
colorsoutput with colors, red for longer stepsprofileoutput the time spent on each stepdisplay-modulesoutput the modules that are hidden by default, modules in["node_modules", "bower_components", "jam", "components"]will not be displayed by default
This way the command line output will contain information that is very useful for us to pinpoint the packaging performance, including the time taken to package each step.
|
|
Making good use of resolve
Let’s start with resolving module paths and analyzing dependencies. But this process becomes more and more performance-critical when the project application depends on more and more heavy modules, when the project gets bigger and bigger, and when there are more and more files and folders.
The webpack configuration resolve has an alias configuration item that redirects dependencies on a module to another path. Let’s look at how we can use resolve.alias cleverly to improve coding efficiency while optimizing webpack packaging performance.
If we write it this way, we don’t have to show a long list of paths after require or import in each js file that references moment, we just need to simply require('monent') in the js file, which is actually equivalent to require('moment/min/moment-with -locales.min.js'), which reduces the number of errors we can accidentally cause when handling paths, and also makes the code more concise. More importantly, if we directly require('monent') without configuring aliases in webpack, webpack will look for all moment related packages from under node_modules and package them, including source and compressed code, which significantly slows down packaging.
By default, webpack will look for all modules and module dependencies under resolve.root, but there are some directories that we’re pretty sure don’t have new dependencies on and we can explicitly tell webpack not to scan this file for dependencies, thus reducing webpack’s workload. This is where the module.noParse configuration item is used.
Thus, because we configured moment in resolve.alias to redirect to moment/min/moment-with-locales.min.js, the /moment-with-locales/ in the module.noParse configuration takes effect, so webpack will just package the dependencies directly.
babel loader + ES6
webpack is a great tool, and it’s really easy to use with npm to manage modules. A good horse and a good saddle, a tool like Babel makes it possible to experience the convenience and efficiency of the new ES6 syntax before it is fully available in browsers. The Babel team also provides us with a babel-loader that integrates with webpack so that we can experience the new ES6 features with a simple configuration in webpack.
This configuration is fine, but for many third-party packages, there is no need to go through babel-loader at all (mature third-party packages are ES5ed before release to be compatible with older browsers), so having these packages go through babel-loader will undoubtedly create a huge performance burden, after all, babel6 has to go through dozens of plugins. Here we can use exclude when configuring the loader to remove third-party packages that don’t need to be processed by babel-loader, thus making the whole package build a lot more efficient.
Handling images, fonts and other files
In css or js code, there are cases where require image resources are involved. webpack can inline the image address into the packaged js and return the image path via require(). In fact, not only images, but also iconfont and flash used in css, can be handled similarly. Here you need to use url-loader or file-loader.
- file-loader: Copies the matched file to the output folder and returns the file path according to the
output.publicPathsetting. - url-loader: Similar to
file-loader, but it can return a DataUrl(base64) if the file is smaller than the set limit
|
|
By passing arguments to url-loader, if the image is less than 8kb, it is inlined in the css or js file using base64, and if it is larger than 8kb, the image path is written to the code via the prefix configured in output.publishPath and the image is extracted to the output directory.
The webpack, angular, and jquery mystery
Many people know that angular actually wraps a miniature version of jQuery called jQLite, but it’s still possible to use jQuery, especially when using some third-party libraries that rely on jQuery.
To use jQuery, simply ensure it is loaded before the angular.js.
This statement in the official angular documentation actually assumes that we are not using any module loading/packaging tools, which means that all js files are introduced globally via the script tag. This is true, and if you look at the angular source code you will see that
But if you use webpack, the situation is a little different. After all, webpack advocates modularity and does not allow modules to be exposed to the global world by default. So how do you get angular to use jQuery in this case? Most of you probably have the same idea as I did at the beginning.
It doesn’t work.
webpack offers a more efficient way to do this, using webpack’s built-in ProvidePlugin plugin, which requires a simple configuration in webpack.config.js that
The providePlugin actually replaces strings and variables in the process of processing the module. Go look at the webpack packaged code and you’ll see the truth.
This way, even when webpack encounters global $, jQeury, and window.jQuery in a required third-party library, it will use the jQuery library under the node_module.
Merging public code
When webpack packages a project with multiple entry files that all require or import the same module, webpack will introduce a copy of the same module for each entry file if you don’t do anything about it. When the same module changes, all the entries introduced need to be repackaged at once, resulting in a performance penalty. The CommonsChunkPlugin can extract the same modules and package them separately, thus reducing the performance penalty when rebuilding and packaging.
For example, we define app and vendor module entries in the entry, the former being the result of merging and compressing our own code, and the latter being the result of merging and compressing a third-party library.
Then use CommonsChunkPlugin in the plugin section to extract the public parts.
|
|
This way, all modules that have require to these third-party modules defined in the vendor array will be extracted uniformly and put into vendor.js. In the plugin’s configuration we also make the determination to add hash to the final generated filename if it is a production environment.
Extracting separate style files
When processing css webpack requires two different loaders: css-loader, which returns the css file as text and handles url() and @import(), and style-loader, which inserts the css into the page as a style tag. If other precompiled style languages are used (such as less, sass, and stylus), they need to be precompiled by the corresponding loader before being processed by the css-loader, which is usually written like this
The loader configured this way handles all scss files, first using sass-loader to turn sass into css, and then using css-loader and style-loader. The problem with this is that all css files are inserted directly into the page as style tags, which is not good for caching. If we want separate css files, we need the webpack plugin extract-text-webpack-plugin to extract the css from the js code and merge it. This is defined in the loader as follows
Then add the extract-text-webpack-plugin configuration item to the plugin section.
Lazy loading
Lazy loading can be easily implemented using webpack’s Code Splitting. For large applications, it is not cost effective to download all the files into the browser at once, as some features may not be used often enough to be loaded in the first place. The Code Splitting feature allows you to define “split points” in the code, where the code will load the required modules only when it reaches those points, thus enabling lazy loading on demand.
So, where are the “splitting points” located? A page module often includes html, css, js three kinds of resource files, how to load these three resources?
For the “split point” is very simple, because it is when the route to a page to load the required modules, so of course the “split point” in the definition of the route. Putting it in the route also helps us solve the problem of loading three kinds of resources, because the route usually needs to define the template and controller when routing to this page, which are exactly the html and js resources mentioned earlier, as for the css resources, they can be used as dependencies of html and js resources.
Load templates dynamically
When defining a route, we load the required template dynamically in the template, but the template and templateUrl parameters are strings, which obviously do not meet our needs. We can naturally think of using ui-router’s templateProvider parameter, which can be a function that supports returning a promise in the function, which will eventually return the html string.
This way, the template preferences.partial.html is loaded only when the route /preferences is accessed. Let’s take a look at the configuration of templateProvider, first its function returns a promise which directly uses the constructor of $q which takes two parameters: resolve and reject to resolve and reject the promise respectively. Then in this promise we resolve the content of the preferences.partial.html template string. So when do we resolve? Here we focus on webpack’s require.ensure function, which is a function to implement “Code Splitting” with three arguments.
- array of dependent modules: an array of module names that webpack will load before executing the callback functions that follow.
- callback function: this will be executed only after the module array is loaded.
- chunk name: the modules split from this “split point” will be put into additional modules, this parameter specifies the name of the module. This parameter is mainly used in the case of multiple
require.ensures, so that the code split from multiplesplit pointscan be put into the same module.
Dynamic loading
Next, let’s talk about how to load js resources dynamically. The js resource here is actually the js file that contains the controller. So how do you load the controller’s js module dynamically? Each route definition can have a resolve, and only when the promise is resolved will it actually go to that route, so that’s where the js and other module dependencies are dynamically loaded.
The resolve is named loadPreferencesModule, because its role is to load the preferences module and the other modules it depends on, and does not require us to actually return anything, so line 8 directly resolves the null value. Also note that line 7 also uses preferences as the chunk name, which ensures that the code split from this “split point” is together with the template split from above. You should know that ocLazyLoad is a lazy loading library for angular, and you can use it to implement angular lazy loading. But it doesn’t load the file dynamically, it enables the module name of angular in the file dynamically loaded by webpack, because angular doesn’t allow to declare a module dynamically.
As for how to load css resources, in fact, css can be loaded by using css-loader in js or html through require(xxx.css), because usually css is bound to a page or a module.