Many people, like me, should have seen or heard the following phrase when they first encountered the concept of docker.
docker technology is lighter and faster than virtual machine technology, and docker containers are essentially processes
Even we have more or less implicitly accepted that the container implementation is based on two very important features of the linux kernel, namespace and cgroup. So, how exactly do namespace and cgroup isolate the docker container processes? Let’s find out today.
container
Before we understand how docker container processes are isolated, let’s take a look at what namespace and cgroup are in the linux kernel.
namespace
If we were to implement a vm-like virtualization technology ourselves, the first thing we would think about is how to isolate the processes of each vm from the host processes and prevent process privileges from “escaping”. The namespace feature introduced by linux kernel v2.6.24 released in 2008 allows us to do various kinds of isolation of linux.
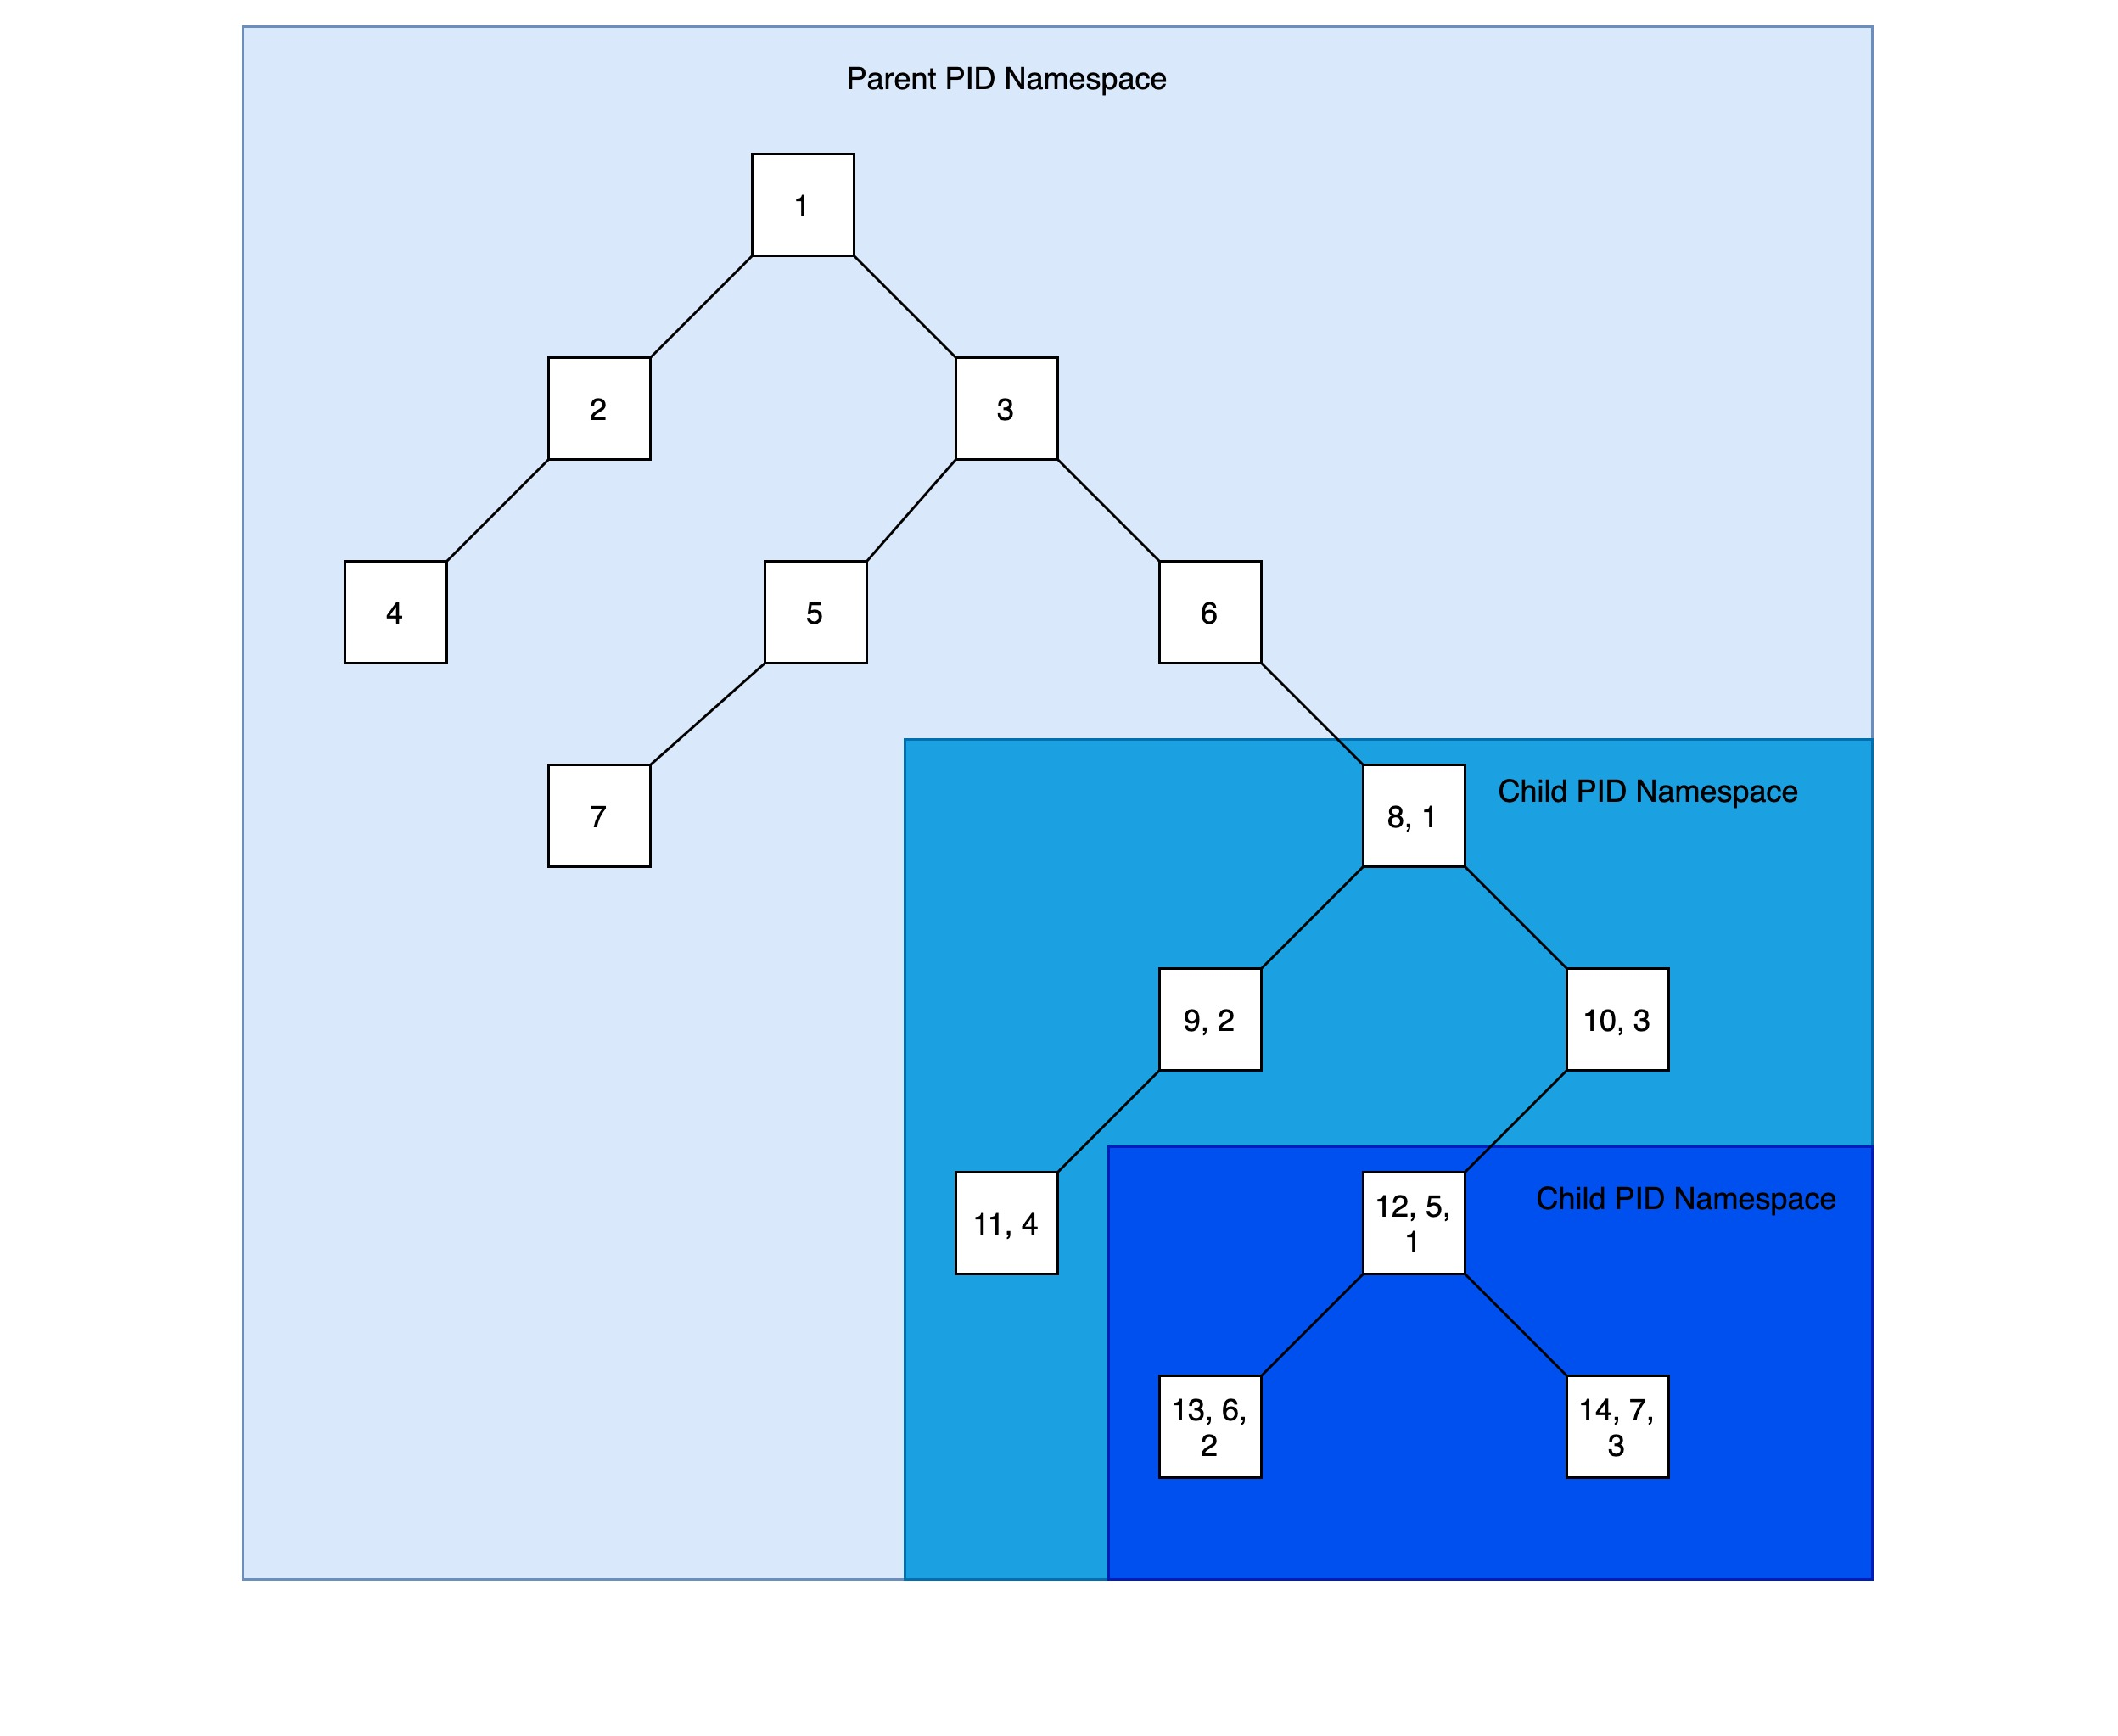
Anyone familiar with the chroot command should be able to guess how the namespace in the linux kernel works. In linux, the default directory structure starts with the root directory /, and the chroot command is used to run commands from the specified location as the root. Similarly, anyone who knows the linux boot process knows that when linux starts, there is an init process with a pid of 1. All other processes are derived from this process. init and other derived processes form a tree with the init process as the root, and processes in the same process tree can review or even terminate other processes if they have enough privileges. This obviously poses a security problem. The pid namespace (a type of linux namespace) allows us to create a separate process tree with its own pid of 1, which is usually specified when the new process tree is created. pid namespace makes it impossible for processes in different process trees to access each other directly, provides isolation between processes, and even makes it possible to Nested process trees can be created.
In linux, creating namespace is as simple as using the unshare command and specifying the type of namespace to be created and other parameters, for example, the following command will create a new pid namespace and run zsh in it.
|
|
Because zsh is an interactive shell, you will find yourself in a new shell, and we can run new processes in the new world again.
Before starting the sleep process there are only two processes running, zsh and ps, and the pid of the zsh process is 1, all other processes are its children. However, if you open a new terminal you can also see the zsh process, but you will find that its pid is not 1.
As you can see, you can see the processes in the child process tree through the parent process tree, but you cannot see the processes in the parent process tree through the child process tree. But the pid of the process seen in the parent process tree is different from the pid of the process seen in the child process tree.
In fact, in addition to pid namespace, the linux kernel provides many different types of namespace.
- Mount(mnt) namespace can mount or unmount the file system without affecting the host file system.
- PID(Process ID) In a pid namespace, the first process has a pid of 1. All other processes in this namespace are children of this process, and other processes at the OS level need not be in this process.
- network(netns) namespace will virtualize the new kernel stack, each network namespace includes its own network devices, routing tables, etc.
- IPC(Interprocess Communication) namespace is used to isolate communication resources between processes in different IPC namespaces, such as shared memory, etc.
- UTS: UTS namespace is used to isolate hostname from domainname
If the linux environment provides util-linux, then you can use the lsns command to view the current linux namespace and even customize the output format.
You can also use the nsenter command to get into a linux namespace, isn’t that a bit similar to docker exec?
No, the above command should output zsh, why is it like this? After reading the documentation carefully, I realized that nsenter just goes to the target namespace, but the SHELL environment variable is context dependent, which means nsenter just switches the namespace, but not the context in which the program is running. The corresponding docker exec will switch the namespace and running context completely, so we can use docker exec to do various debug operations.
cgroup
It is not entirely true that processes in a process tree cannot interact with processes in other process trees. For example, a process inside a process tree will take up the host’s resources (CPU/Memory/NetworkIO/DiskIO, etc.), which may cause other processes to not get enough resources. Fortunately, we can use the cgroup feature of the linux kernel to limit the number of resources a process can occupy, including CPU, memory, network bandwidth, diskIO, etc. It is important to note that namespace and cgroup are two different features, and it is possible that only one or two of the namespaces mentioned above are used in combination with cgroup to manage a group of processes.
As an example, with the cgcreate command we create a cgroup.
With the above command we have created a cgroup named memory:mycgrp with owner set to morven and let’s see the default resource limits for memory:mycgrp.
|
|
As you can see, the default resource limit for memory is in bytes, so let’s limit the memory:mycgrp cgroup to a maximum of 10MB of memory.
|
|
Next, we create a process to run the java program using the memory:mycgrp cgroup.
As you can see, the memory limit prevents us from running memory-consuming java programs with the memory:mycgrp cgroup, and we directly get an OOM error message.
In fact, in addition to limiting the size of the process’ consumption of various host resources, sometimes we also need to restrict which system calls the process can make. For example, if we want to restrict a specific application from accessing network-related system calls, then we need another function provided by the linux kernel, seccomp-bpf, which we will not expand on here.
docker containers
With the above introduction, I think you should have a first guess on how docker implements resource isolation. As we imagine, docker implements isolation by creating a combination of namespace and cgroup for each container.
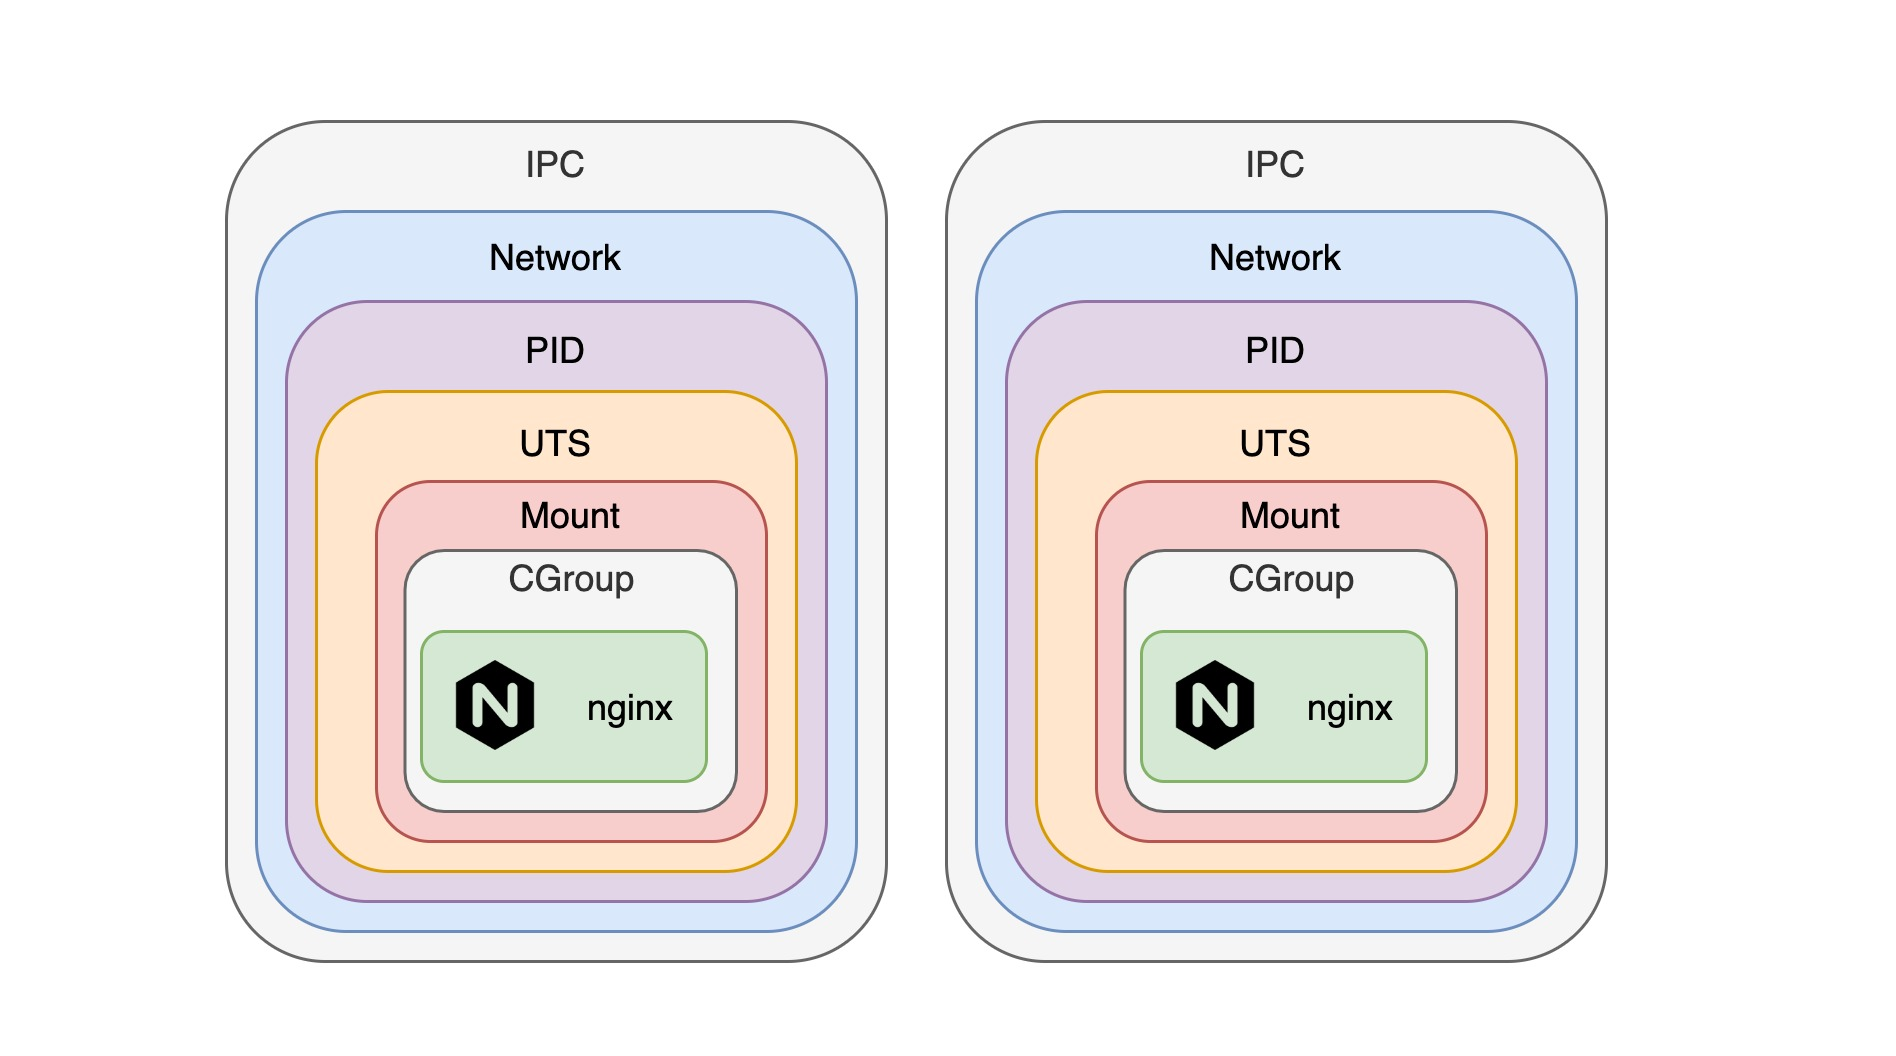
Except for mounting the host’s filesystem and port mapping with the host, each container is actually a combination of a separate namespace and cgroup. However, with some command line arguments provided by docker, we can make multiple containers share the same namespace and communicate directly.
As an example, let’s create an nginx container and make it act as a local proxy for requests from port 80 to http://127.0.0.1:1313.
|
|
Note: Specifying the
-ipc=shareableargument when starting the nginx container makes the ipc namespace of the nginx container sharable by other containers.
Next, we create a hugo site and start a container to run it. To ensure that the hugo container shares the same namespace as the nginx container, we need to add additional parameters to the hugo container when we start it to ensure that it shares the same namespace.
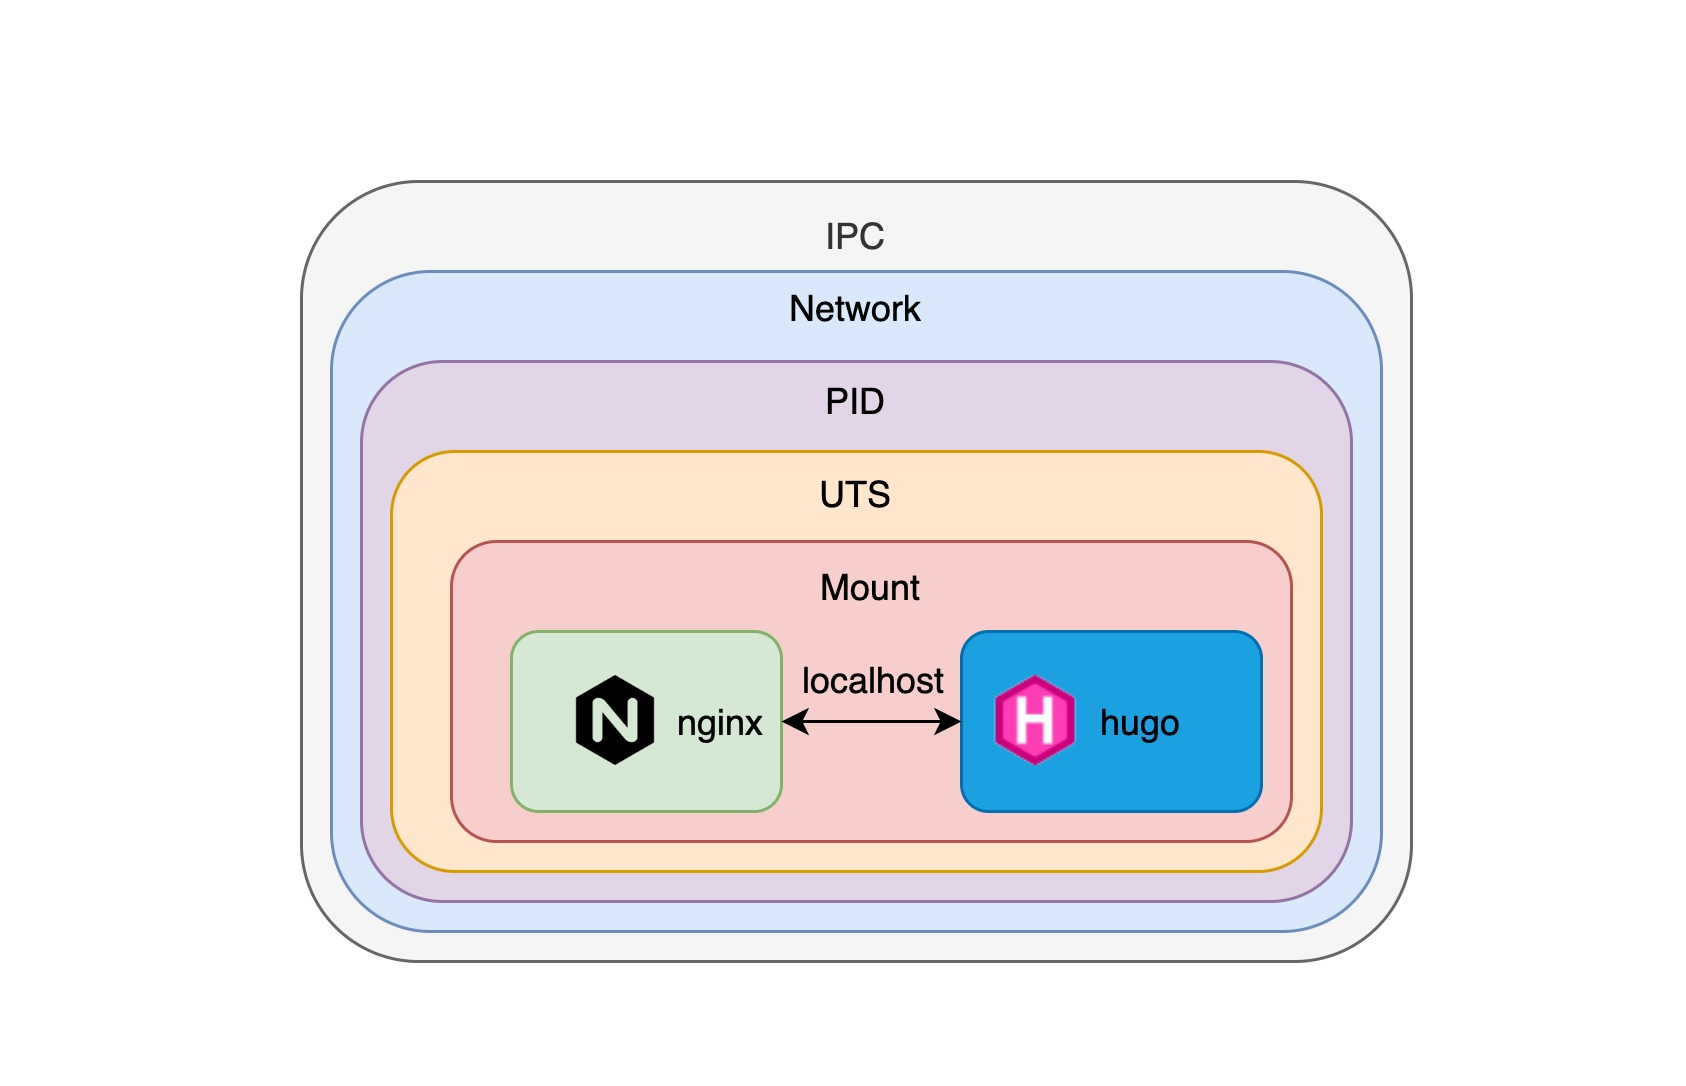
As you can see, when we visit http://localhost:8080/, we can see the hugo site page. This is when the nginx container proxies local requests to the hugo container, and by specifying the namespace parameter we can have multiple containers running in the same namespace, so that they can connect to each other, as you can see in the following diagram.
pod
Since we can interconnect multiple container processes by combining namespace and cgroup, isn’t this the most basic requirement for pods in k8s? In a nutshell, pod allows us to have multiple containers sharing the same namespace to ensure interconnectivity of these container processes, with the slight difference that pod uses the CNI(Container Network Interface) networking standard instead of docker’s native networking model.
pod is a combination of containers
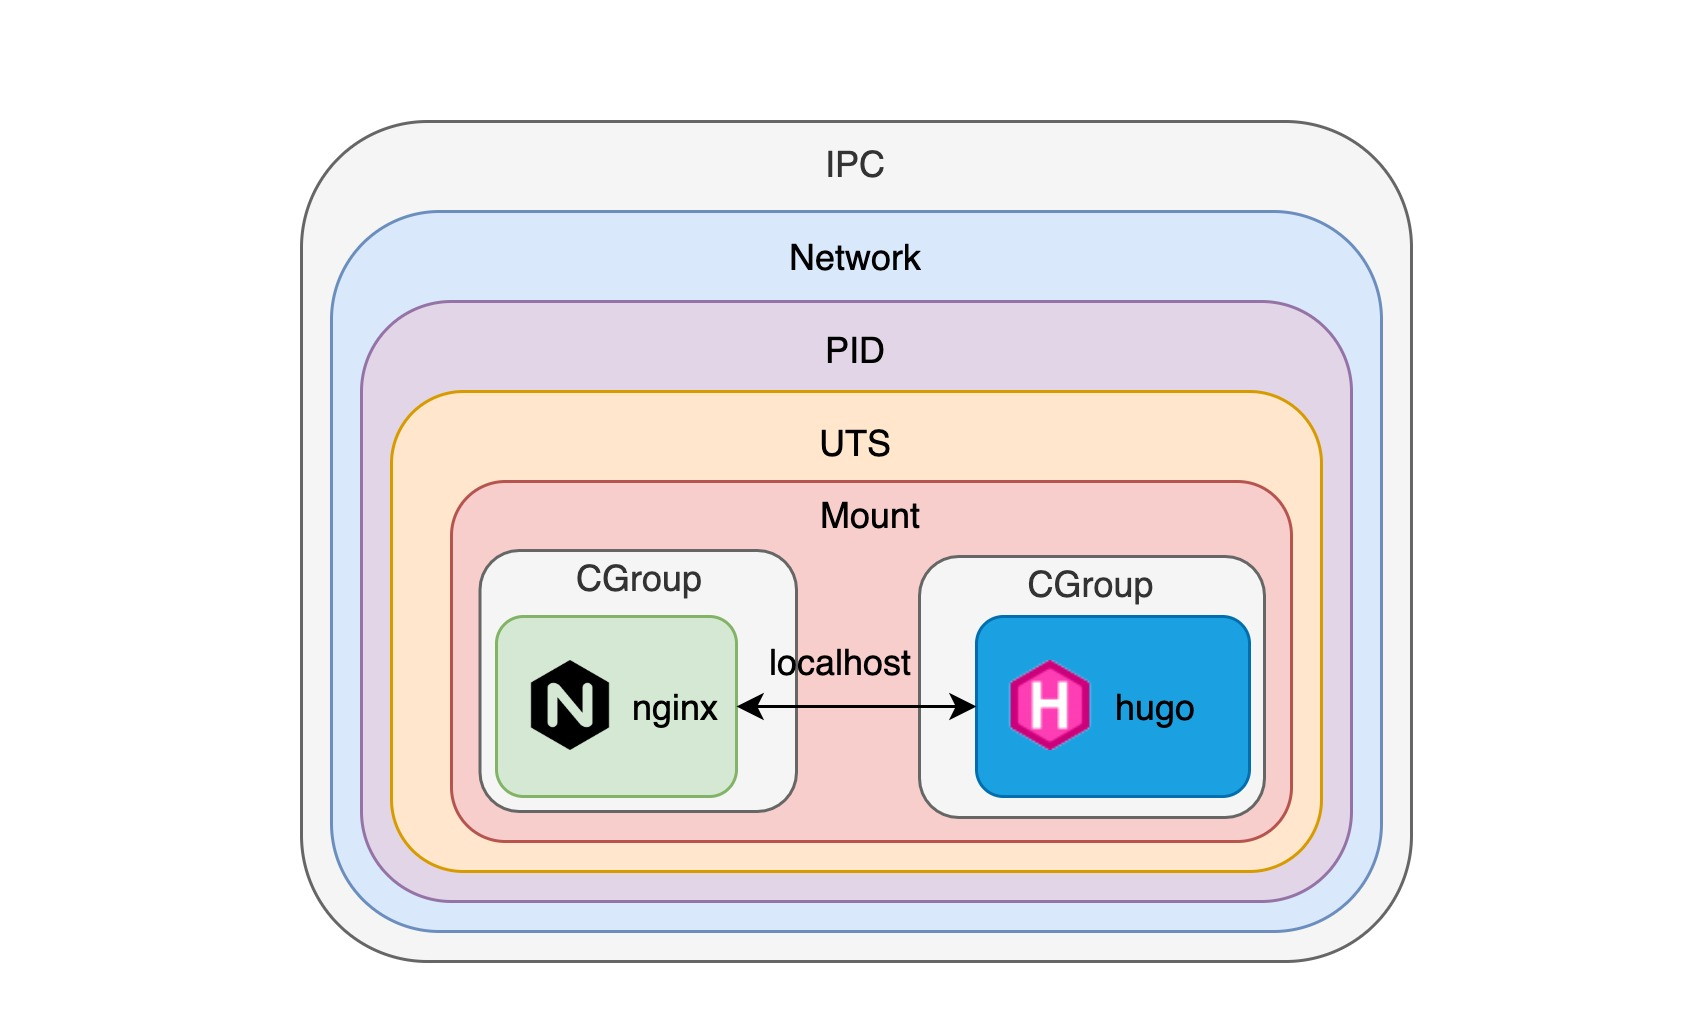
As we can see on this diagram above, once we create these containers with pods, they run as if they were on the same machine, can access each other directly using localhost + port number, can share the same volume, and can even use IPC to send signals like HUP or TERM to other processes (Kubernetes 1.7, Docker >= 1.13), please refer to: https://kubernetes.io/docs/tasks/configure-pod-container/share-process-namespace/
But is a pod as simple as putting together multiple containers that share the same namespace? Let’s look at a more complex example.
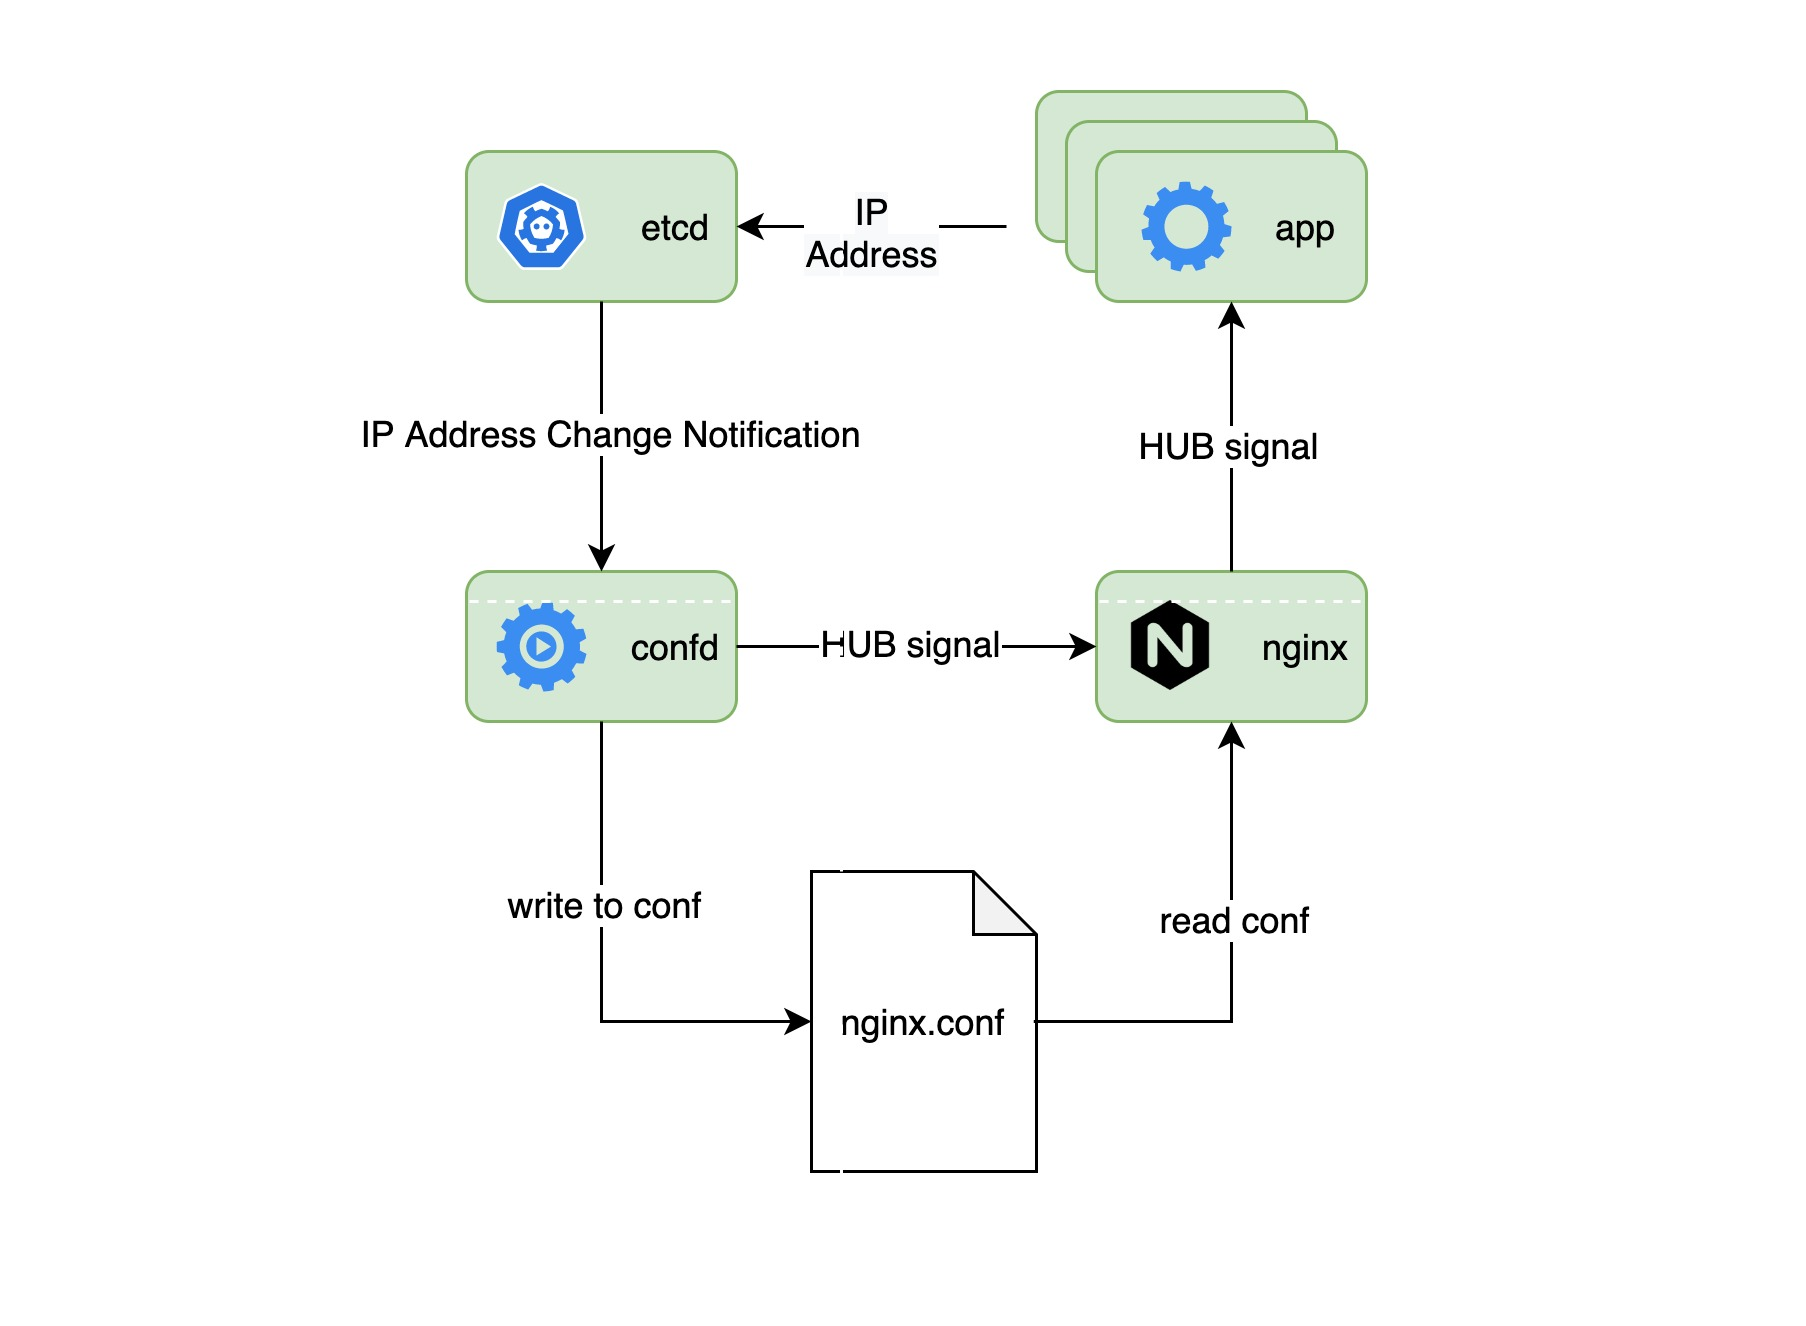
In this example, nginx acts as a front-end load balancer for multiple applications, and it needs to load a new configuration file every time the application’s IP address pool changes. We use confd as the configuration distribution center. etcd stores the IP address pool information for all applications and sends notifications to confd whenever this information changes. confd then generates a new configuration file and sends a HUB signal to the nginx process to end the old process and load the new configuration file to start the new nginx process.
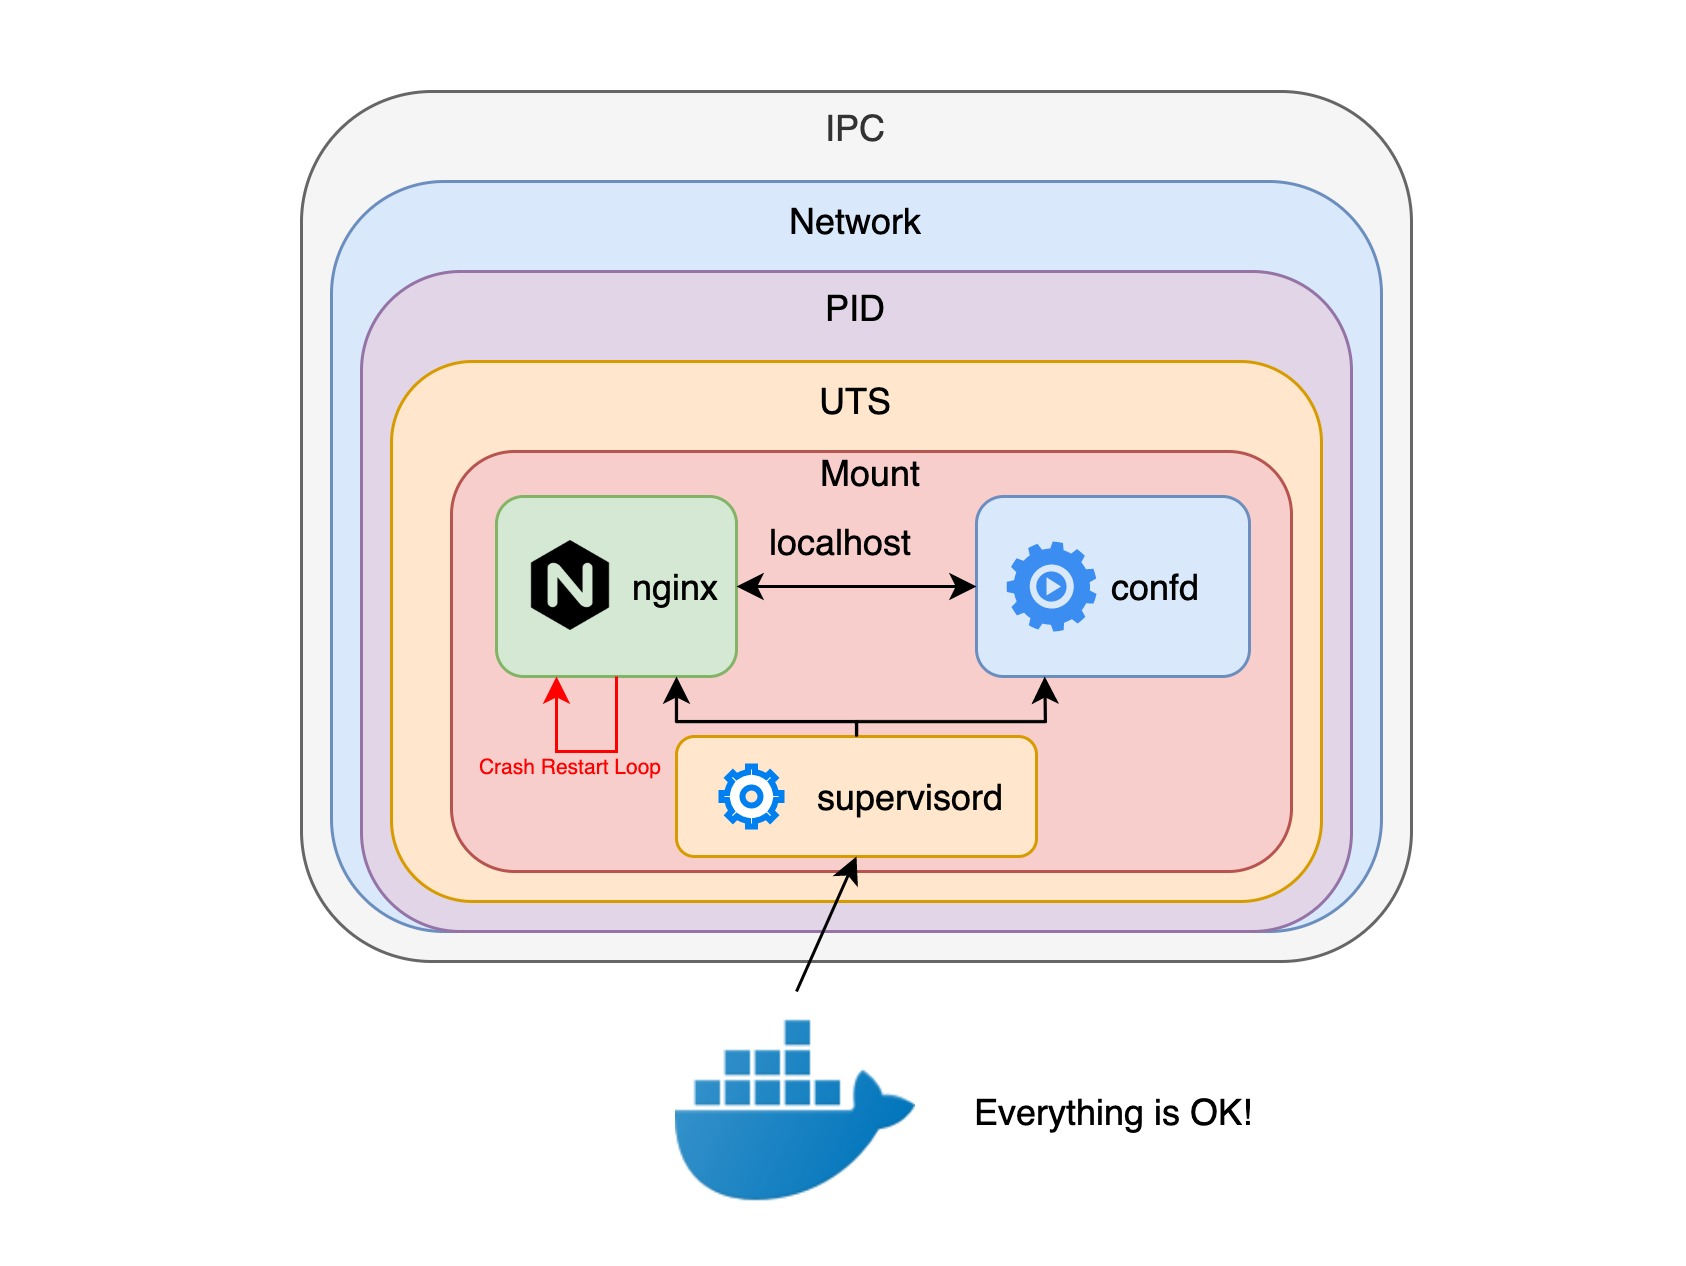
If we use a docker container, our first thought is to put the confd and nginx processes into the same docker container, but the docker container only allows one execution entry point, so we have to create a supervisord process to create and manage the confd and nginx processes, but The problem is that the nginx process needs to be restarted constantly, and more importantly, the container probe API only knows the health of the supervisord process, and there is no way to monitor whether confd and nginx processes are running properly.
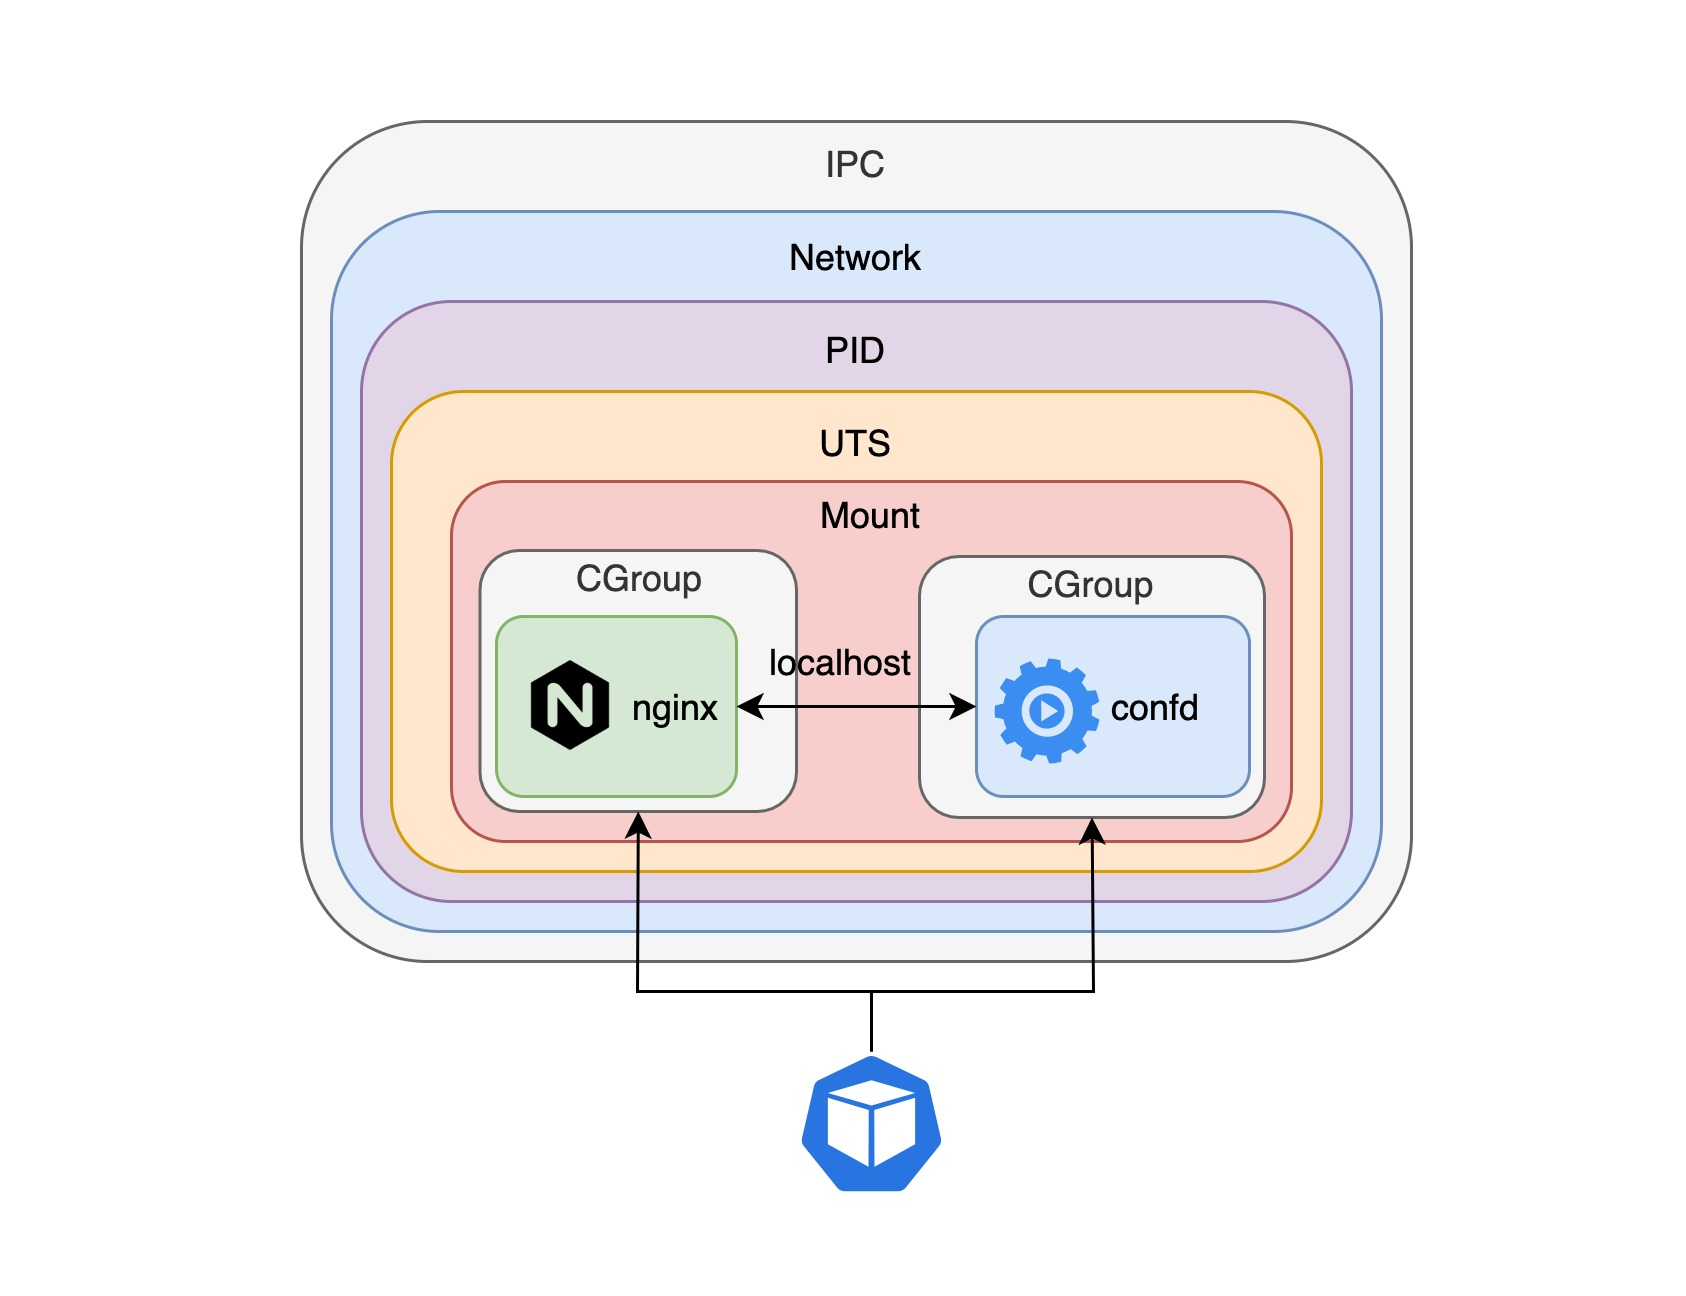
But if you run confd and nginx processes in separate containers and put them in a pod, the pod can check the health of each process because the pod can take advantage of the per-container probe API to get the status of the container processes and then try to restart the container processes if each process exits abnormally, as well as get logging information for each container.
By putting multiple different containers into a pod, each container is not even aware of the existence of the other containers, as we saw in the example above. The confd container is not aware of the existence of the nginx container, it only knows that it needs to listen to the application IP address pool information stored in etcd, generate a new configuration when that information changes, and send a HUB signal to to a specific process. In fact, the container running with the confd container does not have to be the nginx container; it can be any application container, so that the confd container becomes a general-purpose configuration distribution container. In the k8s concept, such a container is called a sidecar, and if you are familiar with istio, you must be familiar with this concept. istio uses sidecar to supervise the network traffic of microservices, which in turn enables complex functions such as traffic routing, policy enforcement, and authentication authorization.
The magic pause container
If we run the docker ps command on a node of a k8s cluster, we will find many containers with the keyword pause.
What exactly are these pause containers? Why are there so many pause containers on a node?
We know from the previous introduction that docker containers are great for running single programs, but it would be unwieldy to combine several programs inside a single docker container. Instead, splitting them into different containers and using pods to combine them is the most efficient way to do it. But who will create the initial namespace for these multiple container processes in the same pod? It seems that anyone can, but no one is suitable. More importantly, how to manage the lifecycle of these container processes? We know that the process with pid 1 is the root node of the entire pod process tree, and it is responsible for the management of other processes, including the recycling of zombie processes.
As you may have guessed, yes, in k8s, it is the pause container that acts as the initial container in each pod, creating the namespace and managing the lifecycle of other container processes.
Let’s see how to use the pause container to create a pod from scratch and share namespace, first we start the pause container.
|
|
Note: Note that we did the mapping from port 8080 to port 80 when we started the pause container, because the nginx container then needs to expose the nginx service using the network initialized by the pause container.
Next, we create an nginx container using the namespace of the pause container and make it act as a local proxy for requests from port 80 to http://127.0.0.1:1313.
|
|
Next, we create a hugo site and start a container to run it. To ensure that the hugo container shares the same namespace as the nginx container, we need to add additional parameters to the hugo container when we start it to ensure that it shares the same namespace.
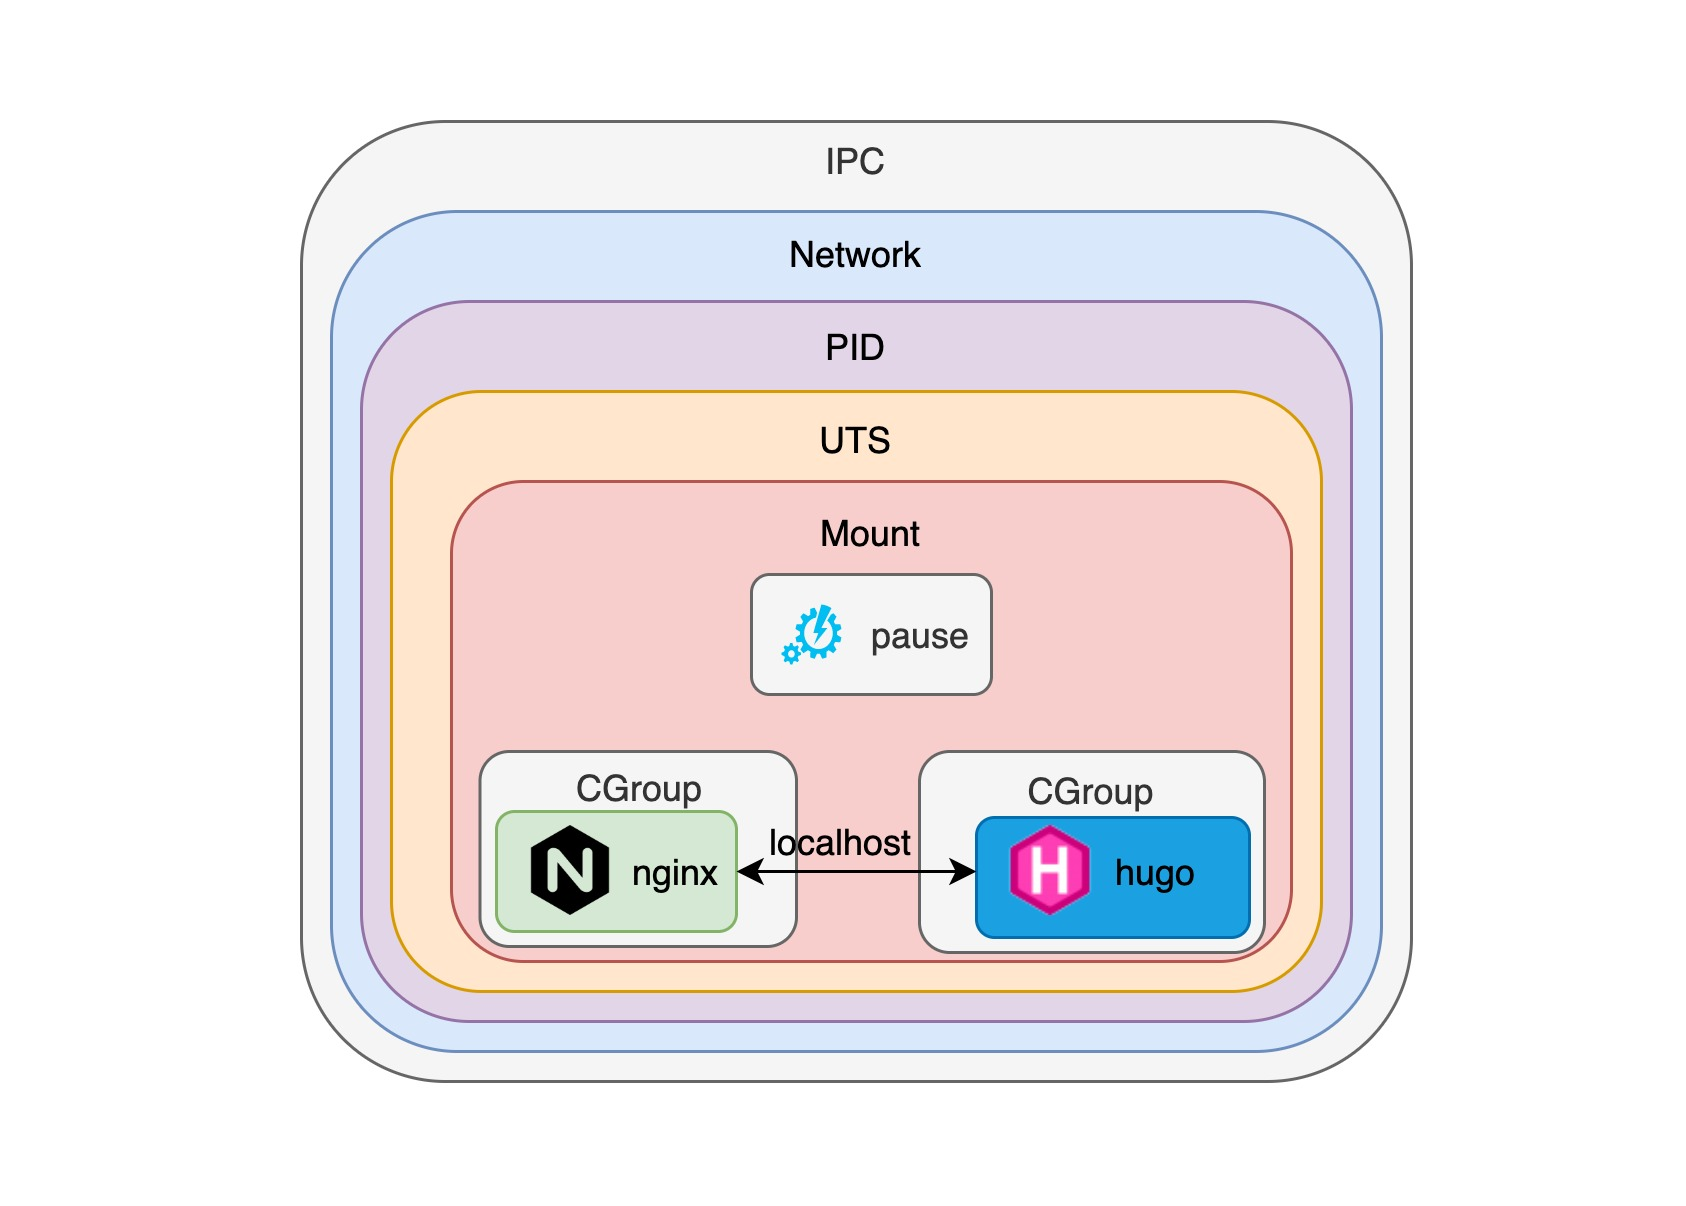
This ensures that both hugo and nginx container processes use the namespace created by the pause container, and that each container can communicate directly with each other using localhost, so that nginx can proxy requests to the hugo container. In fact, it is worth discussing how the pause container manages the lifecycle of each container process, so we will talk more about that when we get a chance.