1. Introduction to vcluster
A virtual cluster (vcluster for short) is a fully functional, lightweight, well-isolated Kubernetes cluster running on top of a regular Kubernetes cluster. The core idea of a virtual cluster is to provide an isolated Kubernetes control plane (e.g., API Server) running on top of a “real” Kubernetes cluster. In contrast to a fully independent “real” cluster, a virtual cluster does not have its own worker nodes or network, and the workload is actually scheduled on the underlying host cluster.

By default, vcluster runs as a Pod with 2 containers. (Scheduled by StatefulSet), containing.
- Control Plane: contains API Server, Controller Manager, datastore. By default sqlite is used as datastore and k3s is used to run API Server and Controller Manager.
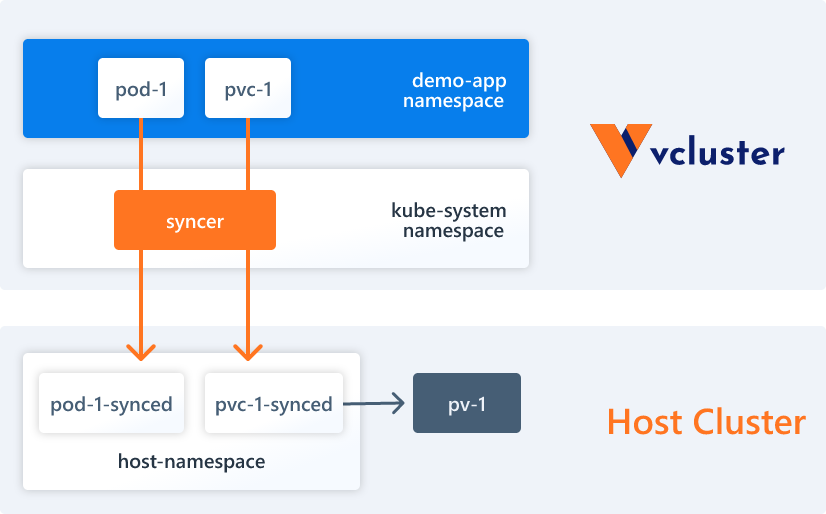
- Syncer Synchronizer: vcluster itself has no actual working nodes or network, it uses syncer to replicate resources created in the virtual cluster to the underlying host cluster.
There are two types of resources in vcluster.
- High-level (purely virtual): These resources exist only in the virtual cluster, such as Deployment, StatefulSet, CRD, and so on.
- Low-level (synchronous resources): Some underlying Kubernetes resources need to be synchronized to the underlying host cluster, such as Pods, Services, Persistent Volumes, etc.
vcluster has the following features.
- Cluster-level resources available: allowing tenants to use resources such as CRD, Namespaces, ClusterRole, etc. in a virtual cluster, which is more powerful than isolation via namespaces.
- Lightweight: vcluster builds virtual clusters by default using k3s, a certified lightweight Kubernetes distribution that is 100% compatible with the Kubernetes API, which compiles Kubernetes components into a single binary file of less than 100 MB, disabling by default all unwanted Kubernetes features, such as Pod schedulers or certain controllers, are disabled by default, making k3s memory usage half that of regular k8s. In addition vcluster supports other distributions such as k0s or regular k8s.
- Cost-effective: Creating virtual clusters is cheaper and more efficient than “real” clusters, requiring at least a single vcluster Pod (with API server, syncer, back-end storage).
- Good Isolation: Each virtual cluster has a separate control plane and access point, and you can limit the network and workload of the virtual cluster.
- No performance degradation: Pods are actually deployed in the underlying host cluster, so they don’t suffer performance impact at all when they run.
- Reduced overhead on the host cluster: Advanced resources (e.g. Deployment, StatefulSet, CRD) are only kept in the virtual cluster and do not reach the underlying host cluster, thus significantly reducing the number of requests to the underlying host cluster, Kubernetes API Server.
- Easy to deploy : vcluster can be deployed via vcluster CLI, helm, kubectl, cluster api, Argo CD, and many other tools (it is essentially just a StatefulSet resource).
- Single Namespace Encapsulation: Each virtual cluster and all its workloads reside within a single namespace of the underlying host cluster.
- Flexible and versatile: vcluster supports different backend stores (e.g. sqlite, mysql, postgresql and etcd), plugins, allows custom synchronization policies for resources, and you can even deploy vclusters within vcluster.
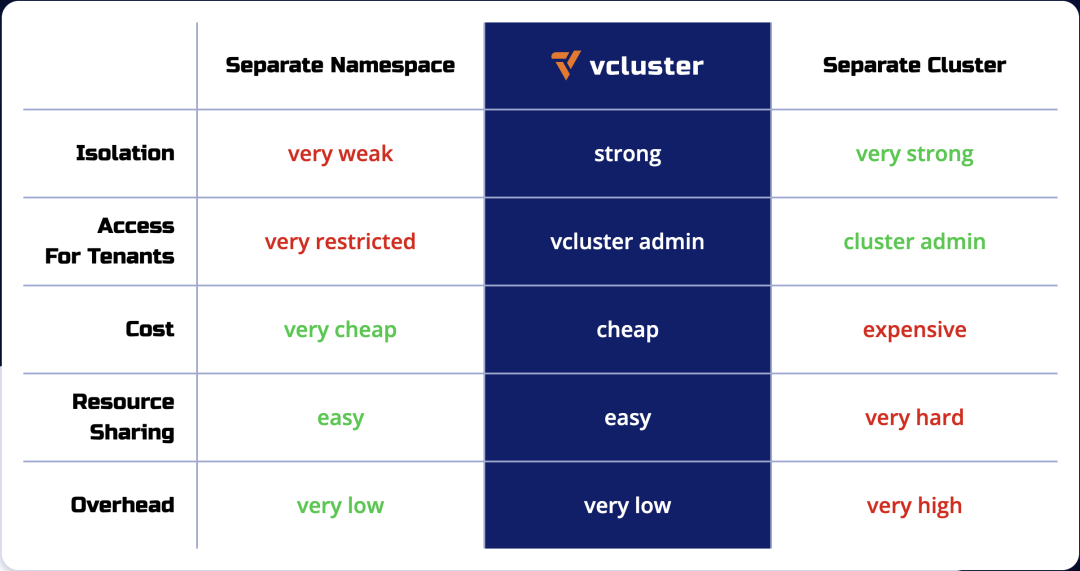
Using virtual clusters is more cost effective than creating separate Kubernetes clusters, and provides better multi-tenancy and isolation than the namespace isolation approach. The following table compares namespaces, vclusters, and individual Kubernetes clusters in terms of isolation, multi-tenant access, and cost.
2. vcluster Quick Start
2.1. Preparing persistent storage
Creating a virtual cluster requires the use of persistent storage by default, you can skip this step if the default persistent storage is already configured in the cluster.
Execute the following command to install OpenEBS.
|
|
Set StorageClass openebs-hostpath as the default StorageClass.
|
|

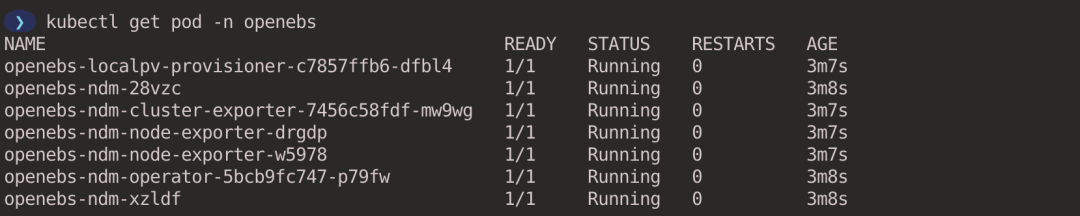
Verify that the OpenEBS components are functioning properly.
2.2. Installing vcluster CLI
Refer to Install vcluster CLI to install the vcluster CLI tool according to the corresponding OS version.
2.3. Creating a virtual cluster
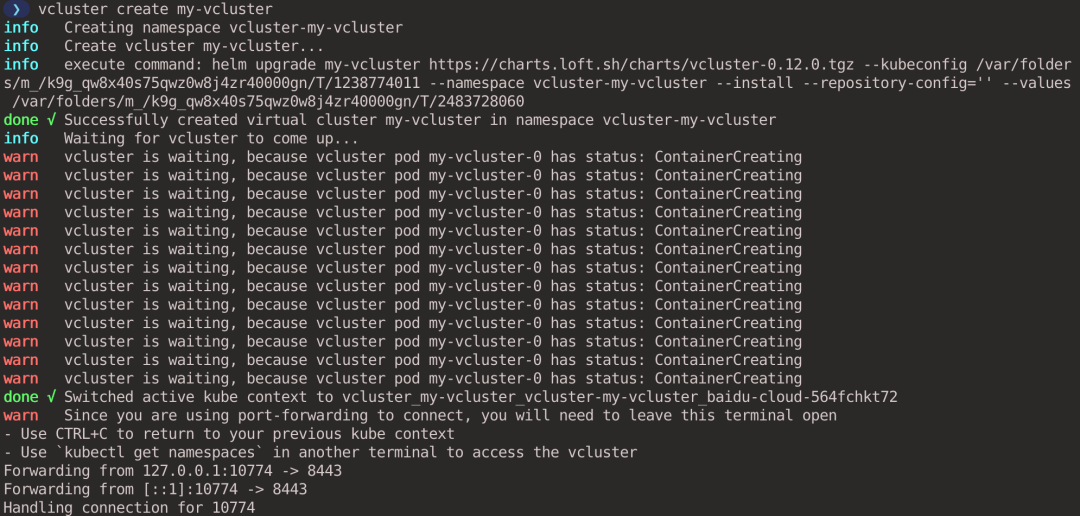
Execute the following command to create a virtual cluster named my-vcluster, which will be created in the vcluster-<vcluster-name> (vcluster-my-vcluster in this case) Namespace by default. You can also use the -n parameter to specify the Namespace where the virtual cluster is created.
|
|
After the virtual cluster is created, vcluster will automatically connect to the virtual cluster via port forwarding for us. If you use kubectl or helm to install the virtual cluster, you can use the vcluster connect <cluster-name> command to connect to the virtual cluster manually.
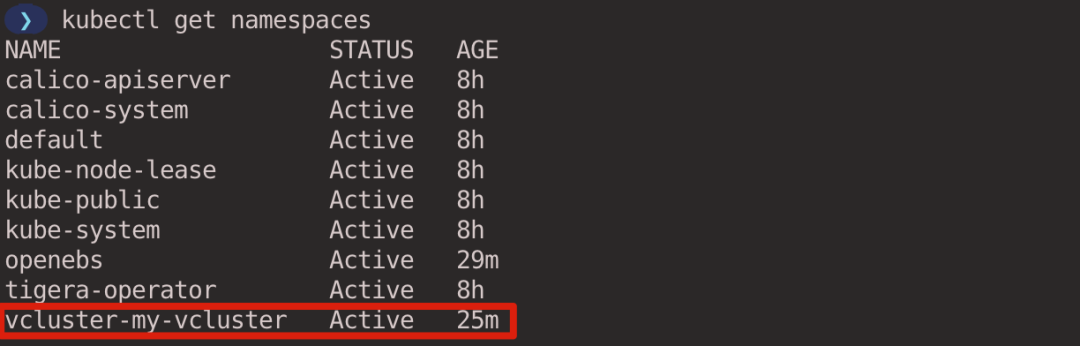
Open another window and execute the kubectl command to see the Pod and Namespace. You can see that this is a brand new cluster and you cannot see the vcluster-my-vcluster Namespace that the virtual cluster belongs to, because it exists in the host cluster.

2.4. Creating resources in a virtual cluster
Create a Namespace in the virtual cluster and deploy an nginx Deployment in it.
View the created Pods.
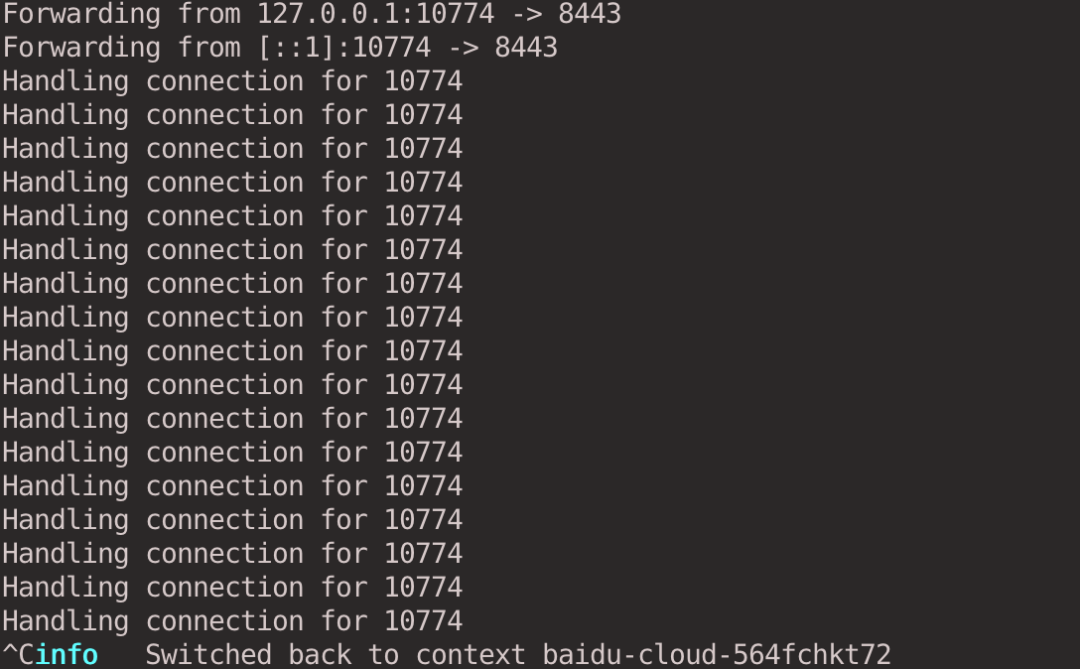
Keyboard press ctrl + c to disconnect from the virtual cluster and the kubectl context will automatically switch back to the host cluster.
When you look at the Namespace in the host cluster, you don’t see the demo-nginx Namespace created in the virtual cluster, because it only exists in the virtual cluster.
You will also not see nginx-deployment in the host cluster.

Pods exist in the Namespace to which the virtual cluster belongs. vcluster has a syncer controller that is responsible for synchronizing the resources in the virtual cluster to the underlying host cluster and rewriting the names of the resources with certain rules, e.g., Pods in the virtual cluster end up in the host cluster according to <pod-name>-x-<namespace>-x-<vcluster-name>. The actual scheduling of Pods relies on the scheduler on the host cluster by default.

2.5. Clean up a virtual cluster
Virtual clusters can be deleted using the vcluster delete command.
|
|
3. Exposing vcluster
By default, vcluster can only be accessed through port forwarding in a remote cluster. To access the virtual cluster directly you can choose to expose the virtual cluster outside the cluster by using a LoadBalancer or NodePort type service.
The easiest way to do this is to specify the --expose parameter when creating the virtual cluster, and vcluster will create a LoadBalancer-type Service to expose the virtual cluster (provided the public cloud-hosted Kubernetes cluster supports LoadBalancer). After the virtual cluster is created, vcluster will automatically switch to the kubeconfig context of the virtual cluster for us, and the virtual cluster can be accessed directly through the kubectl command line.
|
|
You can also manually create a Service to expose a vcluster, see Exposing vcluster (ingress etc.) for more ways to do this.
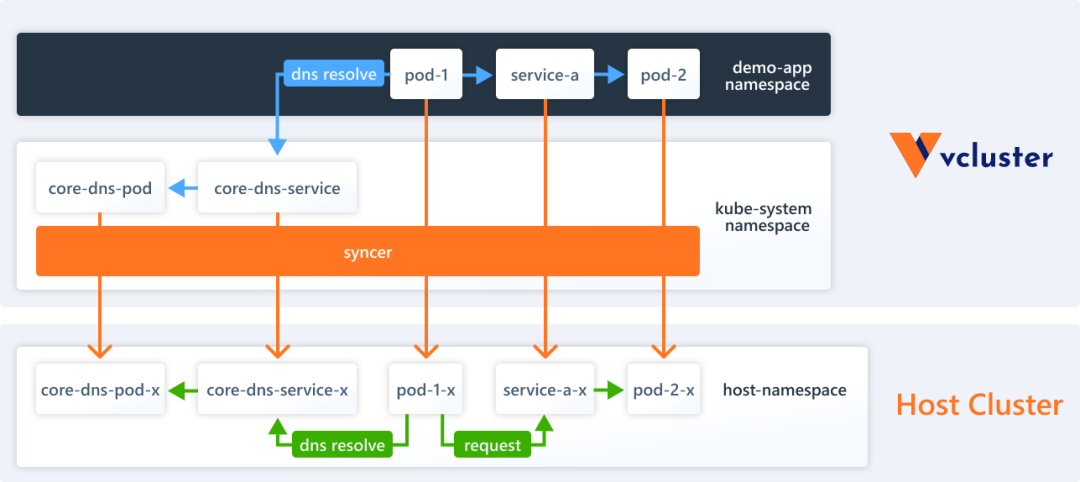
4. Networking & DNS Resolution
Each virtual cluster has its own separate DNS server (CoreDNS) that provides DNS resolution for the Services in the virtual cluster. vcluster syncer ensures that the names of the synchronized Services in the virtual cluster satisfy the intuitive logic of the regular Kubernetes cluster DNS names. These Services actually map to the rewritten Services in the underlying host cluster.
Pods in a virtual cluster access services in this virtual cluster just like in a regular Kubernetes cluster, no difference. However, if you want to communicate between the virtual cluster and the host cluster, then you may need to do some setup.
Create a virtual cluster for testing (executed in the host cluster context).
|
|
4.1. Communication between virtual and host clusters via IP address
Pods created in a virtual cluster are synced to the host cluster by the vcluster syncer, so the Pod is actually running in the underlying host cluster. This means that these Pods have regular cluster internal IP addresses and can communicate with each other via IP addresses.
Create a Pod in the virtual cluster (executed in the virtual cluster context). The context can be switched with the kubectl config use-context <context-name> command, and the context can be obtained with the kubectl config get-context command.
|
|
Create a Pod in the host cluster (executed in the host cluster context).
|
|
View the IP addresses of the Pods created in the virtual and host clusters. (Performed in the host cluster context)

Ping test between two Pods and the network can communicate with each other (executed in the host cluster context).

Pods As you can see, Pod and Service resources between the virtual cluster and the host cluster can access each other directly via IP addresses by default.
4.2. Communication between virtual cluster and host cluster via domain name
Pods in the virtual cluster cannot access the Service in the host cluster directly by Service name, because the Service in the host cluster is not visible in the virtual cluster; similarly Pods in the host cluster cannot access the Service in the virtual cluster by Service name (the Service in the virtual cluster is visible in the host cluster after the syncer rewritten Service).
vcluster provides the ability to map Services from a virtual cluster to a host cluster and vice versa.
The Deployment of the virtual and host clusters are exposed separately through the Service.
4.2.1. Mapping the Host Cluster Service to a Virtual Cluster
Create a configuration file host-to-vcluster.yaml that declares that the nettool-host Service in the default Namespace of the host cluster is mapped to the nettool-host Service in the default Namespace of the virtual cluster.
Execute the following command to update the virtual cluster configuration (executed in the host cluster context).
|
|

Use the Pod of the virtual cluster to access the nettool-host Service of the host cluster.
|
|
4.2.2. Mapping a Virtual Cluster Service to a Host Cluster
Create a configuration file vcluster-to-host.yaml. Declare that the nettool-virtual Service in the default Namespace of the virtual cluster is mapped to the nettool-virtual Service in the vcluster-net-vcluster Namespace (the Namespace where the virtual cluster is located) of the host cluster.
Execute the following command to update the virtual cluster configuration (executed in the host cluster context).
|
|
Use the Pod of the host cluster to access the nettool-virtual Service of the virtual cluster.
|
|
After the experiment, execute the following command to clean up the virtual cluster (executed in the host cluster context).
|
|
5. Suspend & Resume Virtual Clusters
When a virtual cluster is temporarily unused, we can choose to suspend the virtual cluster, which will reduce the number of copies in the control plane of that virtual cluster to 0 and remove all workloads running on that virtual cluster; when it is needed, it can be resumed, which is useful for saving compute resources used by the workloads of the virtual cluster.
Create a virtual cluster for testing (executed in the host cluster context).
|
|
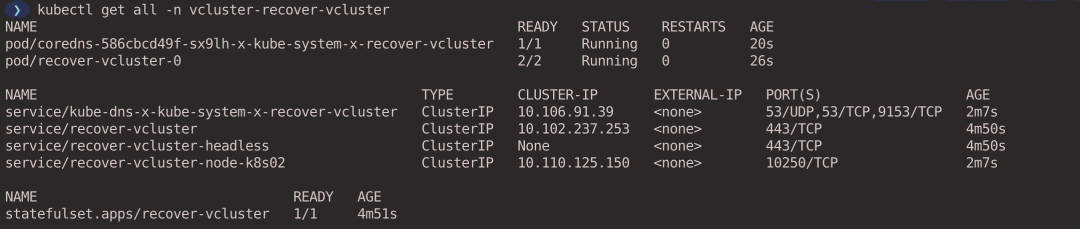
View the workloads currently running in the virtual cluster (executed in the host cluster context).
|
|
- coredns Pod is synchronized from the virtual cluster to the host cluster via syncer.
- recover-vcluster is deployed as a StatefulSet to manage the virtual cluster.
5.1. Suspend the virtual cluster
Execute the following command to suspend the virtual cluster. It will reduce the number of copies of the vcluster’s StatefulSet to 0 and delete all workloads created by the vcluster (in this example, the coredns Pod). (executed in the host cluster context)
|
|

5.2. Recovering a Virtual Cluster
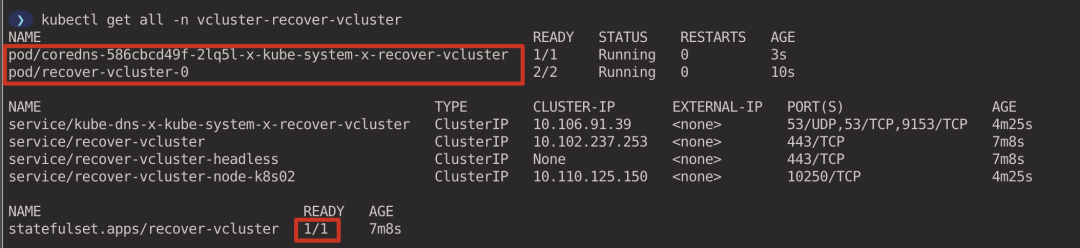
Execute the following command to restore the virtual cluster. The number of copies of the StatefulSet of the vcluster will be restored to the original number and the vcluster syncer will recreate the corresponding workloads. (executed in the host cluster context)
|
|
View the workload associated with the virtual cluster (executed in the host cluster context).
|
|
After the experiment, execute the following command to clean up the virtual cluster (executed in the host cluster context).
|
|
6. Storage
This section describes how Pods in a virtual cluster use Persistent Volume to store persistent data.
By default vcluster does not synchronize Persistent Volumes and StorageClasses to the host cluster, create a configuration file sync-storage.yaml that declares the synchronization of Persistent Volume and StorageClasses resources.
Execute the following command to create a virtual cluster based on the above configuration file (executed in the host cluster context).
|
|
6.1. Creating a StorageClass
In subsection 2.1 we deployed OpenEBS dynamically provisioned storage volumes, here we continue to leverage OpenEBS. create a StorageClass, specifying OpenEBS as the Provisioner for persistent volumes, with the storage path set to /var/my-local-hostpath.
|
|
Create StorageClass in the virtual cluster(executed in the virtual cluster context).
|
|
vcluster will create the real StorageClass in the host cluster, which will rewrite my-local-hostpath StorageClass in some format (executed in the host cluster context).
|
|

6.2. Creating a PersistentVolumeClaim
Create PersistentVolumeClaim in the virtual cluster (executed in the virtual cluster context).
|
|
Since the StorageClass we created sets the volumeBindingMode parameter to WaitForFirstConsumer, it means that the creation of PV and back-end storage will be triggered when the PVC is used by a Pod, and the binding of PVC/PV is realized at the same time. The PVC is currently in Pending state. If you want to bind the PVC to the PV immediately, you can set the volumeBindingMode parameter to Immediate in the StorageClass.

6.3. Creating a Pod Consuming PersistentVolumeClaim
|
|
Create a Pod in a virtual cluster (executed in the virtual cluster context).
|
|
You can see that the Pod currently in the virtual cluster is successfully running and the PVC is bound to the PV (executing in the virtual cluster context).

After the experiment, execute the following command to clean up the virtual cluster (executed in the host cluster context).
|
|
7. High Availability
vcluster supports high availability by creating Vanilla k8s (the regular Kubernetes distribution). vcluster does not currently support high availability for individual binary distributions (e.g. k0s and k3s).
Create a configuration file ha.yaml to set the number of copies of the relevant components.
If you are a Chinese user, since you can’t pull the images directly from gcr in China, here I pull the relevant images to my Docker Hub in advance, so you can use them directly.
|
|
Execute the following command to create a virtual cluster: (executed in the host cluster context)
--connect=false: indicates that the virtual cluster will not be connected to the virtual cluster after it is created.--distro: parameter can specify the Kubernetes distribution to be used for creating the virtual cluster, by default K3S is used as the virtual cluster, here we specify Vanilla k8s (regular Kubernetes distribution) to deploy the virtual cluster.
|
|
You can see that there are 3 components of the virtual cluster control plane (executed in the host cluster context).
|
|

After the experiment, execute the following command to clean up the virtual cluster (executed in the host cluster context).
|
|
8. Pod Scheduling
By default, vcluster will reuse the host cluster’s scheduler to schedule workloads. This saves compute resources, but there are some limitations.
- Tagging nodes within a virtual cluster has no effect on scheduling.
- Exhausted or polluted nodes within a virtual cluster have no effect on scheduling.
- Custom schedulers cannot be used in a vcluster.

In some cases, you may want to mark nodes within a virtual cluster to control workload scheduling through features such as affinity or topology distribution. vcluster supports running separate schedulers within a virtual cluster, rather than reusing the scheduler of the host cluster.
Create the configuration file schedule.yaml, enable the scheduler in the virtual cluster and set the node synchronization mode to Real Nodes All mode (or Real Nodes Label Selector mode). vcluster’s nodes have the following modes.
- Fake Nodes (default): The node information created in the virtual cluster is not the same as the real host cluster (fake nodes) and the node is deleted if no Pod in the virtual cluster schedules to it.
- Real Nodes: The information of the node created in the virtual cluster is the same as the real host cluster, and the node will be deleted if no Pod is scheduled to it in the virtual cluster. This mode requires setting
.sync.nodes.enabled: true. - Real Nodes All: Nodes created in the virtual cluster have the same information as the real host cluster and always synchronize all nodes in the host cluster to the virtual cluster, regardless of whether a Pod is scheduled to the node in the virtual cluster. Using this mode requires setting
.sync.nodes.enabled: trueand.sync.nodes.syncAllNodes: true. - Real Nodes Label Selector: Synchronizes only the specified nodes to the virtual cluster via the label selector. This mode requires setting
.sync.nodes.enabled: trueand.sync.nodes.nodeSelector: "label1=value1".
Execute the following command to create a virtual cluster (executed in the host cluster context).
|
|
Viewing the nodes of the virtual cluster, you can see that the node information is the same as the host cluster, and that the node currently in use is the AWS EKS node (executing in the virtual cluster context).
Tag the node ip-192-168-44-166.ec2.internal with disktype=ssd (executed in the virtual cluster context).
|
|
Create the Deployment, select the node based on the label with the nodeSelector parameter, and assign all 6 Pods to node ip-192-168-44-166.ec2.internal.
|
|
Execute the following command to create Deployment (executed in the virtual cluster context).
|
|
Looking at the distribution of Pods, you can see that all Pods are dispatched to node ip-192-168-44-166.ec2.internal (executed in the virtual cluster context).
|
|

After the experiment, execute the following command to clean up the virtual cluster (executed in the host cluster context).
|
|
9. Isolation Mode
By default, vcluster does not isolate the network and workload in a virtual cluster. Pods created in a virtual cluster cannot access the host cluster via DNS names, but can still access the host cluster directly via IP addresses (see subsection 4.1); and workloads in a virtual cluster are not limited in the resources they can use.
We can create a virtual cluster in isolated mode by specifying the --isolate parameter when creating the virtual cluster, which adds some restrictions to the network and workload of the virtual cluster.
- Enforce Pod security standards in the vcluster syncer, such as limiting the creation of privileged containers or Pods with mounted host paths.
- Set ResourceQuota and LimitRange for the virtual cluster to restrict resource usage.
- Set NetworkPolicy for the virtual cluster to restrict external access to workloads in the virtual cluster.
|
|
9.1. Network Isolation
Next, verify the network isolation. Create a Pod in the virtual cluster (executed in the virtual cluster context).
|
|
Create a Pod in the host cluster (executed in the host cluster context).
|
|
View the IP addresses of Pods created in the virtual cluster and the host cluster (performed in the host cluster context).

Ping test between two Pods, you can see that the virtual cluster cannot access the host cluster through IP address, but the host cluster can access the virtual cluster(executed in the host cluster context).

Let’s look at the NetworkPolicy created in the host cluster (there is no NetworkPolicy in the virtual cluster) (executed in the host cluster context).
|
|

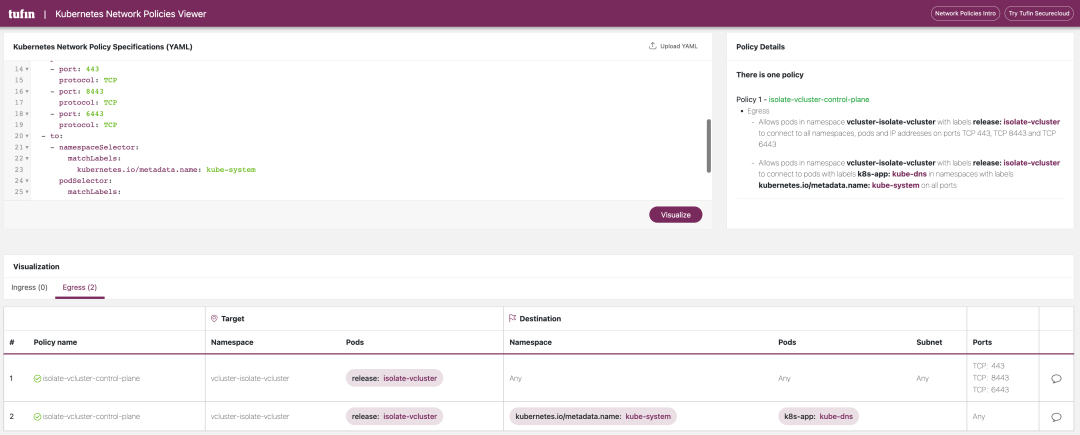
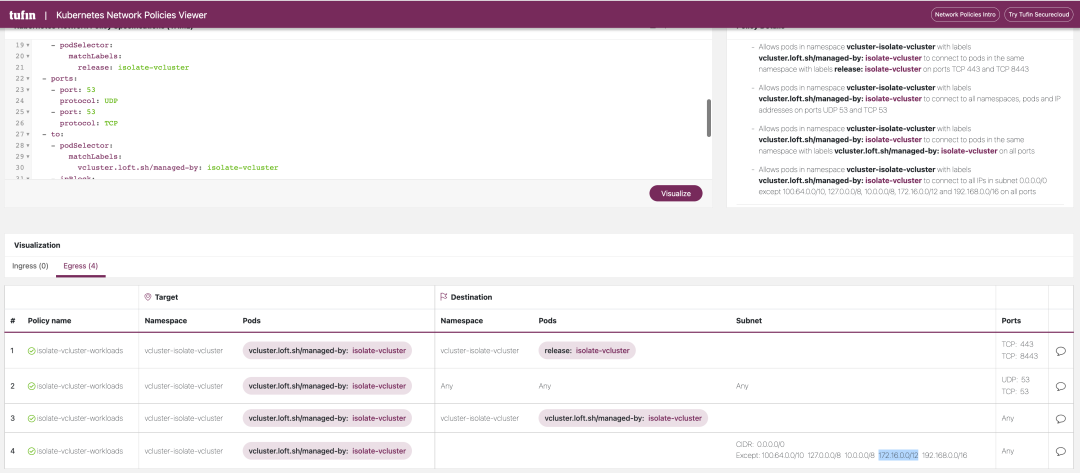
The YAML files for these two NetworkPolicy policies are shown below, and you can see that the NetworkPolicy restricts the traffic in the Egress direction of the virtual cluster, ensuring that workloads in the virtual cluster cannot actively access the host cluster or other virtual clusters.
|
|
For a more visual view of Networkpolicy, we can use this website: https://orca.tufin.io/netpol/ and paste the above two Networkpolicy to view it.
9.2. Resource Limits
vcluster also creates ResourceQuota and LimitRange in the Namespace where the virtual cluster is located to limit the use of resources.
-
Where ResourceQuota is used to control the maximum amount of resources consumed by the host cluster for the entire virtual cluster. The default ResourceQuota created is shown below, which limits the virtual cluster to create up to 100 Configmaps, 40 Endpoints, 40 Gi of memory, 10 core CPUs, etc…
1 2 3 4 5 6 7 8 9 10 11 12 13 14 15 16 17 18 19 20 21 22 23 24 25 26 27apiVersion: v1 kind: ResourceQuota metadata: annotations: meta.helm.sh/release-name: isolate-vcluster meta.helm.sh/release-namespace: vcluster-isolate-vcluster labels: app.kubernetes.io/managed-by: Helm name: isolate-vcluster-quota namespace: vcluster-isolate-vcluster spec: hard: count/configmaps: "100" count/endpoints: "40" count/persistentvolumeclaims: "20" count/pods: "20" count/secrets: "100" count/services: "20" limits.cpu: "20" limits.ephemeral-storage: 160Gi limits.memory: 40Gi requests.cpu: "10" requests.ephemeral-storage: 60Gi requests.memory: 20Gi requests.storage: 100Gi services.loadbalancers: "1" services.nodeports: "0" -
LimitRange is used to control the maximum amount of resources requested by each Pod (the LimitRange setting is applied when a Pod is created without specifying the
resources.requestsandresources.limitsparameters). The default LimitRange is created as shown below.1 2 3 4 5 6 7 8 9 10 11 12 13 14 15 16 17 18 19 20 21apiVersion: v1 kind: LimitRange metadata: annotations: meta.helm.sh/release-name: isolate-vcluster meta.helm.sh/release-namespace: vcluster-isolate-vcluster labels: app.kubernetes.io/managed-by: Helm name: isolate-vcluster-limit-range namespace: vcluster-isolate-vcluster spec: limits: - default: cpu: "1" ephemeral-storage: 8Gi memory: 512Mi defaultRequest: cpu: 100m ephemeral-storage: 3Gi memory: 128Mi type: Container
After the experiment, execute the following command to clean up the virtual cluster (executed in the host cluster context).
|
|