This article focuses on how to enable eBPF on a calico cluster to accelerate network data forwarding, and will also provide an introduction to eBPF and some of its advantageous features in calico.

1. eBPF

1.1 About eBPF

eBPF is a revolutionary technology, originating from the Linux kernel, that allows running sandboxed programs in the operating system kernel. It is used to safely and efficiently extend the functionality of the kernel without changing the kernel source code or loading kernel modules.

eBPF

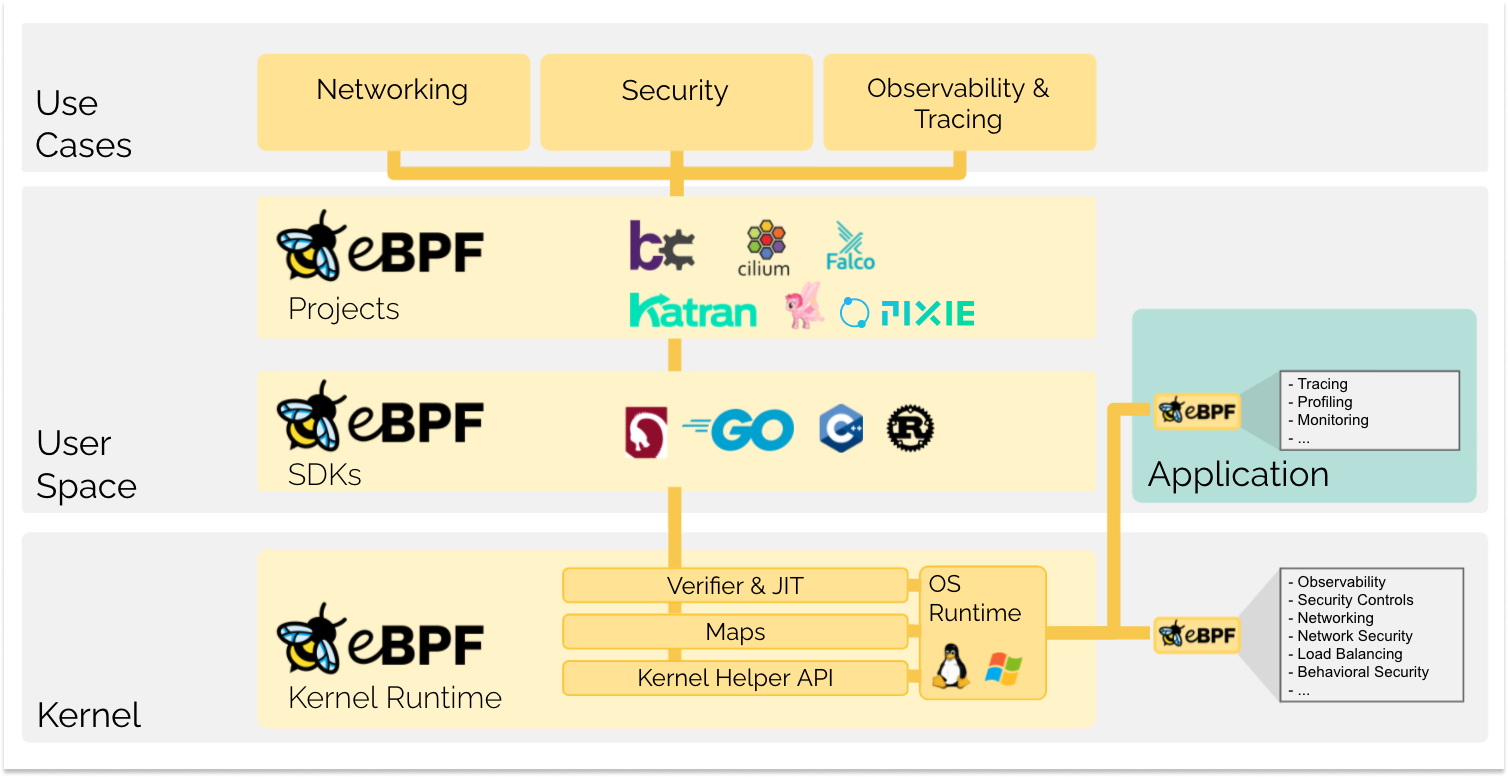
It allows applets to be loaded into the kernel and attached to hooks that are triggered when certain events occur. This even allows a lot of customization of the kernel’s behavior. Although the eBPF virtual machine is the same for each type of hook, the functionality of the hooks varies greatly. Because it can be dangerous to load programs into the kernel, the kernel runs all programs through a very strict static verifier; the static verifier sandboxes the program to ensure that it can only access the allowed parts of memory and that it must terminate quickly.

eBPF is a Linux kernel feature that allows fast yet safe mini-programs to be loaded into the kernel in order to customise its operation.

1.2 Advantages of eBPF

Several advantages of ebpf.

  • Higher throughput IO
  • Lower CPU resource usage
  • Native support for K8S services without kube-proxy
    • Lower first packet latency
    • Preserves external client source IP for external requests
    • DSR (Direct Server Return) support
    • Less resource consumption than kube-proxy for ebpf data plane synchronization forwarding rules

More information can be found in this official calico introductory article.

2. calico configuration eBPF

2.1 Upgrade kernel

We use centos7 system, according to the documentation more suitable kernel version need to be greater than 5.8, so we directly use elrepo source to upgrade the latest 6.1.4 version of the kernel.

 1
 2
 3
 4
 5
 6
 7
 8
 9
10
11
12
13
14
15
16
17
18
19
20
21
22
23
24
25
26
27
28
29
30
31
32
33
34
35
36
37
38
39
# Check the supported kernel versions in the elrepo repository.
[root@k8s-calico-master-10-31-90-1 ~]# yum --disablerepo="*" --enablerepo="elrepo-kernel" list available
Loaded plugins: fastestmirror
Loading mirror speeds from cached hostfile
elrepo-kernel                                                                                                                                      | 3.0 kB  00:00:00
elrepo-kernel/x86_64/primary_db                                                                                                                    | 2.1 MB  00:00:00
Available Packages
elrepo-release.noarch                                                                7.0-6.el7.elrepo                                                        elrepo-kernel
kernel-lt.x86_64                                                                     5.4.228-1.el7.elrepo                                                    elrepo-kernel
kernel-lt-devel.x86_64                                                               5.4.228-1.el7.elrepo                                                    elrepo-kernel
kernel-lt-doc.noarch                                                                 5.4.228-1.el7.elrepo                                                    elrepo-kernel
kernel-lt-headers.x86_64                                                             5.4.228-1.el7.elrepo                                                    elrepo-kernel
kernel-lt-tools.x86_64                                                               5.4.228-1.el7.elrepo                                                    elrepo-kernel
kernel-lt-tools-libs.x86_64                                                          5.4.228-1.el7.elrepo                                                    elrepo-kernel
kernel-lt-tools-libs-devel.x86_64                                                    5.4.228-1.el7.elrepo                                                    elrepo-kernel
kernel-ml.x86_64                                                                     6.1.4-1.el7.elrepo                                                      elrepo-kernel
kernel-ml-devel.x86_64                                                               6.1.4-1.el7.elrepo                                                      elrepo-kernel
kernel-ml-doc.noarch                                                                 6.1.4-1.el7.elrepo                                                      elrepo-kernel
kernel-ml-headers.x86_64                                                             6.1.4-1.el7.elrepo                                                      elrepo-kernel
kernel-ml-tools.x86_64                                                               6.1.4-1.el7.elrepo                                                      elrepo-kernel
kernel-ml-tools-libs.x86_64                                                          6.1.4-1.el7.elrepo                                                      elrepo-kernel
kernel-ml-tools-libs-devel.x86_64                                                    6.1.4-1.el7.elrepo                                                      elrepo-kernel
perf.x86_64                                                                          5.4.228-1.el7.elrepo                                                    elrepo-kernel
python-perf.x86_64                                                                   5.4.228-1.el7.elrepo                                                    elrepo-kernel


# It looks like the ml version of the kernel is more suitable for our needs, so we can install it directly using yum.
sudo yum --enablerepo=elrepo-kernel install kernel-ml -y
# Use the grubby tool to view information about the installed kernel versions on your system.
sudo grubby --info=ALL
# Set the newly installed kernel version 6.1.4 as the default kernel version, where index=0 should be the same as the kernel version information viewed above.
sudo grubby --set-default-index=0
# Check if the default kernel is modified successfully.
sudo grubby --default-kernel
# Reboot the system to switch to the new kernel.
init 6
# Check that the kernel version is the new 6.1.4 after rebooting.
uname -a

After confirming that the system kernel upgrade was successful we move on to the next step.

 1
 2
 3
 4
 5
 6
 7
 8
 9
10
11
12
13
$ ansible calico -m shell -a "uname -rv"
10.31.90.4 | CHANGED | rc=0 >>
6.1.4-1.el7.elrepo.x86_64 #1 SMP PREEMPT_DYNAMIC Wed Jan  4 18:17:10 EST 2023
10.31.90.5 | CHANGED | rc=0 >>
6.1.4-1.el7.elrepo.x86_64 #1 SMP PREEMPT_DYNAMIC Wed Jan  4 18:17:10 EST 2023
10.31.90.3 | CHANGED | rc=0 >>
6.1.4-1.el7.elrepo.x86_64 #1 SMP PREEMPT_DYNAMIC Wed Jan  4 18:17:10 EST 2023
10.31.90.2 | CHANGED | rc=0 >>
6.1.4-1.el7.elrepo.x86_64 #1 SMP PREEMPT_DYNAMIC Wed Jan  4 18:17:10 EST 2023
10.31.90.1 | CHANGED | rc=0 >>
6.1.4-1.el7.elrepo.x86_64 #1 SMP PREEMPT_DYNAMIC Wed Jan  4 18:17:10 EST 2023
10.31.90.6 | CHANGED | rc=0 >>
6.1.4-1.el7.elrepo.x86_64 #1 SMP PREEMPT_DYNAMIC Wed Jan  4 18:17:10 EST 2023

2.2 Configuring the API Server

By default, calico communicates with the apiserver in the cluster via kube-proxy. When we enable ebpf, we tend to turn off the kube-proxy function of the cluster. At this point, in order to ensure that calico can communicate with the apiserver, we need to manually configure a stable and available address first. Generally speaking, it is sufficient to use the VIP and port that we configured when we initialized the cluster.

 1
 2
 3
 4
 5
 6
 7
 8
 9
10
11
12
$ cat kubernetes-services-endpoint.yaml
kind: ConfigMap
apiVersion: v1
metadata:
  name: kubernetes-services-endpoint
  namespace: tigera-operator
data:
  KUBERNETES_SERVICE_HOST: "k8s-calico-apiserver.tinychen.io"
  KUBERNETES_SERVICE_PORT: "8443"

$ kubectl create -f kubernetes-services-endpoint.yaml
configmap/kubernetes-services-endpoint created

After updating the configuration, check whether the pod restarted successfully and whether the cluster is normal.

1
2
$ watch kubectl get pods -n calico-system
$ calicoctl node status

2.3 Configuring kube-proxy

Since ebpf will conflict with kube-proxy, it is better to disable kube-proxy. There are two ways to disable kube-proxy, one is to remove it directly from daemonset and the other is to set a specific node to not run kube-proxy by using nodeSelector. The official documentation shows that there are advantages to both approaches. If you are using ebpf directly when initializing the k8s cluster, you can consider disabling kube-proxy in the initialization parameters, but here we already have kube-proxy installed, so it is more elegant to use nodeSelector to control it.

1
$ kubectl patch ds -n kube-system kube-proxy -p '{"spec":{"template":{"spec":{"nodeSelector":{"non-calico": "true"}}}}}'

At this point we look at the kube-proxy status of the cluster and see that DESIRED and CURRENT are both 0.

1
2
3
$ kubectl get ds -n kube-system kube-proxy
NAME         DESIRED   CURRENT   READY   UP-TO-DATE   AVAILABLE   NODE SELECTOR                            AGE
kube-proxy   0         0         0       0            0           kubernetes.io/os=linux,non-calico=true   4d9h

2.4 Configuring eBPF

To enable eBPF you only need to modify the linuxDataplane parameter. Note that eBPF mode does not support configuring hostPorts, so you need to set it to empty at the same time.

1
2
$ kubectl patch installation.operator.tigera.io default --type merge -p '{"spec":{"calicoNetwork":{"linuxDataplane":"BPF", "hostPorts":null}}}'
installation.operator.tigera.io/default patched

Wait for the calico rolling reboot to complete, that is, successfully enable eBPF. note that in the process of rolling reboot, there will be some nodes using eBPF and some nodes using iptables.

2.5 Configuring DSR

eBPF also has a nice feature called DSR (Direct Server Return), which means that after receiving an external request, the pod itself will directly return the packet to the client, instead of returning the packet via the original path, which can effectively shorten the return path and thus improve performance.

Direct Server Return

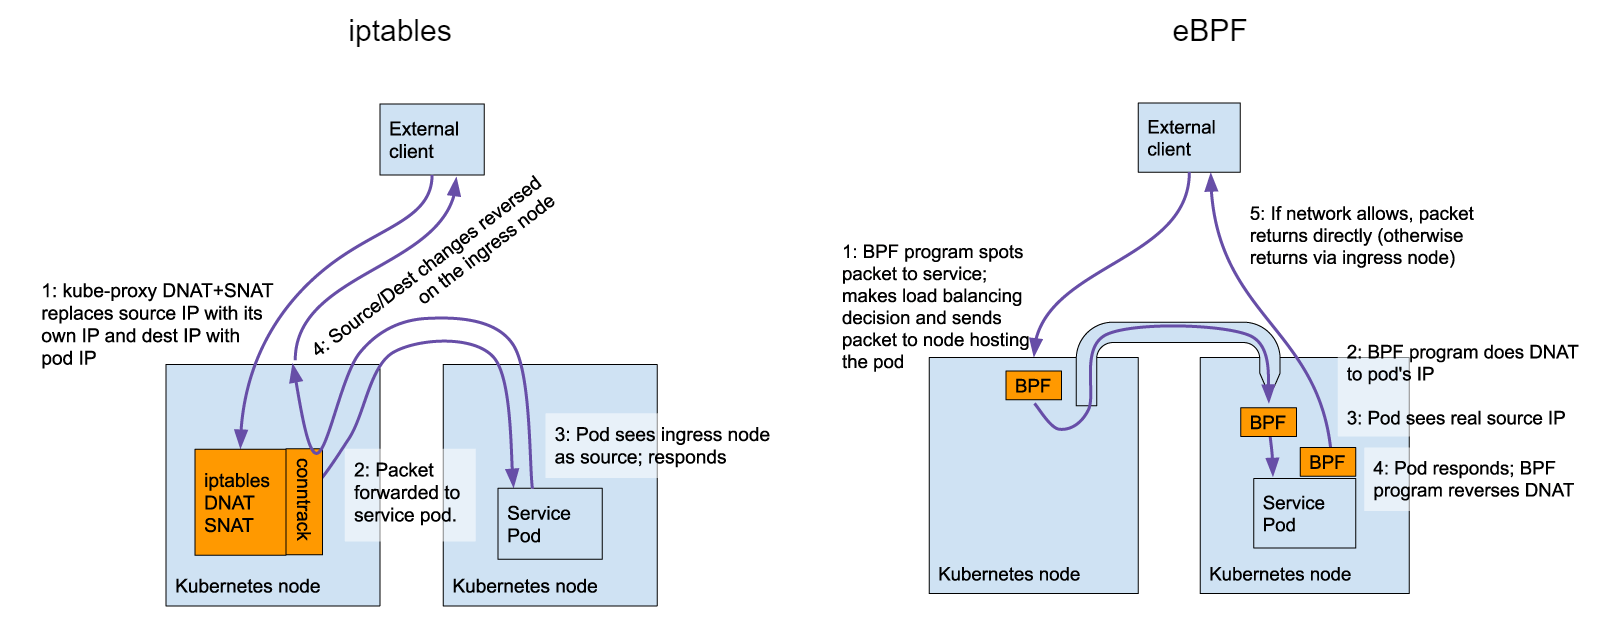
DSR mode works very similar to LVS DR mode, but generally speaking, DSR requires the network itself to be properly connected between pod and client, so the feature is not enabled by default.

We can use calicoctl to modify the bpfExternalServiceMode parameter in felixconfiguration and change it from the default Tunnel to DSR to enable it.

1
2
3
# Enable DSR mode
$ calicoctl patch felixconfiguration default --patch='{"spec": {"bpfExternalServiceMode": "DSR"}}'
Successfully patched 1 'FelixConfiguration' resource

If you need to turn off DSR mode just modify it back.

1
2
# Disable DSR mode
$ calicoctl patch felixconfiguration default --patch='{"spec": {"bpfExternalServiceMode": "Tunnel"}}'

3. Checking eBPF

3.1 calico-bpf

Officially, calico-bpf is built into calico-node to help us troubleshoot and locate some problems in eBPF mode, and we can also use it to check if the cluster’s eBPF is working properly.

The corresponding ds/calico-node can also be replaced with the pod name of the calico-node on top of a particular node.

1
2
3
4
5
6
7
8
# View instructions for using the calico-bpf tool
$ kubectl exec -n calico-system ds/calico-node -- calico-node -bpf
# View eth0 NIC counter
$ kubectl exec -n calico-system ds/calico-node -- calico-node -bpf counters dump --iface=eth0
# View conntrack status
$ kubectl exec -n calico-system ds/calico-node -- calico-node -bpf conntrack dump
# View routing table
$ kubectl exec -n calico-system ds/calico-node -- calico-node -bpf routes dump

3.2 Accessing the service

We test on a machine outside the cluster, accessing podIP , clusterIP and loadbalancerIP respectively to see if the client IP address 10.31.100.100 is returned correctly.

1
2
3
4
5
6
7
8
root@tiny-unraid:~# curl 10.33.26.2
10.31.100.100:43240

root@tiny-unraid:~# curl 10.33.151.137
10.31.100.100:52758

root@tiny-unraid:~# curl 10.33.192.0
10.31.100.100:7319

With eBPF configured, accessing both clusterIP and loadbalancerIP from outside the cluster is able to return the client’s IP address properly.

4. Disable eBPF

Disabling eBPF is also very simple, just reverse the above process, here directly disable calico’s eBPF function (DSR only takes effect under eBPF), and then enable k8s cluster kube-proxy can be.

1
2
3
4
# Set linuxDataplane to iptables mode
$ kubectl patch installation.operator.tigera.io default --type merge -p '{"spec":{"calicoNetwork":{"linuxDataplane":"Iptables"}}}'
# Disable nodeSelector, enable kube-proxy for k8s cluster
$ kubectl patch ds -n kube-system kube-proxy --type merge -p '{"spec":{"template":{"spec":{"nodeSelector":{"non-calico": null}}}}}'

Once the configuration is complete, wait for the calico reboot of all nodes to finish and for the kube-proxy to start.