Introduction
Sometimes in business, it is necessary to use some unique ID to record the identification of one of our data. The most common ones are none other than the following: UUID, database self-incrementing primary key, Redis’ Incr command, and other methods to get a unique value. Below we talk about the advantages and disadvantages of each of them in order to introduce our distributed snowflake algorithm.
UUID
First is the UUID , which is composed of 128-bit binary, typically converted to hexadecimal, and then represented as a String. To ensure the uniqueness of the UUID, the specification defines elements including NIC MAC address, timestamp, namespace, random or pseudo-random numbers, and timing, and an algorithm to generate the UUID from these elements.
There are five versions of UUIDs.
- Version 1: Timestamp and mac address based
- Version 2: Based on timestamp, mac address and
POSIX UID/GID. - Version 3: Based on MD5 hash algorithm
- Version 4: Based on random numbers
- Version 5: Based on SHA-1 hash algorithm
Pros and Cons of UUID:
The advantages are simple code and better performance. The disadvantage is that it is not sorted and cannot be guaranteed to increment in order; secondly, it is too long and takes up more space in the storage database, which is not conducive to retrieval and sorting.
database auto-increment primary key
If you use mysql database, then by setting the primary key to auto_increment is the easiest way to achieve monotonically incremented unique ID, and it is also convenient for sorting and indexing.
But the disadvantage is also obvious, because of excessive reliance on the database, then limited by the performance of the database will lead to concurrency is not high; and then if the amount of data is too large, then it will bring problems to the sub-base and table; and if the database is down, then this function is not available.
Redis
Redis is now an indispensable part of many projects. In Redis, there are two commands, Incr and IncrBy, which are single-threaded and can be used to ensure atomicity and achieve the goal of generating unique values with good performance.
However, in Redis, even with AOF and RDB, there is still data loss, which may result in duplicate IDs; furthermore, there is a dependency on Redis, which can affect ID generation if it is unstable.
Snowflake
The above analysis one by one finally leads to our distributed snowflake algorithm Snowflake , which was first used internally by twitter as a unique ID generation algorithm in a distributed environment. It was open sourced in 2014. The open source version is written by scala, you can find this version again at the address.
https://github.com/twitter-archive/snowflake/tags
It has the following features.
- can meet the high concurrency distributed system environment ID non-duplication.
- based on timestamps, it can guarantee the basic orderly increment.
- does not rely on third-party libraries or middleware.
Implementation Principle
Snowflake structure is a 64bit data of type int64. It is as follows.
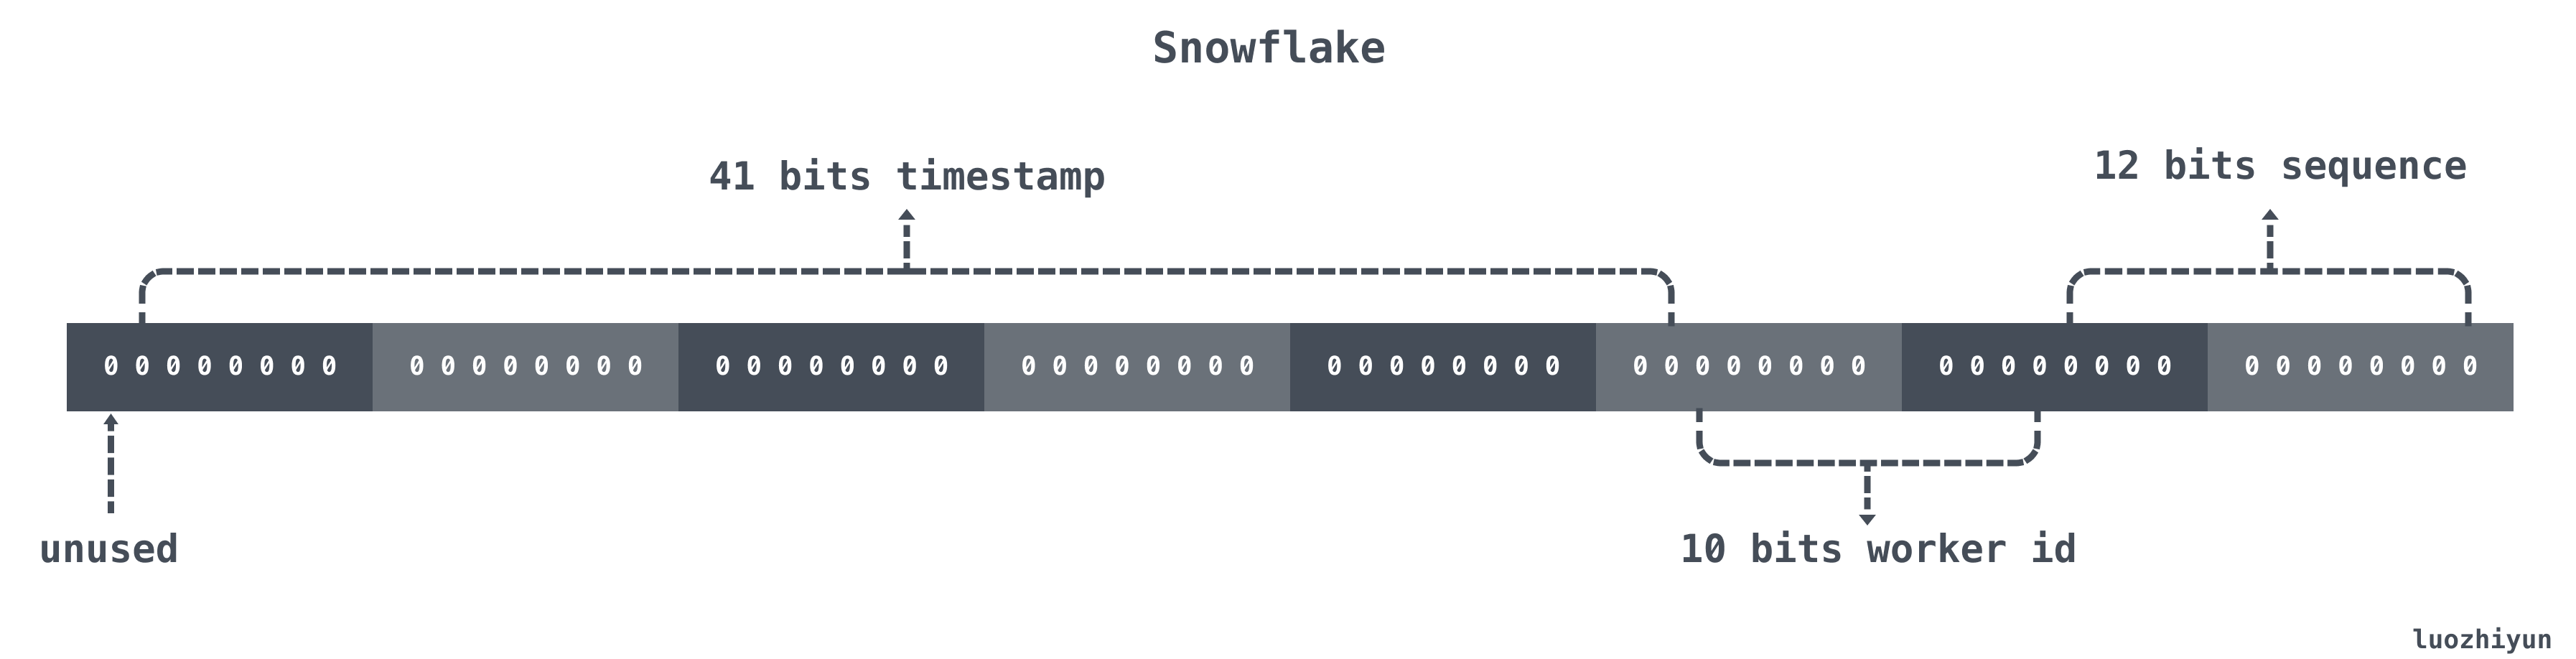
| position | size | role | |
|---|---|---|---|
| 0~11bit | 12bits | Sequence number, used to generate different IDs within the same millisecond, can record 4095 | |
| 12~21bit | 10bits | 10bit is used to record machine IDs, a total of 1024 machines can be recorded | |
| 22~62bit | 41bits | is used to record the time stamp, here can record 69 years | |
| 63bit | 1bit | symbol bits, no processing |
The above is just a general standard to classify 64bit, and the general situation can be adjusted according to your business situation. For example, the current business only has about 10 machines and is expected to increase to triple digits in the future, and requires multi-room deployment, and the QPS will grow to a million within a few years.
Then for the million QPS divided equally among 10 machines, each machine can take 100,000 requests, and the 12-bit serial number is fully sufficient. For the future will increase to three digit machines, and the need for multi-room deployment needs we only need to split the 10 bits of work id, split 3 bits to represent the number of rooms to represent a total of 8 rooms can be deployed, the other 7bits represent the number of machines to represent each room can be deployed 128 machines. Then the data format will be as follows.

Code implementation
Implementation steps
In fact, after reading the above data structure, you need to implement a snowflake algorithm by yourself is very simple, the steps are roughly as follows.
- obtain the current millisecond timestamp.
- compare the current millisecond timestamp with the last saved timestamp.
- if it is equal to the last saved timestamp, then add one to the sequence number sequence.
- if they are not equal, then set the sequence to 0 directly.
- then the or operation is used to stitch the int64 return value that the snowflake algorithm needs to return.
code implementation
First we need to define a Snowflake structure.
Then we need to define some constants to facilitate bitwise fetching when we use the snowflake algorithm.
|
|
It is important to note that since -1 is represented in binary as
11111111 11111111 11111111 11111111 11111111 11111111 11111111 11111111 11111111
So to get the maximum value of the timestamp of 41bits you can shift -1 to the left by 41 bits to get
11111111 11111111 11111111 11111110 00000000 00000000 00000000 00000000 00000000
Then we can do the ^ iso-or operation with -1
00000000 00000000 00000001 11111111 11111111 11111111 11111111 11111111
This will represent the 41bits timestamp maximum value. The same is true for datacenteridMax and workeridMax.
Then we can set a NextVal function to get the ID returned by Snowflake.
|
|
The above code is also very simple, look at the comments should also be able to understand, I will say here what the last returned r series of bit operation means.
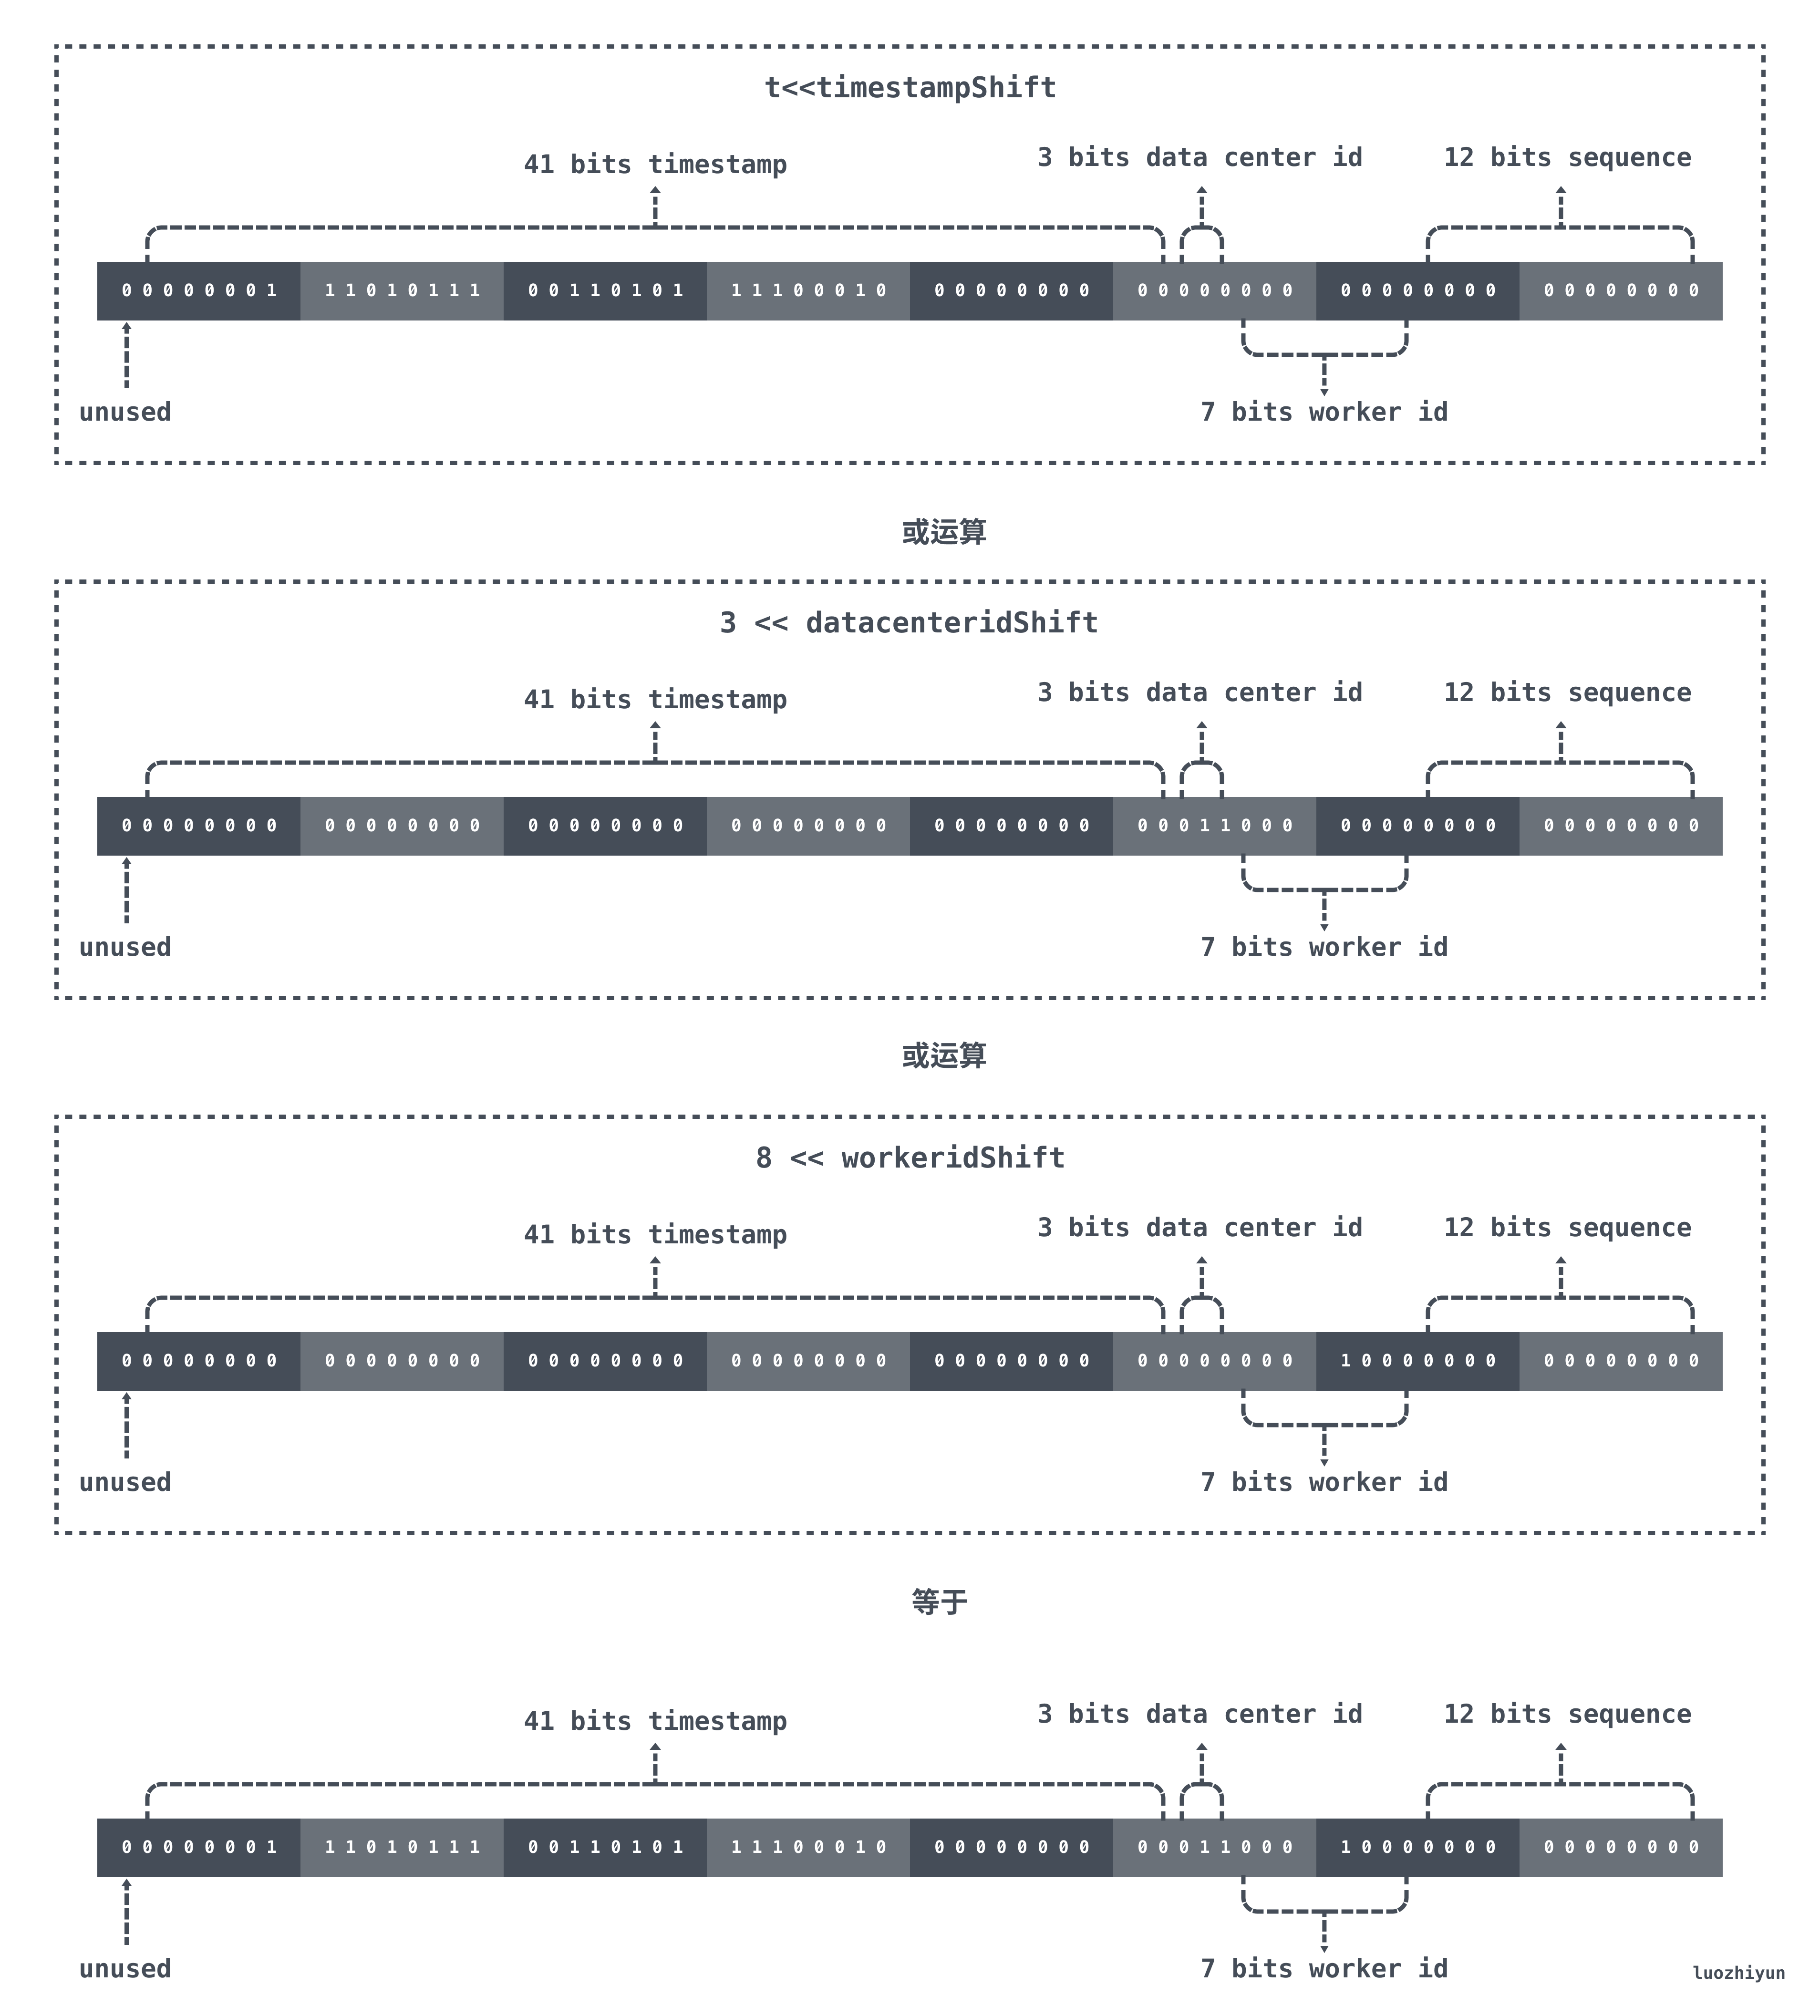
First of all, t is the time difference from the epoch. Our epoch is set to 2020-01-01 00:00:00 at the time of initialization, so for the 41bit timestamp, it will overflow only after 69 years. After shifting to the left for t, all 0’s below the timestampShift position are taken or filled by datacenterid, workerid, and sequence.
In the current example, if the current time is 2021/01/01 00:00:00, then the result of the bitwise operation is as follows.