I was looking at some excellent open source libraries when I saw an interesting cache library fastcache, in its introduction mainly has the following characteristics:

  1. read and write data to be fast, even under concurrency.
  2. maintain good performance even in a cache of several gigabytes, as well as minimize the number of GCs.
  3. the design should be as simple as possible.

This article will examine how its kernel achieves such goals by writing a simple cache library that mimics it. I hope you will find it useful.

Design Thinking

In our projects, we often use Go cache libraries like the patrickmn/go-cache library. However, many cache libraries actually use a simple Map to store data, which is fine when the concurrency is low and the amount of data is small, but when the amount of data is high and the concurrency is high, it will prolong the GC time and increase the number of memory allocations.

For example, let’s use a simple example.

1
2
3
4
5
6
7
func main() {
    a := make(map[string]string, 1e9) 
    for i := 0; i < 10; i++ {
        runtime.GC()
    } 
    runtime.KeepAlive(a)
}

In this example, a map of size 1 billion (1e9) is preallocated, and then we output the GC situation via gctrace.

The environment for the experiment is Linux, and the machine configuration is 16C 8G

1
2
3
4
5
6
7
[root@localhost gotest]# GODEBUG=gctrace=1 go run main.go 
...
gc 6 @13.736s 17%: 0.010+1815+0.004 ms clock, 0.17+0/7254/21744+0.067 ms cpu, 73984->73984->73984 MB, 147968 MB goal, 16 P (forced)
gc 7 @15.551s 18%: 0.012+1796+0.005 ms clock, 0.20+0/7184/21537+0.082 ms cpu, 73984->73984->73984 MB, 147968 MB goal, 16 P (forced)
gc 8 @17.348s 19%: 0.008+1794+0.004 ms clock, 0.14+0/7176/21512+0.070 ms cpu, 73984->73984->73984 MB, 147968 MB goal, 16 P (forced)
gc 9 @19.143s 19%: 0.010+1819+0.005 ms clock, 0.16+0/7275/21745+0.085 ms cpu, 73984->73984->73984 MB, 147968 MB goal, 16 P (forced)
gc 10 @20.963s 19%: 0.011+1844+0.004 ms clock, 0.18+0/7373/22057+0.076 ms cpu, 73984->73984->73984 MB, 147968 MB goal, 16 P (forced)

The above shows the last 5 GCs, let’s see what it means in detail.

 1
 2
 3
 4
 5
 6
 7
 8
 9
10
11
12
13
14
15
16
17
18
19
20
21
22
23
24
25
26
27
gc 1 @0.004s 4%: 0.22+1.4+0.021 ms clock, 1.7+0.009/0.40/0.073+0.16 ms cpu, 4->5->1 MB, 5 MB goal, 8 P

gc 10 @20.963s 19%: 0.011+1844+0.004 ms clock, 0.18+0/7373/22057+0.076 ms cpu, 73984->73984->73984 MB, 147968 MB goal, 16 P (forced)

gc 10 :程序启动以来第10次GC
@20.963s:距离程序启动到现在的时间
19%:当目前为止,GC 的标记工作所用的CPU时间占总CPU的百分比

垃圾回收的时间
0.011 ms:标记开始 STW 时间
1844 ms:并发标记时间
0.004 ms:标记终止 STW 时间

垃圾回收占用cpu时间
0.18 ms:标记开始 STW 时间
0 ms:mutator assists占用的时间
7373 ms:标记线程占用的时间
22057 ms:idle mark workers占用的时间
0.076 ms:标记终止 STW 时间

内存
73984 MB:标记开始前堆占用大小
73984 MB:标记结束后堆占用大小
73984 MB:标记完成后存活堆的大小
147968 MB goal:标记完成后正在使用的堆内存的目标大小

16 P:使用了多少处理器

You can see from the above output that each GC takes a very long time to process and consumes a lot of CPU resources. So what is the reason for this?

The underlying data structure of string actually consists of two parts, which include a pointer to a byte array and the size of the array.

1
2
3
4
type StringHeader struct {
    Data uintptr
    Len  int
}

Since the StringHeader contains pointers, each pointer is scanned every time it is GC’d, so there are a lot of pointers in the huge map, which causes a huge consumption of resources.

In the above example, the data in map a is stored roughly like this.

map

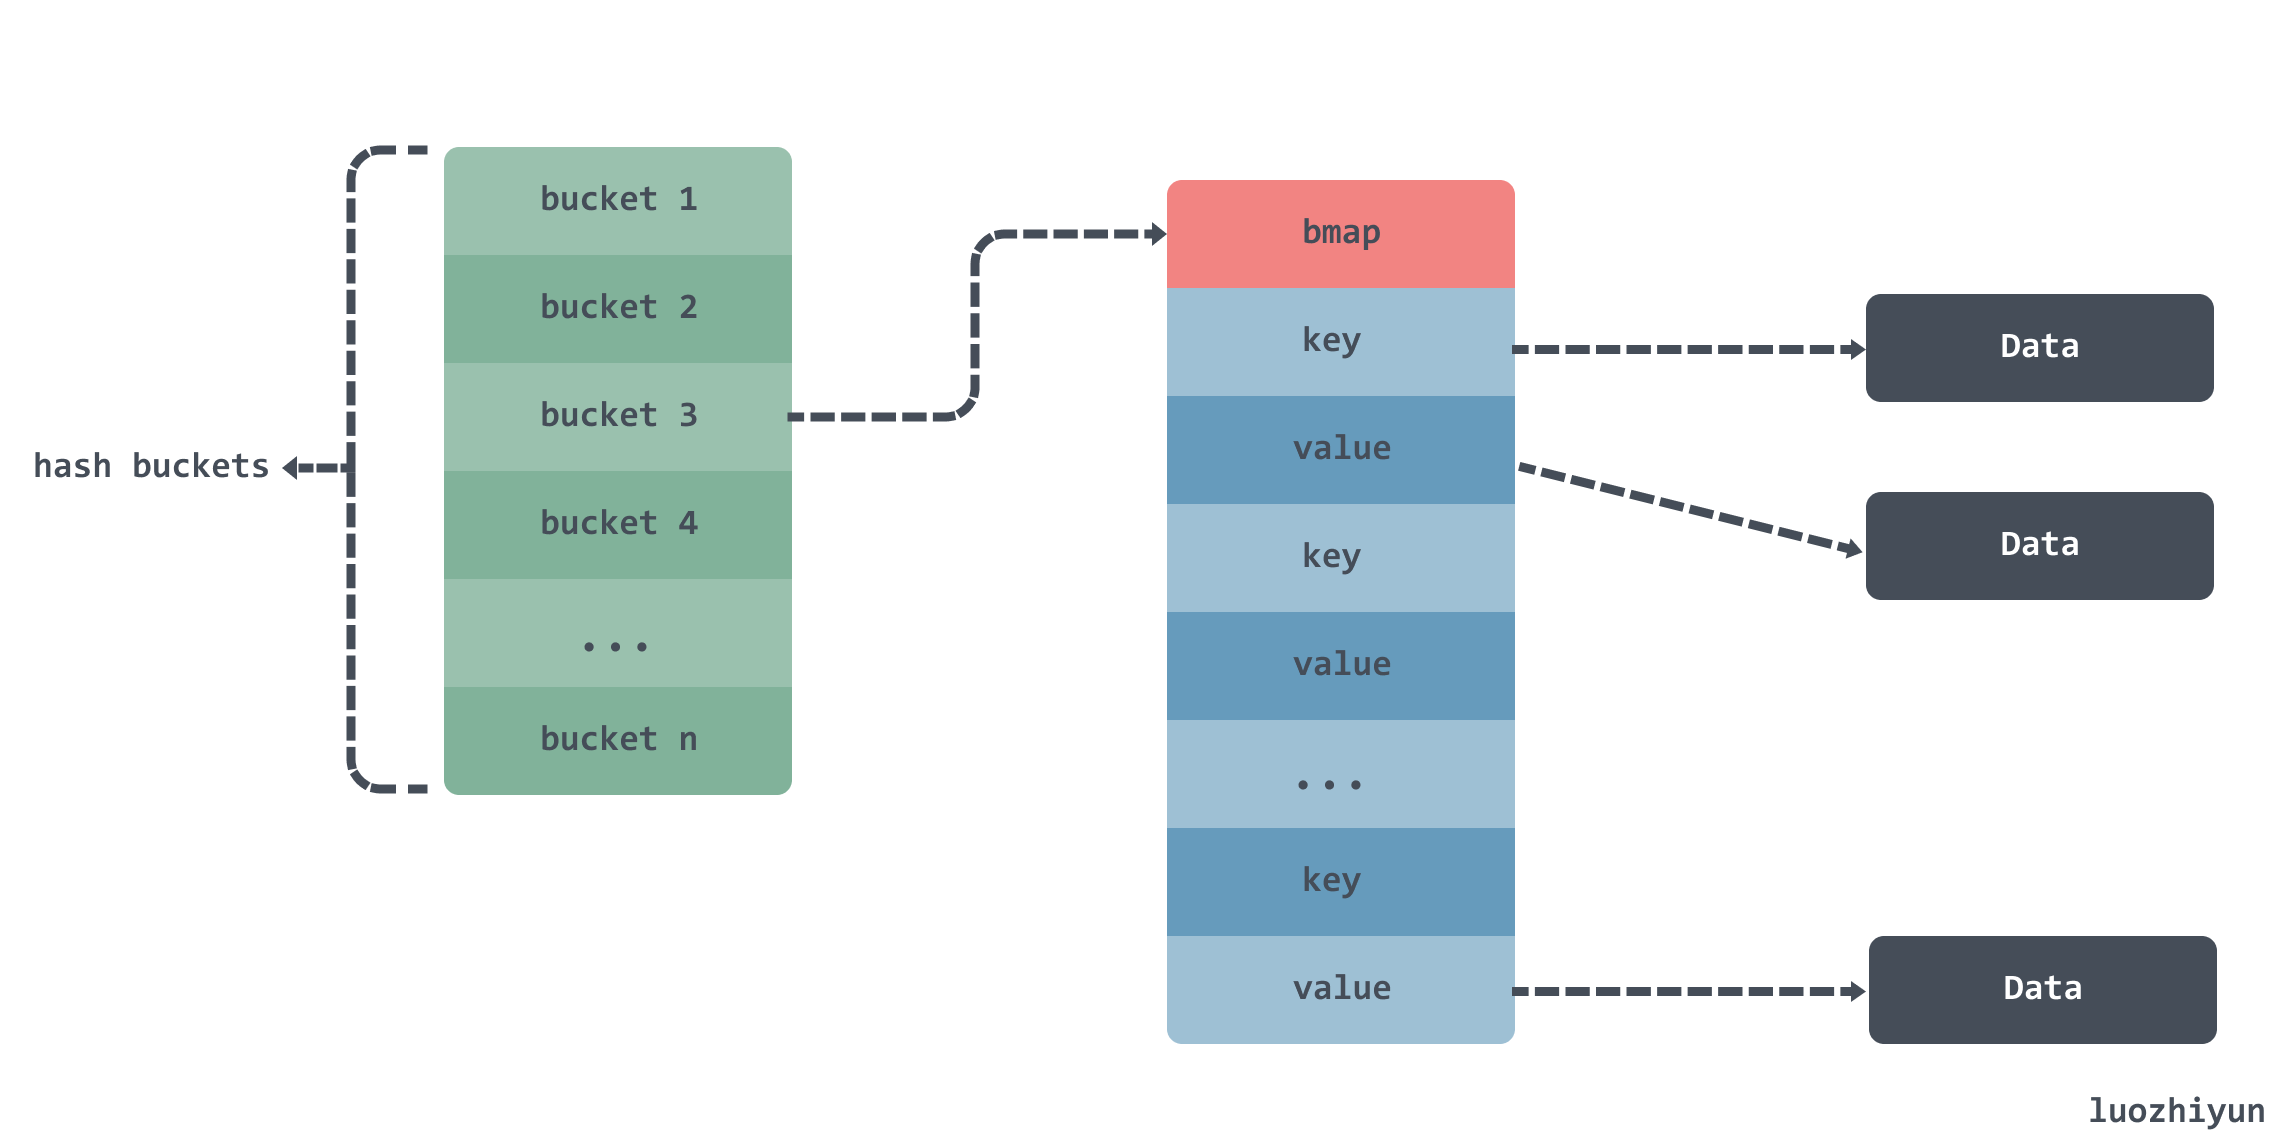
There are multiple buckets inside a map, and a bmap array inside the bucket to hold data, but since key and value are both of type string, you also need to scan the string data according to the Data pointer in the StringHeader at GC time.

For this case, if all the string bytes are in a single memory segment, we can track where a string starts and ends in that segment by offset. By tracking the offset, we don’t need to store the pointer in our large array, and GC won’t be bothered. As follows:

sobyte

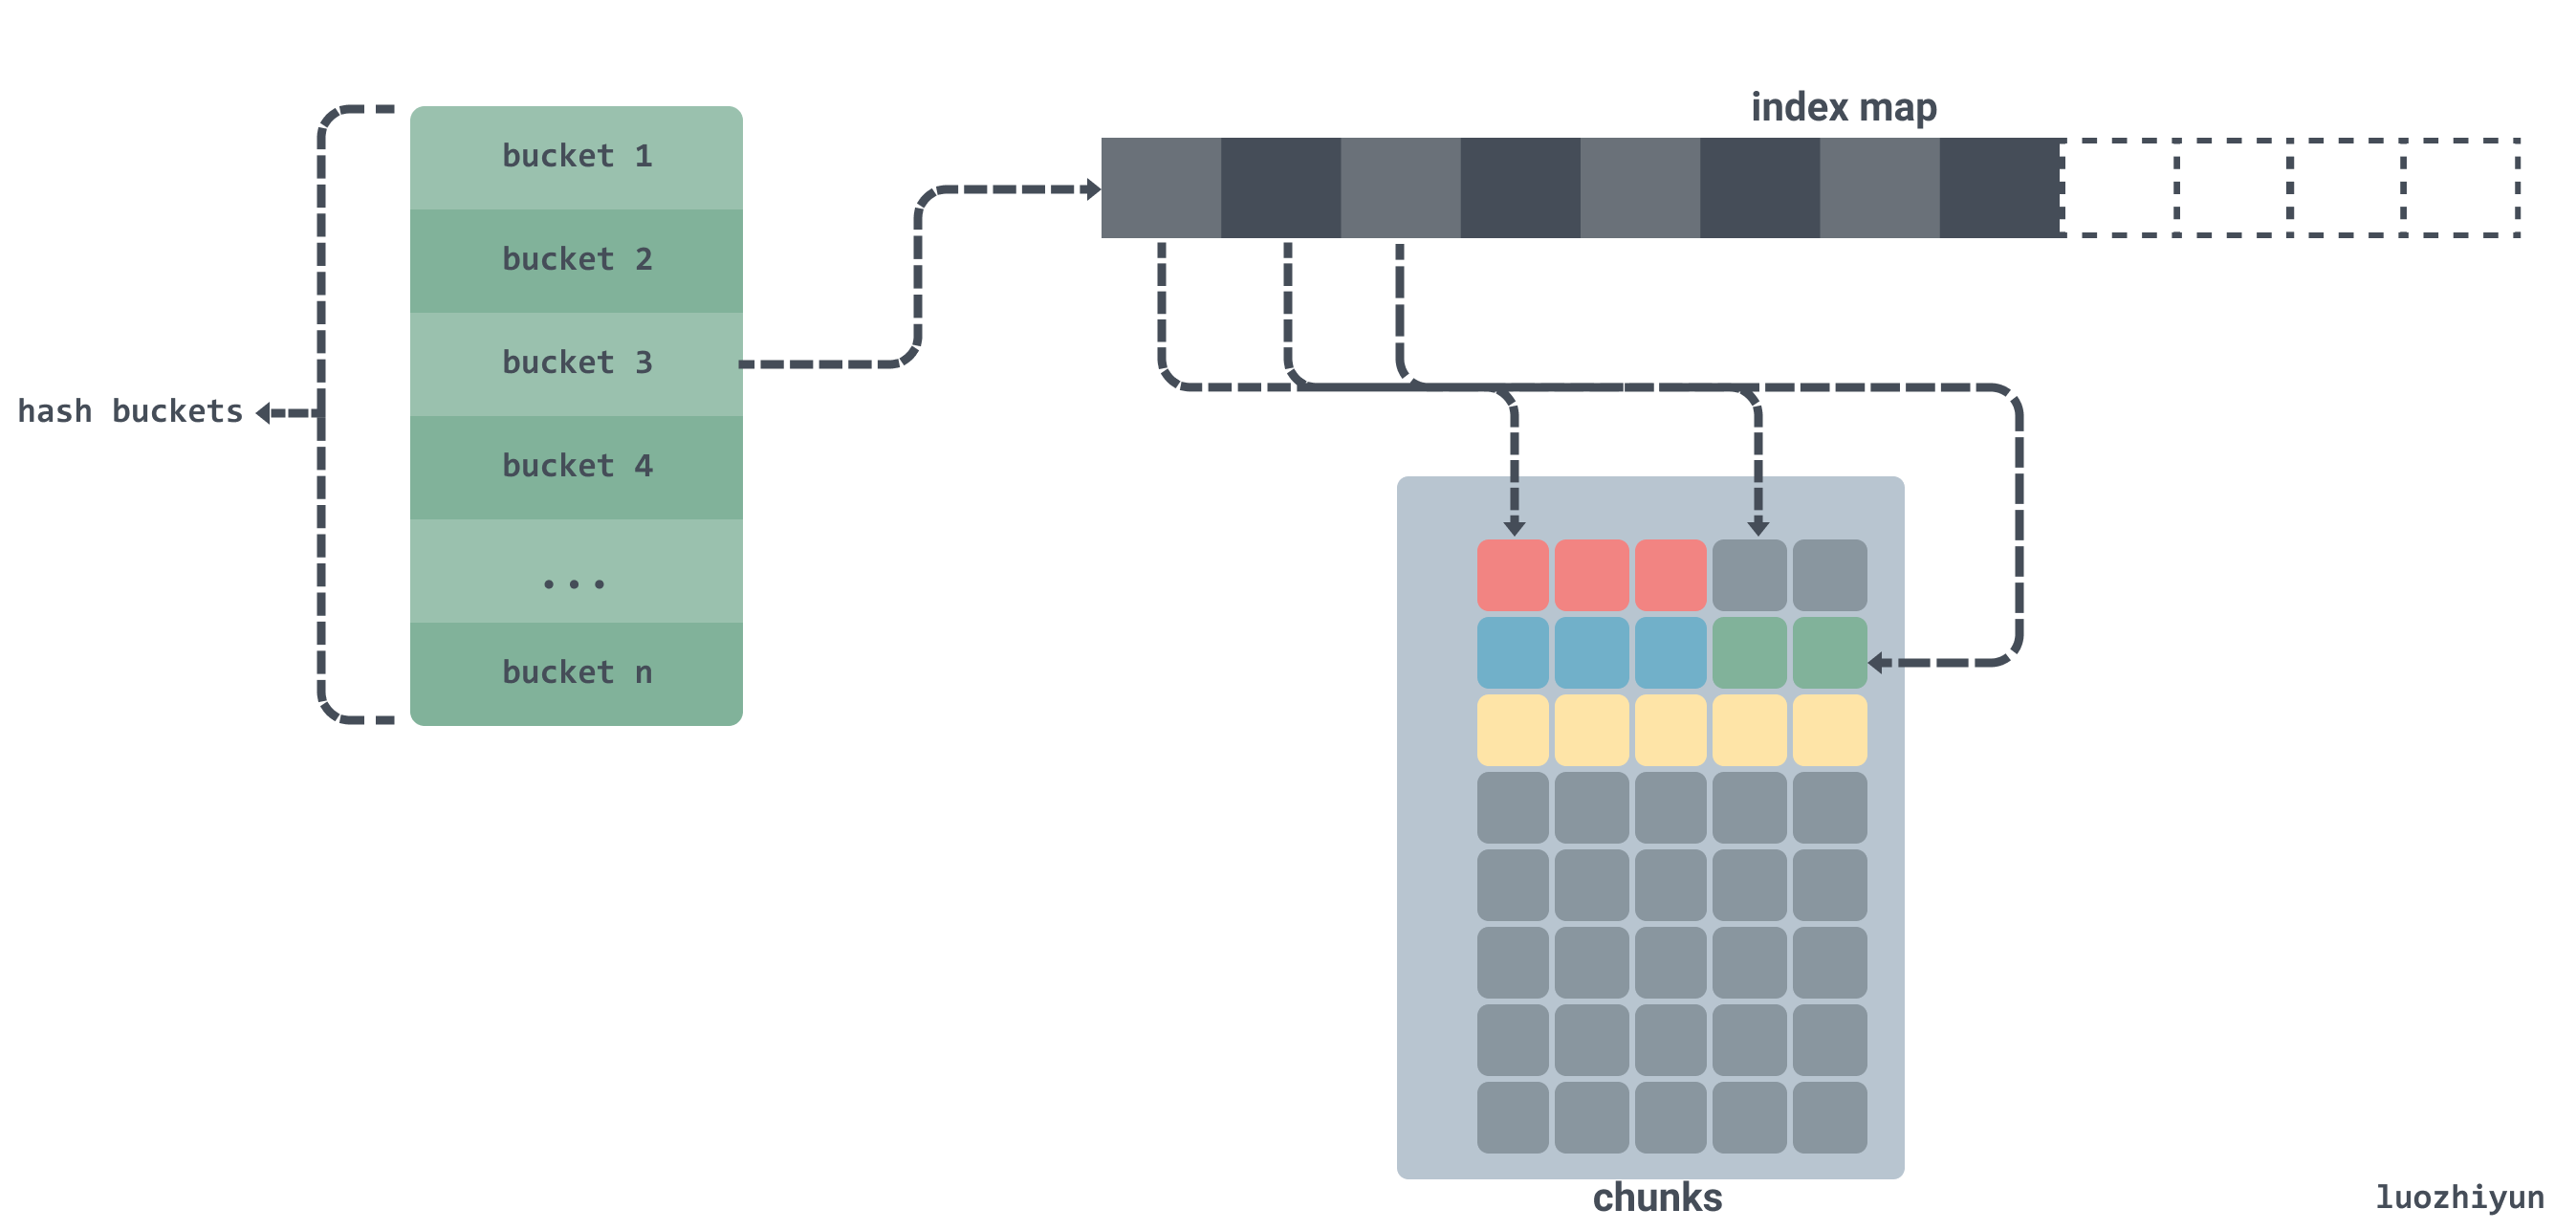
As shown above, if we copy the byte data in the string to a contiguous byte array chunks and allocate memory for this byte array in advance and store only the offset of the string in the array instead of the pointer.

Is there any other way to do this than the optimization described above?

Actually, we can also call mmap syscall directly from the system OS to allocate memory, so that the GC will never do memory management on this memory, and therefore will not scan it. As follows:

 1
 2
 3
 4
 5
 6
 7
 8
 9
10
func main() { 
    test := "hello syscall"
    data, _ := syscall.Mmap(-1, 0, 13, syscall.PROT_READ|syscall.PROT_WRITE, syscall.MAP_ANON|syscall.MAP_PRIVATE)
    p := (*[13]byte)(unsafe.Pointer(&data[0]))

    for i := 0; i < 13; i++ {
        p[i] = test[i]
    }
    fmt.Println(string(p[:]))
}

The system call requests 13bytes of memory directly from the OS, and then writes a string to the requested memory array.

So we can also improve performance by requesting a block of memory from the OS in advance, instead of requesting memory when it is needed, to reduce frequent memory allocations.

Source code implementation

API

Let’s define the API of this library before we develop it.

func New

1
func New(maxBytes int) *Cache

Create a Cache structure and pass in the preset cache size in bytes.

func (*Cache) Get

1
func (c *Cache) Get(k []byte) []byte

Gets the value in the Cache, passed in as a byte array.

func (*Cache) Set

1
func (c *Cache) Set(k, v []byte)

Set the key-value pair to the cache, k is the key, v is the value, and the parameters are byte arrays.
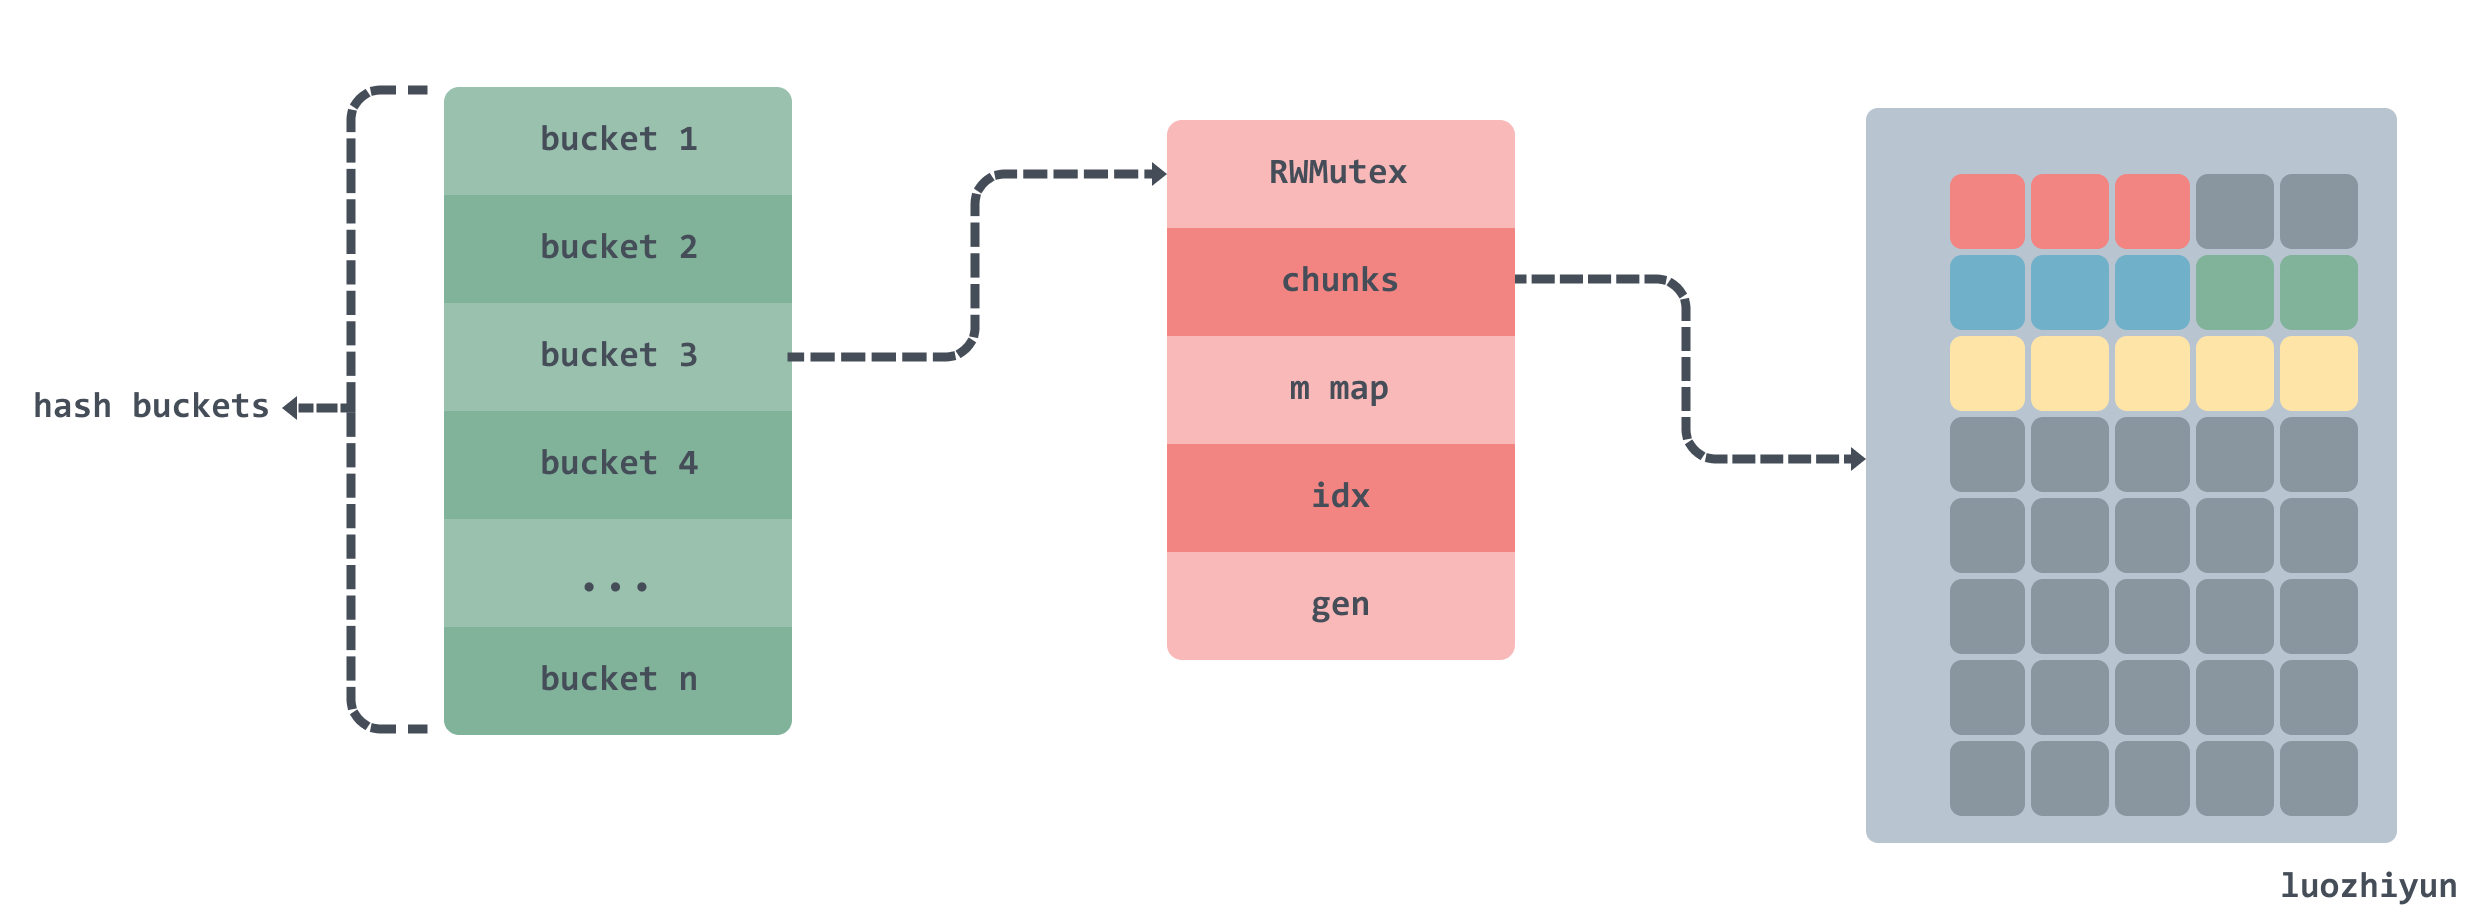
Structs

 1
 2
 3
 4
 5
 6
 7
 8
 9
10
11
12
13
14
15
16
17
18
19
20
21
22
const bucketsCount = 512

type Cache struct { 
    buckets [bucketsCount]bucket
}

type bucket struct {
    // 读写锁
    mu sync.RWMutex

    // 二维数组,存放数据的地方,是一个环形链表
    chunks [][]byte

    // 索引字典
    m map[uint64]uint64

    // 索引值
    idx uint64

    // chunks 被重写的次数,用来校验环形链表中数据有效性
    gen uint64
}

Through our analysis above, we can see that the real place to store data is the chunks two-dimensional array, which is implemented by m field to map the index paths and build a circular chain according to the chunks and gen fields, and the circular chain will add one for each turn of gen.

sobyte

Initialization

 1
 2
 3
 4
 5
 6
 7
 8
 9
10
11
12
13
func New(maxBytes int) *Cache {
    if maxBytes <= 0 {
        panic(fmt.Errorf("maxBytes must be greater than 0; got %d", maxBytes))
    }
    var c Cache
    // 算出每个桶的大小 
    maxBucketBytes := uint64((maxBytes + bucketsCount - 1) / bucketsCount)
    for i := range c.buckets[:] {
    // 对桶进行初始化
        c.buckets[i].Init(maxBucketBytes)
    }
    return &c
}

We will set up a New function to initialize our Cache structure, where the size of the cached data will be distributed equally to each bucket, and then initialize each bucket.

 1
 2
 3
 4
 5
 6
 7
 8
 9
10
11
12
13
14
15
16
17
18
19
const bucketSizeBits = 40
const maxBucketSize uint64 = 1 << bucketSizeBits
const chunkSize = 64 * 1024

func (b *bucket) Init(maxBytes uint64) {
    if maxBytes == 0 {
        panic(fmt.Errorf("maxBytes cannot be zero"))
    }
  // 我们这里限制每个桶最大的大小是 1024 GB
    if maxBytes >= maxBucketSize {
        panic(fmt.Errorf("too big maxBytes=%d; should be smaller than %d", maxBytes, maxBucketSize))
    }
    // 初始化 Chunks 中每个 Chunk 大小为 64 KB,计算 chunk 数量
    maxChunks := (maxBytes + chunkSize - 1) / chunkSize
    b.chunks = make([][]byte, maxChunks)
    b.m = make(map[uint64]uint64)
    // 初始化 bucket 结构体
    b.Reset()
}

Here the memory inside the bucket is allocated by chunk, each chunk occupies about 64 KB of memory. at the end the reset method of the bucket is called to initialize the bucket structure.

 1
 2
 3
 4
 5
 6
 7
 8
 9
10
11
12
13
14
15
16
17
18
func (b *bucket) Reset() {
    b.mu.Lock()
    chunks := b.chunks
    // 遍历 chunks
    for i := range chunks {
        // 将 chunk 中的内存归还到缓存中
        putChunk(chunks[i])
        chunks[i] = nil
    }
    // 删除索引字典中所有的数据
    bm := b.m
    for k := range bm {
        delete(bm, k)
    }
    b.idx = 0
    b.gen = 1
    b.mu.Unlock()
}

The Reset method is very simple, it mainly clears the chunks array, deletes all the data in the index dictionary and resets the index idx and gen values.

In the above method, there is a putChunk, which is actually a direct manipulation of the memory we requested from the OS in advance, and there is a getChunk method accordingly. Let’s look at the operation of Chunk in detail.

Chunk operation

getChunk

 1
 2
 3
 4
 5
 6
 7
 8
 9
10
11
12
13
14
15
16
17
18
19
20
21
22
23
24
25
26
27
28
29
30
31
32
const chunksPerAlloc = 1024
const chunkSize = 64 * 1024

var (
    freeChunks     []*[chunkSize]byte
    freeChunksLock sync.Mutex
)

func getChunk() []byte {
    freeChunksLock.Lock()
    if len(freeChunks) == 0 {
        // 分配  64 * 1024 * 1024 = 64 MB 内存
        data, err := syscall.Mmap(-1, 0, chunkSize*chunksPerAlloc, syscall.PROT_READ|syscall.PROT_WRITE, syscall.MAP_ANON|syscall.MAP_PRIVATE)
        if err != nil {
            panic(fmt.Errorf("cannot allocate %d bytes via mmap: %s", chunkSize*chunksPerAlloc, err))
        }
        // 循环遍历 data 数据
        for len(data) > 0 {
            //将从系统分配的内存分为 64 * 1024 = 64 KB 大小,存放到 freeChunks中
            p := (*[chunkSize]byte)(unsafe.Pointer(&data[0]))
            freeChunks = append(freeChunks, p)
            data = data[chunkSize:]
        }
    }
    //从 freeChunks 获取最后一个元素
    n := len(freeChunks) - 1
    p := freeChunks[n]
    freeChunks[n] = nil
    freeChunks = freeChunks[:n]
    freeChunksLock.Unlock()
    return p[:]
}

The initial call to the getChunk function uses a system call to allocate 64MB of memory, and then recursively chops the memory into 1024 copies of 64KB each into the freeChunks free list. Then it fetches the last element of the freeChunks free list each time and returns 64KB of memory. Note that getChunk will be used in the set method of the Cache, which will be described below, so it needs to take into account concurrency issues, so a lock is added here.

putChunk

 1
 2
 3
 4
 5
 6
 7
 8
 9
10
11
func putChunk(chunk []byte) {
    if chunk == nil {
        return
    }
    chunk = chunk[:chunkSize]
    p := (*[chunkSize]byte)(unsafe.Pointer(&chunk[0]))

    freeChunksLock.Lock()
    freeChunks = append(freeChunks, p)
    freeChunksLock.Unlock()
}

The putChunk function is to return the memory data to the freeChunks free list and will be called in the reset method of the bucket.

Set

1
2
3
4
5
6
7
const bucketsCount = 512

func (c *Cache) Set(k, v []byte) {
    h := xxhash.Sum64(k)
    idx := h % bucketsCount
    c.buckets[idx].Set(k, v, h)
}

The Set method will do a hash based on the value of k, and then take the modal map to the buckets bucket, the hash library used here is cespare/xxhash.

The main thing is the Set method inside the buckets.

 1
 2
 3
 4
 5
 6
 7
 8
 9
10
11
12
13
14
15
16
17
18
19
20
21
22
23
24
25
26
27
28
29
30
31
32
33
34
35
36
37
38
39
40
41
42
43
44
45
46
47
48
49
50
51
52
53
54
55
56
57
58
59
60
61
62
63
64
65
66
67
func (b *bucket) Set(k, v []byte, h uint64) {
    // 限定 k v 大小不能超过 2bytes
    if len(k) >= (1<<16) || len(v) >= (1<<16) {
        return
    }
    // 4个byte 设置每条数据的数据头
    var kvLenBuf [4]byte
    kvLenBuf[0] = byte(uint16(len(k)) >> 8)
    kvLenBuf[1] = byte(len(k))
    kvLenBuf[2] = byte(uint16(len(v)) >> 8)
    kvLenBuf[3] = byte(len(v))
    kvLen := uint64(len(kvLenBuf) + len(k) + len(v))
    // 校验一下大小
    if kvLen >= chunkSize {
        return
    }

    b.mu.Lock()
    // 当前索引位置
    idx := b.idx
    // 存放完数据后索引的位置
    idxNew := idx + kvLen
    // 根据索引找到在 chunks 的位置
    chunkIdx := idx / chunkSize
    chunkIdxNew := idxNew / chunkSize
    // 新的索引是否超过当前索引
    // 因为还有chunkIdx等于chunkIdxNew情况,所以需要先判断一下
    if chunkIdxNew > chunkIdx {
        // 校验是否新索引已到chunks数组的边界
        // 已到边界,那么循环链表从头开始
        if chunkIdxNew >= uint64(len(b.chunks)) {
            idx = 0
            idxNew = kvLen
            chunkIdx = 0
            b.gen++
            // 当 gen 等于 1<<genSizeBits时,才会等于0
            // 也就是用来限定 gen 的边界为1<<genSizeBits
            if b.gen&((1<<genSizeBits)-1) == 0 {
                b.gen++
            }
        } else {
            // 未到 chunks数组的边界,从下一个chunk开始
            idx = chunkIdxNew * chunkSize
            idxNew = idx + kvLen
            chunkIdx = chunkIdxNew
        }
        // 重置 chunks[chunkIdx]
        b.chunks[chunkIdx] = b.chunks[chunkIdx][:0]
    }
    chunk := b.chunks[chunkIdx]
    if chunk == nil {
        chunk = getChunk()
        // 清空切片
        chunk = chunk[:0]
    }
    // 将数据 append 到 chunk 中
    chunk = append(chunk, kvLenBuf[:]...)
    chunk = append(chunk, k...)
    chunk = append(chunk, v...)
    b.chunks[chunkIdx] = chunk
    // 因为 idx 不能超过bucketSizeBits,所以用一个 uint64 同时表示gen和idx
    // 所以高于bucketSizeBits位置表示gen
    // 低于bucketSizeBits位置表示idx
    b.m[h] = idx | (b.gen << bucketSizeBits)
    b.idx = idxNew
    b.mu.Unlock()
}
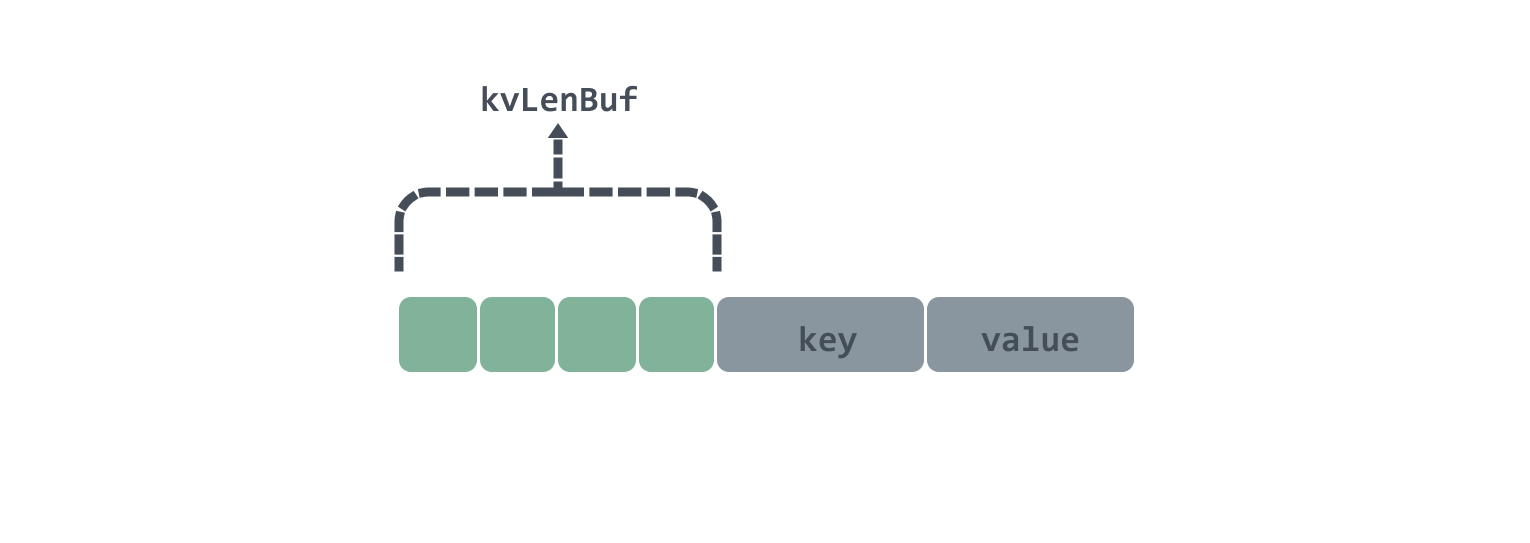
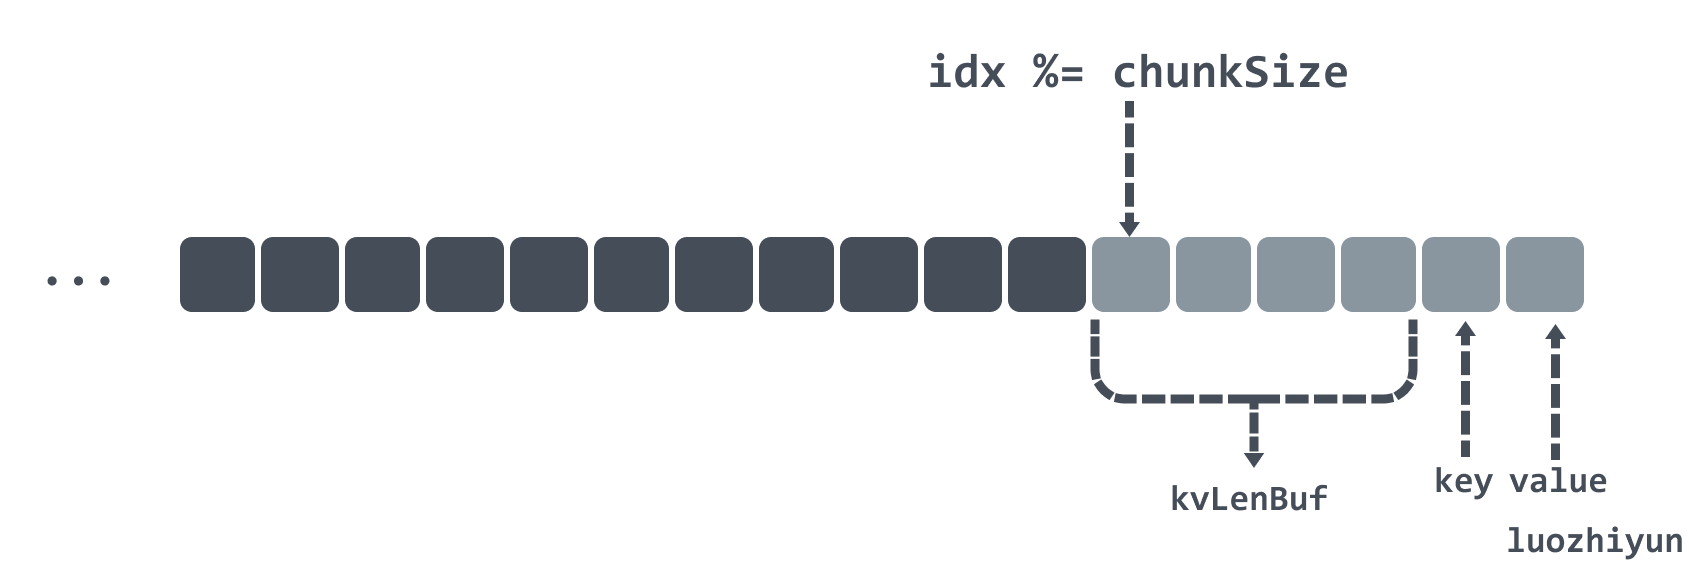
  1. at the beginning of this code I will actually limit the size of the key value to no more than 2bytes.
  2. then encapsulate the 2bytes length of the key value into a 4bytes kvLenBuf as the data header, the total length of the data header and the key value is not to exceed the length of a chunk, that is
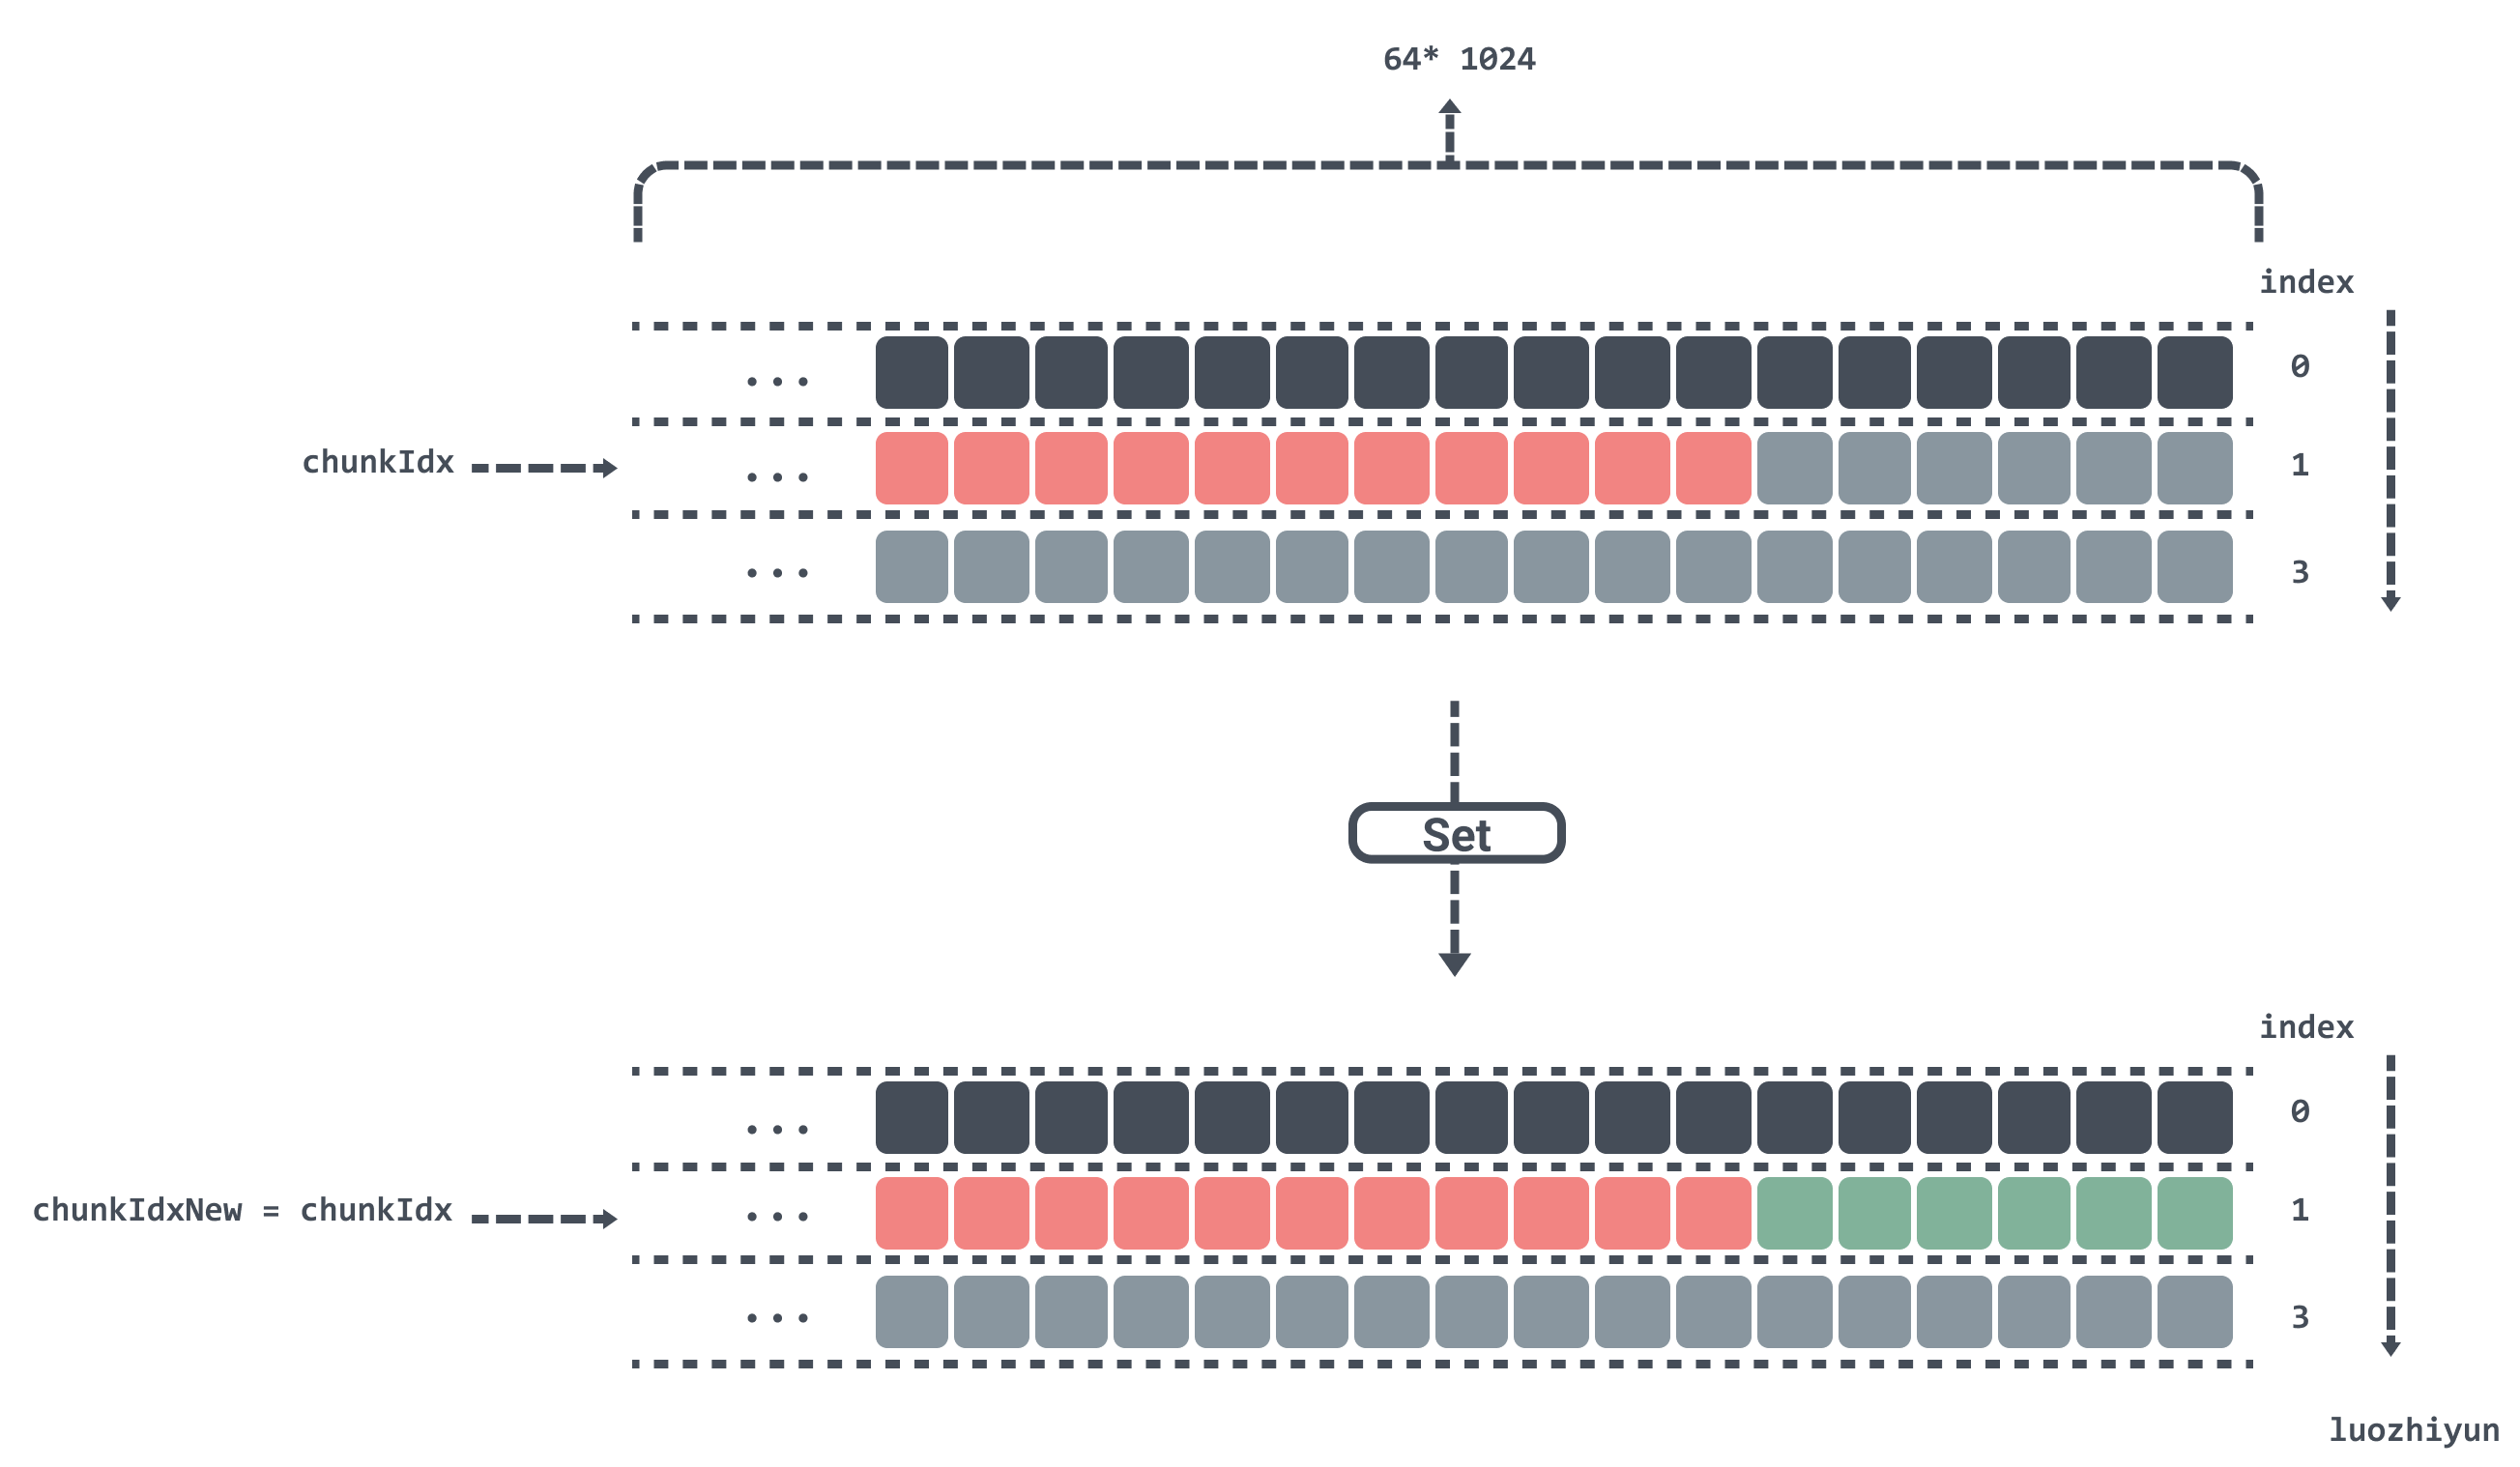
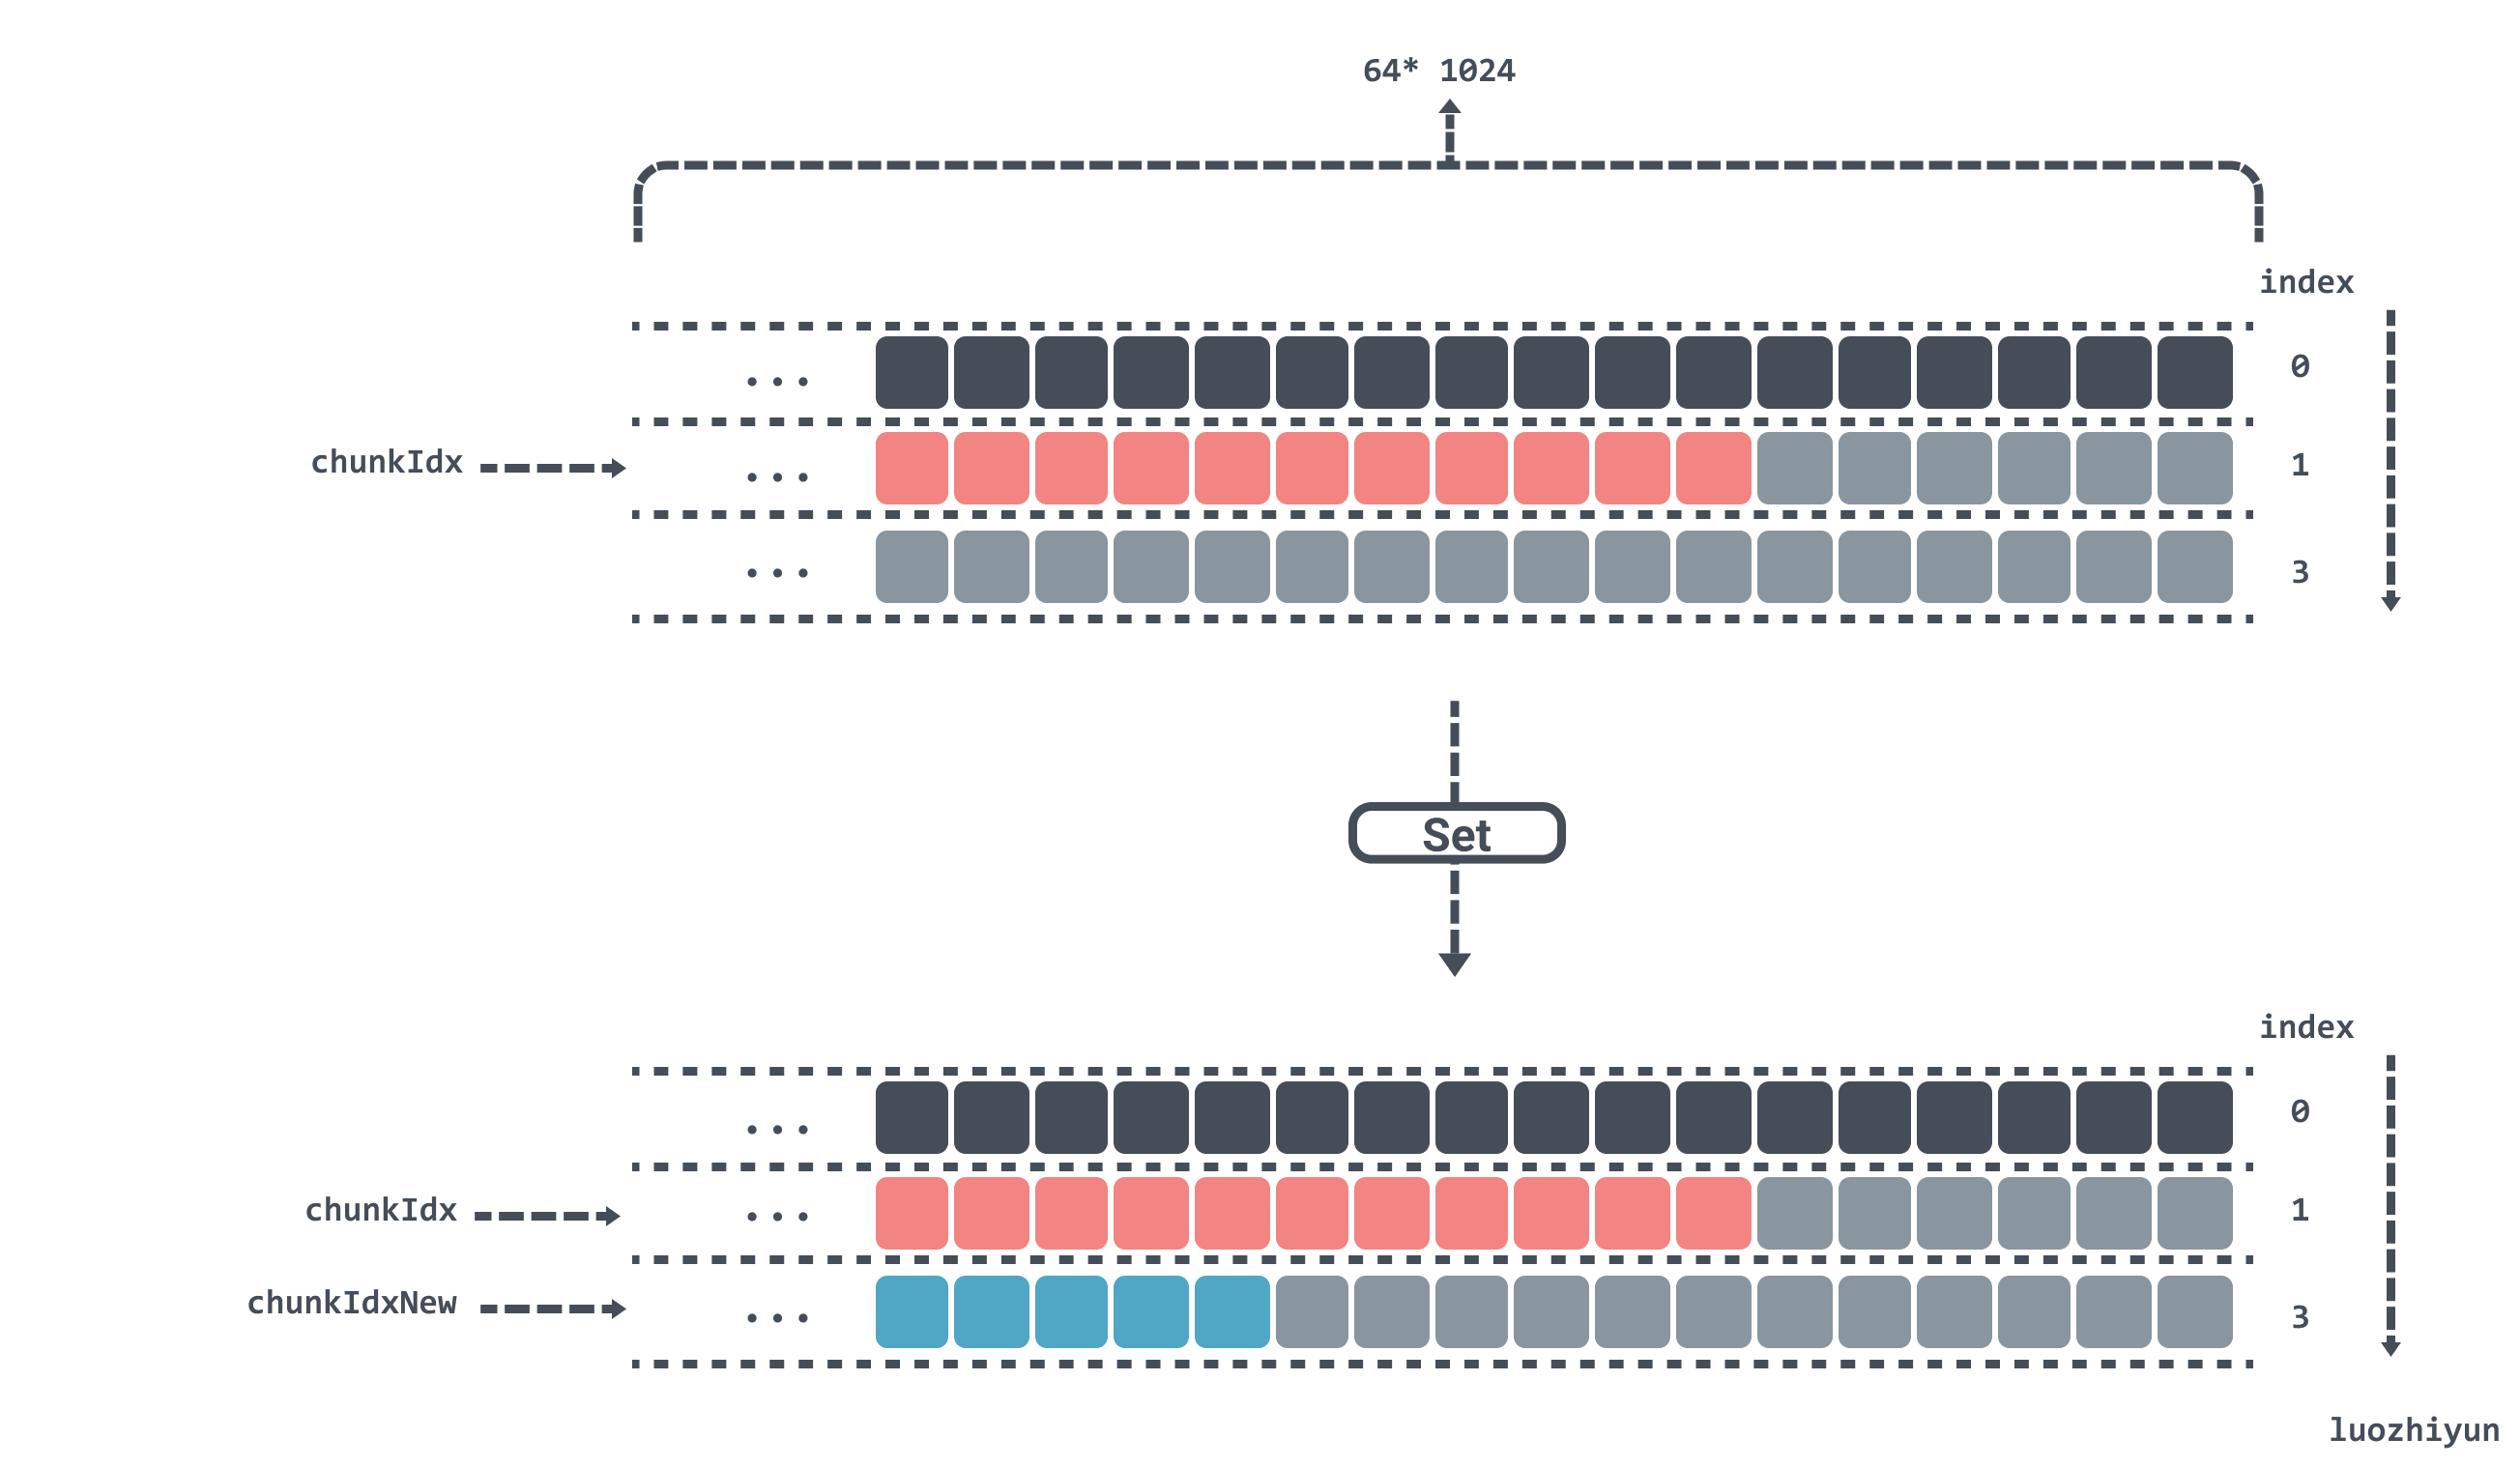
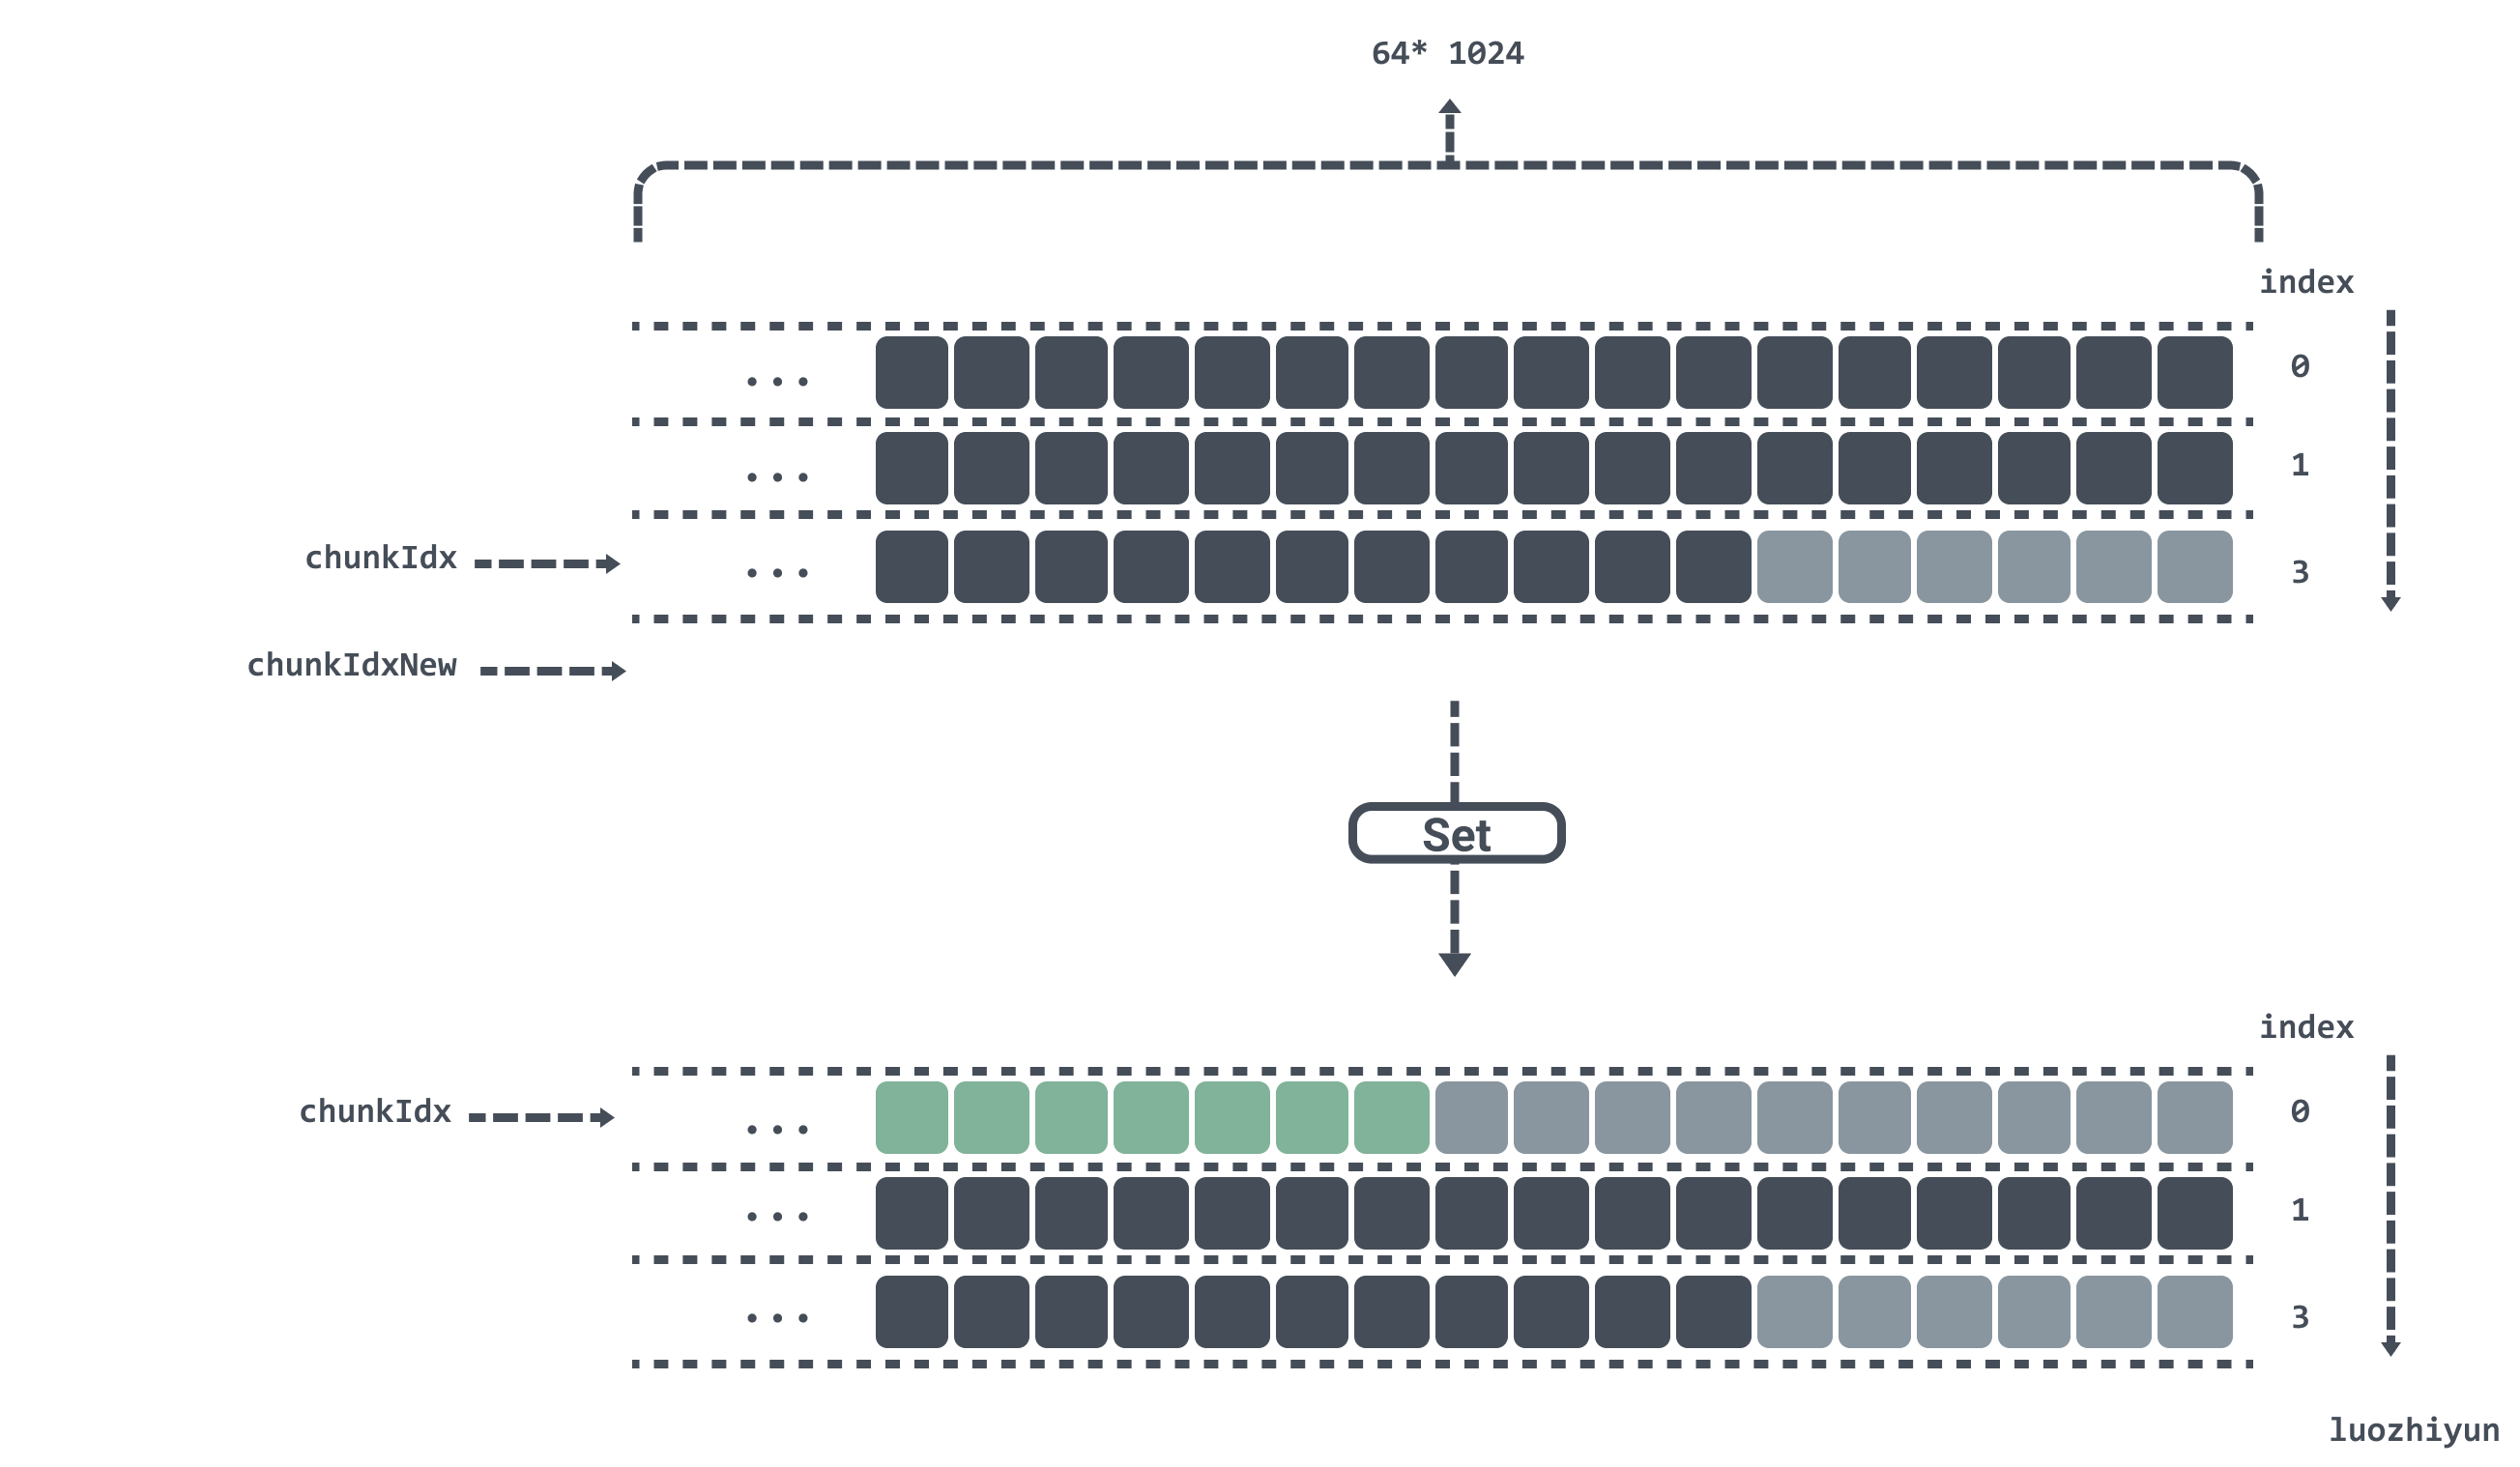
 64 * 1024.
  3. then calculate the original index chunkIdx and the new index chunkIdxNew, to determine whether the added data plus the original data exceeds a chunk length.
  4. find the position in the corresponding chunks according to the new index, and then append the key value and kvLenBuf to the back of the chunk.
  5. set the new idx and the corresponding value in the m dictionary, where the gen and idx are stored by taking and placing.

In Set a key-value pair will have 4bytes of kvLenBuf as the data header, followed by key and value, in kvLenBuf, the first two bytes represent the low and high bits of the key length respectively; the last two bytes represent the low and high bits of the value length respectively, the data diagram is roughly as follows.

sobyte

Here is an example to see how to use chunks as a two-dimensional array to implement a circular linkedlist.

In the Init method of the bucket, we set the length of the chunks according to the number of bytes passed into the maxBytes bucket, since each chunk size is 64 * 1024 bytes, then we set the bucket size of 3 * 64 * 1024 bytes, then the length of the chunks array is 3.

If the chunkIdx is currently calculated to be at position 1 of the chunks array, and there are 6bytes left unused in position chunks[1], then there are several cases as follows.

  1. now assume that the length of the keys put in is 1byte, then the remaining 6bytes in the chunks[1] position is just enough to put down.

    sobyte

  2. Now suppose the length of the key value is more than 1byte, then the remaining space in chunks[1] will not fit and will have to be placed in chunks[2]. sobyte

If chunkIdx is currently calculated to be at position 2 in the chunks array and now Set a key value, after calculating chunkIdxNew to be 3, which has exceeded the length of the chunks array, then the index will be reset, the data will be repositioned from chunks[0], and gen will be added by one, indicating that a run has been completed.

sobyte

Get

1
2
3
4
5
6
func (c *Cache) Get(dst, k []byte) []byte {
   h := xxhash.Sum64(k)
   idx := h % bucketsCount
   dst, _ = c.buckets[idx].Get(dst, k, h, true)
   return dst
}

Here it is the same as the Set method, which first finds the location of the corresponding bucket and then goes inside the bucket to get the data. Note that the dst here can be passed in a slice from outside to reduce duplicate allocation of return values.

 1
 2
 3
 4
 5
 6
 7
 8
 9
10
11
12
13
14
15
16
17
18
19
20
21
22
23
24
25
26
27
28
29
30
31
32
33
34
35
36
37
38
39
40
41
42
43
44
45
46
47
48
49
50
51
52
func (b *bucket) Get(dst, k []byte, h uint64,returnDst bool) ([]byte, bool) {
    found := false
    b.mu.RLock()
    v := b.m[h]
    bGen := b.gen & ((1 << genSizeBits) - 1)
    if v > 0 {
        // 高于bucketSizeBits位置表示gen
        gen := v >> bucketSizeBits
        // 低于bucketSizeBits位置表示idx
        idx := v & ((1 << bucketSizeBits) - 1)
        // 这里说明chunks还没被写满
        if gen == bGen && idx < b.idx ||
            // 这里说明chunks已被写满,并且当前数据没有被覆盖
            gen+1 == bGen && idx >= b.idx ||
            // 这里是边界条件gen已是最大,并且chunks已被写满bGen从1开始,,并且当前数据没有被覆盖
            gen == maxGen && bGen == 1 && idx >= b.idx {
            chunkIdx := idx / chunkSize
            // chunk 索引位置不能超过 chunks 数组长度
            if chunkIdx >= uint64(len(b.chunks)) {
                goto end
            }
            // 找到数据所在的 chunk
            chunk := b.chunks[chunkIdx]
            // 通过取模找到该key 对应的数据在 chunk 中的位置
            idx %= chunkSize
            if idx+4 >= chunkSize {
                goto end
            }
            // 前 4bytes 是数据头
            kvLenBuf := chunk[idx : idx+4]
            // 通过数据头算出键值的长度
            keyLen := (uint64(kvLenBuf[0]) << 8) | uint64(kvLenBuf[1])
            valLen := (uint64(kvLenBuf[2]) << 8) | uint64(kvLenBuf[3])
            idx += 4
            if idx+keyLen+valLen >= chunkSize {
                goto end
            }
            // 如果键值是一致的,表示找到该数据
            if string(k) == string(chunk[idx:idx+keyLen]) {
                idx += keyLen
                // 返回该键对应的值
                if returnDst {
                    dst = append(dst, chunk[idx:idx+valLen]...)
                }
                found = true
            }
        }
    }
end:
    b.mu.RUnlock()
    return dst, found
}

The Get method mainly considers the boundary problem of the circular linkedlist. In the Set method, we store the gen and idx indexes of each key in the m dictionary, so we can get the gen and idx indexes by bit operation after getting the value of the m dictionary through hash.

After finding the gen and idx indexes, it is time to determine the boundary conditions, using an if condition to determine.

1
gen == bGen && idx < b.idx

Here it is determined that if it is in the same loop of the circular linkedlist, then the index corresponding to the key should be less than the index of the current bucket.

1
gen+1 == bGen && idx >= b.idx

Here it means that the current bucket has entered the next loop, so it is necessary to determine whether the index corresponding to the key is greater than the current index to indicate that the value corresponding to the current key has not been overwritten.

1
gen == maxGen && bGen == 1 && idx >= b.idx

Because the gen and idx indexes are stuffed into fields of type uint64, the only maximum value left for gen is maxGen = 1<< 24 -1, and exceeding maxGen will make gen start from 1. So here if key corresponds to gen equal to maxGen, then the current bGen should be equal to 1, and the index corresponding to key should also be greater than the current idx, so that the key-value pair will not be overwritten.

After judging the boundary conditions, the corresponding chunk will be found, and then the data location will be found after taking the mode, and the value will be found and taken out by the offset.

sobyte

Benchmark

Here’s my post-Benchmark.

Code location: https://github.com/devYun/mycache/blob/main/cache_timing_test.go

 1
 2
 3
 4
 5
 6
 7
 8
 9
10
11
12
13
14
15
16
17
18
19
20
21
22
GOMAXPROCS=4 go test -bench='Set|Get' -benchtime=10s
goos: linux
goarch: amd64
pkg: gotest
// GoCache
BenchmarkGoCacheSet-4                836          14595822 ns/op           4.49 MB/s     2167340 B/op    65576 allocs/op
BenchmarkGoCacheGet-4               3093           3619730 ns/op          18.11 MB/s        5194 B/op       23 allocs/op
BenchmarkGoCacheSetGet-4             236          54379268 ns/op           2.41 MB/s     2345868 B/op    65679 allocs/op
// BigCache
BenchmarkBigCacheSet-4              1393          12763995 ns/op           5.13 MB/s     6691115 B/op        8 allocs/op
BenchmarkBigCacheGet-4              2526           4342561 ns/op          15.09 MB/s      650870 B/op   131074 allocs/op
BenchmarkBigCacheSetGet-4           1063          11180201 ns/op          11.72 MB/s     4778699 B/op   131081 allocs/op 
// standard map
BenchmarkStdMapSet-4                1484           7299296 ns/op           8.98 MB/s      270603 B/op    65537 allocs/op
BenchmarkStdMapGet-4                4278           2480523 ns/op          26.42 MB/s        2998 B/op       15 allocs/op
BenchmarkStdMapSetGet-4              343          39367319 ns/op           3.33 MB/s      298764 B/op    65543 allocs/op
// sync.map
BenchmarkSyncMapSet-4                756          15951363 ns/op           4.11 MB/s     3420214 B/op   262320 allocs/op
BenchmarkSyncMapGet-4              11826           1010283 ns/op          64.87 MB/s        1075 B/op       33 allocs/op
BenchmarkSyncMapSetGet-4            1910           5507036 ns/op          23.80 MB/s     3412764 B/op   262213 allocs/op
PASS
ok      gotest  215.182s 

The above tests are for GoCache, BigCache, Map, and sync.Map. The following tests are for the cache libraries developed in this article.

1
2
3
4
// myCachce
BenchmarkCacheSet-4                 4371           2723208 ns/op          24.07 MB/s        1306 B/op        2 allocs/op
BenchmarkCacheGet-4                 6003           1884611 ns/op          34.77 MB/s         951 B/op        1 allocs/op
BenchmarkCacheSetGet-4              2044           6611759 ns/op          19.82 MB/s        2797 B/op        5 allocs/op

You can see that memory allocation is almost non-existent, and the speed of operation is one of the best in the above libraries.

Summary

In this article, we have analyzed the problem of using Map as a cache based on other cache libraries, and then we have given the reasons for this problem and proposed a solution; in our cache library, we first use indexes and memory blocks to store cached data, and then we use OS system calls to allocate memory so that our cached data blocks are out of GC control, thus reducing GC frequency and increasing concurrency.

In fact, not only the cache library, but also in our project when we need to use a large number of data structures with pointers and need to keep references for a long time, we also need to pay attention to the fact that this may cause GC problems and thus bring potential problems to the system.