There are more and more networking solutions for containers, and with each new solution, it is obviously unreasonable to adapt the networking solution to different container runtimes, and CNI is designed to solve this problem.
While maintaining a “home-level Kubernetes cluster” at home during holidays, I got the idea to write a network plugin, and developed Village Net based on cni/plugin.
Taking this network plugin as an example, this article focuses on how to implement a CNI plugin.
How CNI works
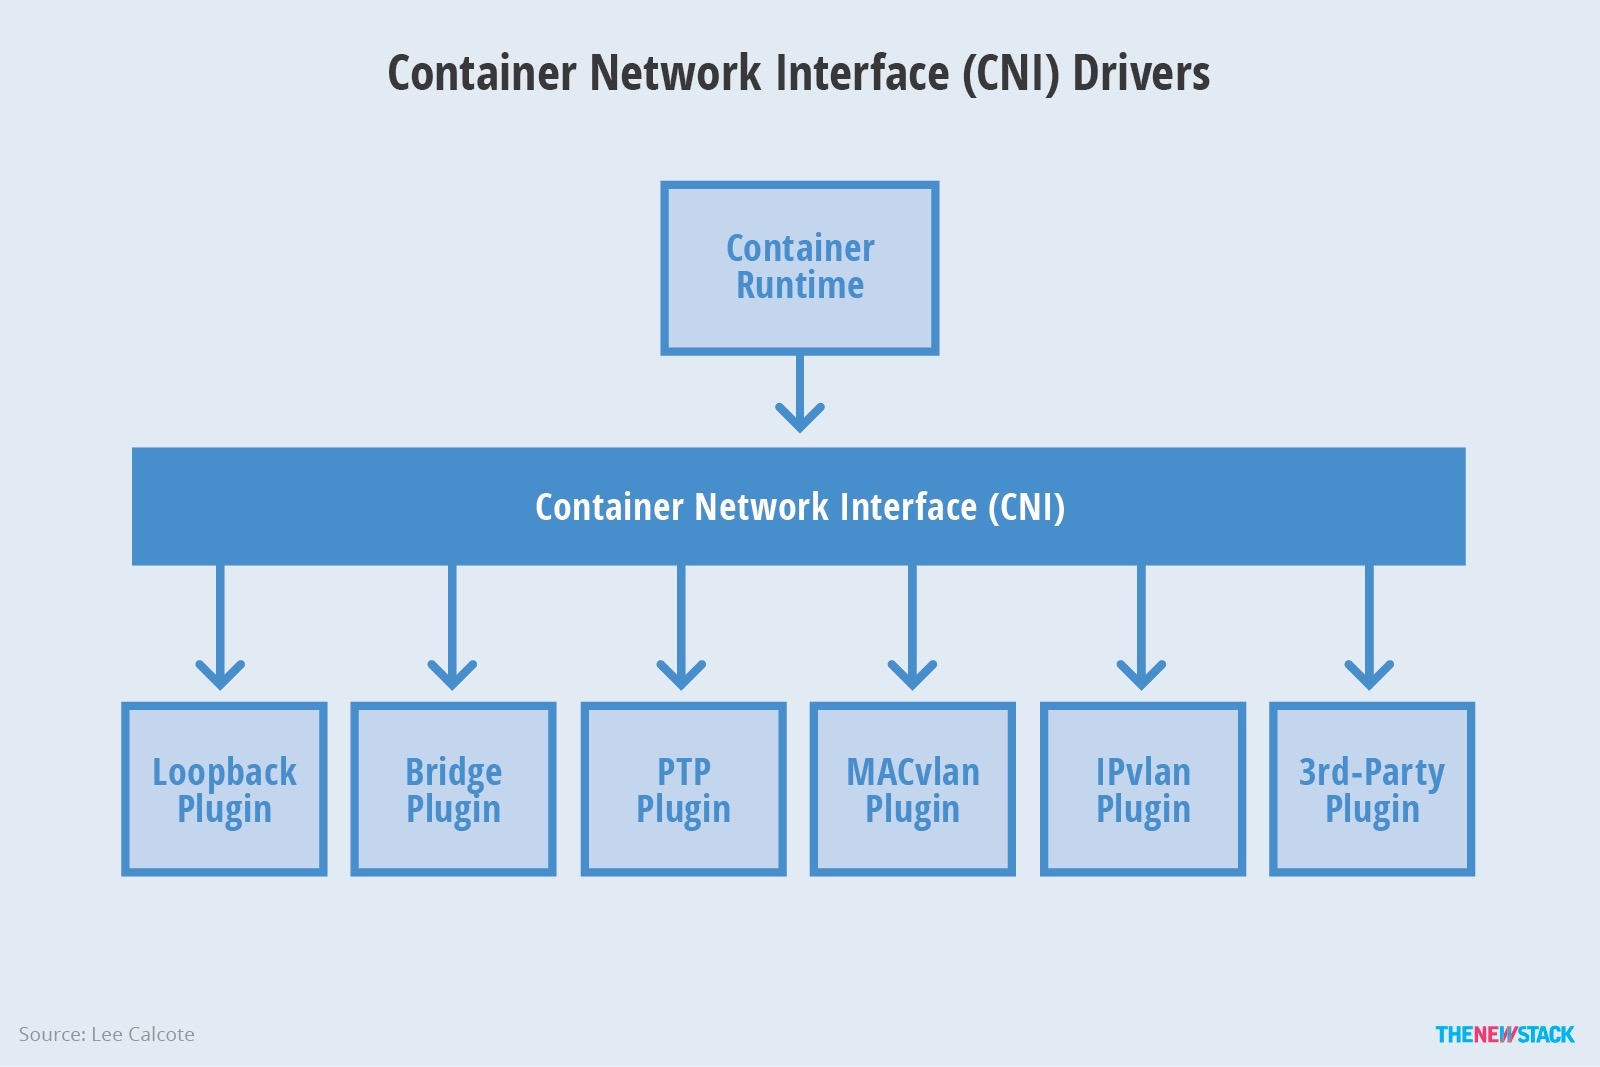
To understand how to implement a CNI plug-in, you need to understand how CNI works, which stands for Container Network Interface, an interface protocol used to configure a container’s network. After the container management system provides the network namespace where the container is located, CNI is responsible for inserting the network interface into that network namespace and configuring the corresponding ip and route.
CNI is actually a bridge between container runtime system and CNI Plugin, CNI will pass the container runtime information and network configuration information to Plugin, and each Plugin will realize the subsequent work, so CNI Plugin is the concrete implementation of container network. This can be summarized in the following diagram.
What is CNI Plugin
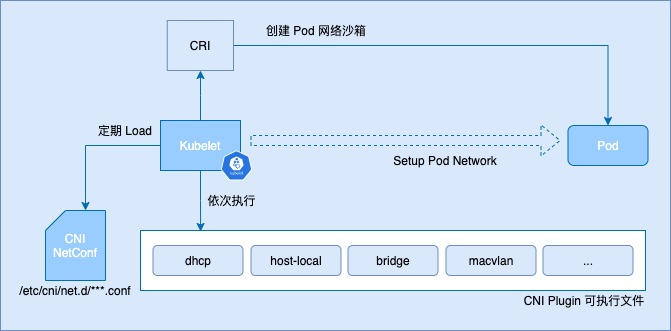
We now know that a CNI Plugin is a concrete implementation of a container network. In a cluster, each Plugin exists as a binary and is invoked by the kubelet through the CNI interface for each plugin to execute. The exact process is as follows.
CNI Plugin can be divided into three categories: Main, IPAM and Meta, where the Main and IPAM plugins complement each other and do the basic work of creating a network environment for containers.
IPAM Plugin
The IPAM (IP Address Management) plug-in is mainly responsible for assigning IP addresses. The official plug-ins available include the following.
- dhcp: A daemon running on the host that makes DHCP requests on behalf of the container.
- host-local: uses a pre-assigned IP address segment to assign and logs the IP usage in memory
- static: used to assign a static IP address to the container, mainly for debugging purposes
Main Plugin
Main plug-in is mainly used to create binary files for specific network devices. The official plug-ins available include the following.
- bridge: Create a bridge on the host and connect it to the container via veth pair.
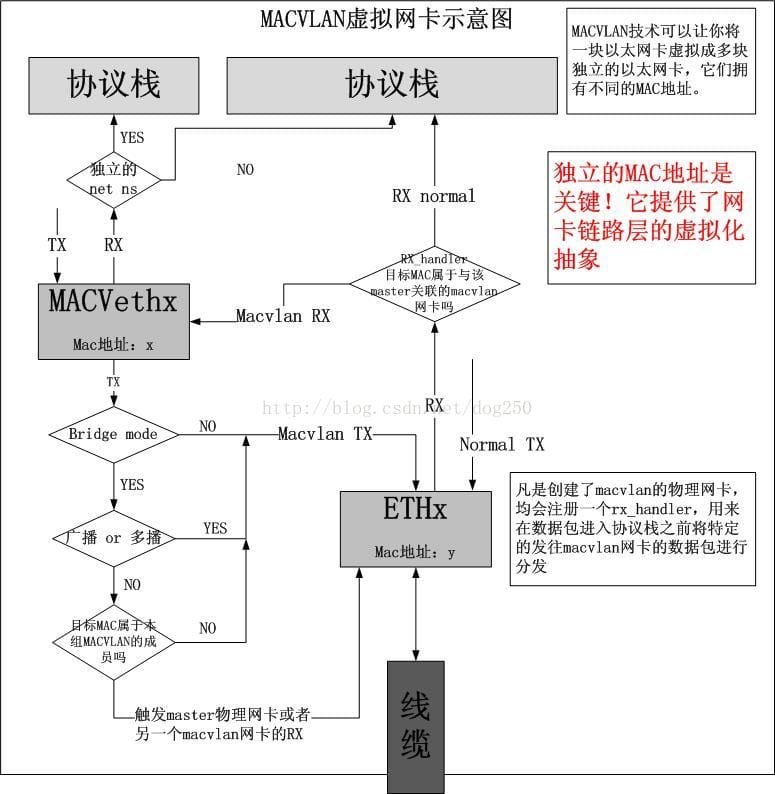
- macvlan: virtualize multiple macvtaps, each with a different mac address
- ipvlan: similar to macvla n, also virtualize multiple virtual network interfaces through a host interface, the difference is that ipvlan virtualizes a shared MAC address, ip address is different
- loopback: lo device (set the loopback interface to up)
- ptp: veth pair device
- vlan: assign vlan device
- host-device: move a device that already exists on the host to the container
Meta Plugin
Internal plugins maintained by the CNI community, currently consisting mainly of
- flannel: A plugin specifically for the Flannel project
- tuning: binary for tuning network device parameters via sysctl
- portmap: binary for configuring port mapping via iptables
- bandwidth: binary for limiting traffic using Token Bucket Filter (TBF)
- firewall: Add rules to control incoming and outgoing traffic to the container via iptables or firewalled
CNI Plugin Implementation
The CNI Plugin repository is located at https://github.com/containernetworking/plugins. Inside you can see the specific implementation of each type of Plugin. Each Plugin needs to implement the following three methods and register them in main.
Take host-local as an example, the registration method is as follows, you need to specify the three methods implemented above, the supported version, and the name of the Plugin.
What is CNI
After understanding how the Plugin works, let’s look at how the CNI works. The CNI repository is at https://github.com/containernetworking/cni. The code analyzed in this article is based on the latest version, v0.8.1.
The community provides a tool, cnitool, that simulates the CNI interface being called to add or remove network devices from an existing network namespace.
First, let’s look at the implementation logic of cnitool.
|
|
From the above code, we can see that the configuration netconf is first parsed from the cni configuration file, and then the netns, containerId and other information is passed to the interface cninet.AddNetworkList as the container’s runtime information.
Next, look at the implementation of the interface AddNetworkList.
|
|
Obviously, the function’s role is to execute the addNetwork operations of each Plugin in order. Then look at the addNetwork function.
|
|
The addNetwork operation for each plugin is divided into three parts.
- First, the FindInPath function is called to find the absolute path of the plugin based on the type of the plugin.
- Then, the buildOneConfig function is called to extract the NetworkConfig structure of the current plugin from the NetworkList, where the preResult is the result of the previous plugin’s execution.
- ExecPluginWithResult function is called to actually execute the Add operation of the plugin. Bytes stores the NetworkConfig structure and a stream of bytes encoded with the result of the previous plugin’s execution, while the c.args function is used to build an instance of type Args, which stores mainly container runtime information and information about the execution of CNI operations.
In fact, invoke.ExecPluginWithResult is just a wrapper function, which calls exec.
|
|
See here, we also see the core logic of the entire CNI, surprisingly simple, just exec the plug-in executable, and retry 5 times when an error occurs.
In short, a CNI plug-in is an executable file that gets the configuration information of the network from the configuration file and the container information from the container runtime, the former in the form of standard input and the latter in the form of environment variables passed to each plug-in, which eventually invokes each plug-in in turn in the order defined in the configuration file and passes the results of the execution of the previous plug-in to the next plug-in with the configuration information included.
Nevertheless, the mature network plugins we are familiar with (e.g. calico) usually do not call Plugin sequentially, but only the main plug-in, which calls the ipam plug-in and gets the execution result on the spot.
How kubelet uses CNI
After understanding how the CNI plugin works, let’s take a look at how kubelet uses the CNI plugin.
When kubelet creates a pod, it calls the CNI plugin to create a network environment for the pod. The source code is as follows. You can see that kubelet calls the plugin.addToNetwork function in the SetUpPod function (pkg/kubelet/dockershim/network/cni/cni.go).
|
|
Let’s take a look at the addToNetwork function, which will first build the runtime information of the pod and then read the network configuration information of the CNI plugin, i.e. the configuration file in the /etc/cni/net.d directory. After assembling the parameters needed by the plugin, it calls cni’s interface cniNet.AddNetworkList.
The source code is as follows.
|
|
Simulate the execution of CNI
After understanding the entire CNI execution process, let’s simulate the CNI execution process. We use the cnitool tool, the main plugin selects bridge and the ipam plugin selects host-local to simulate the container network configuration.
Compile plugins
First, compile the CNI Plugin into an executable file, which can be executed by running the build_linux.sh script from the official repository.
|
|
Creating a network profile
Next, create our own network configuration file, choose bridge for the main plugin, host-local for the ipam plugin, and specify the available ip segments.
|
|
Create a network namespace
|
|
executes cnitool’s add
Finally, specify CNI_PATH as the path to the above compiled plugin executable, and run the cnitool tool from the official repository.
|
|
The result appears to assign an ip of 10.22.0.2 to this network namespace hdls-net, which actually means that the container we created manually has an ip of 10.22.0.2.
Verification
After obtaining the container’s ip, we can verify that it is possible to ping through and use the nsenter command to enter the container’s namespace to find that the container’s default network device, eth0, has also been created.
|
|
Finally, let’s check the network devices of the host and find that the veth device pair corresponding to the eth0 of the container has been created.
|
|
Village Net
The reason for choosing Village Net as the name of the plugin is to implement a layer 2 based network plugin via macvlan. For a layer 2 network, the internal communication is like a small village, communication is basically by roar (arp), of course, there is the meaning of village net, although simple, but good enough to use.
Working principle
The reason for choosing macvlan is that for a “family Kubernetes cluster”, there are not many nodes but many services, so services can only be differentiated by port mapping (nodeport), and since all machines are originally on the same switch and IPs are relatively rich, macvlan/ipvlan are both simple and good solutions. is a simple and well implemented solution. Considering that mac-based dhcp services can be used, and even the ip of pods can be fixed based on mac, we tried to use macvlan to implement network plugins.
However, macvlan has a lot of problems across net namespace, for example, when there is a separate net namespace, the traffic will cross the host’s protocol stack, which causes the iptables/ipvs based cluster ip to not work properly.
Of course, for the same reason, the host and container networks do not interoperate when using macvlan, but this can be solved by creating an additional macvlan bridge.
In order to solve the problem of cluster ip not working properly, the idea of just using macvlan was abandoned and multiple network interfaces were used for networking.
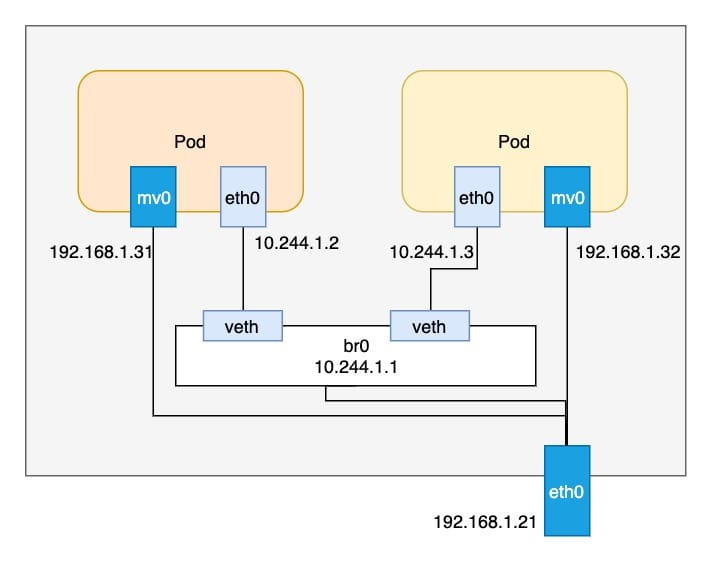
Each Pod has two network interfaces, one is bridge-based eth0 and acts as the default gateway, while relevant routes are added on the host to ensure that communication across nodes is possible. The second interface is a bridge-mode macvlan and assigns the ip of the host segment to this device.
Workflow
Similar to the workflow of CNI mentioned earlier, village net is also divided into main and ipam plugins.
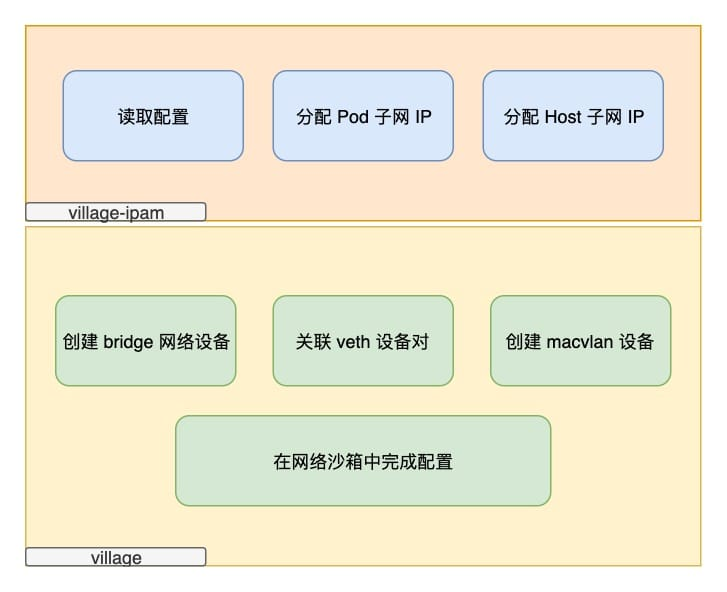
The main task of ipam is to assign an available IP from each of the two network segments based on the configuration, and the main plugin is to create bridge, veth, macvlan devices based on the IPs of the two segments and configure them.
Finally
The implementation of Village Net is still relatively simple, and even requires some manual operations, such as the routing part of the bridge. But the functionality basically meets expectations, and the pitfalls of cni are completely sorted out. cni itself is not complicated, but there are many details that were not considered at the beginning of the process, and even in the end just bypassed by a number of workaround. If there is still time and energy to put into the web plugin later, then consider how to optimize it.