Advantages of containers
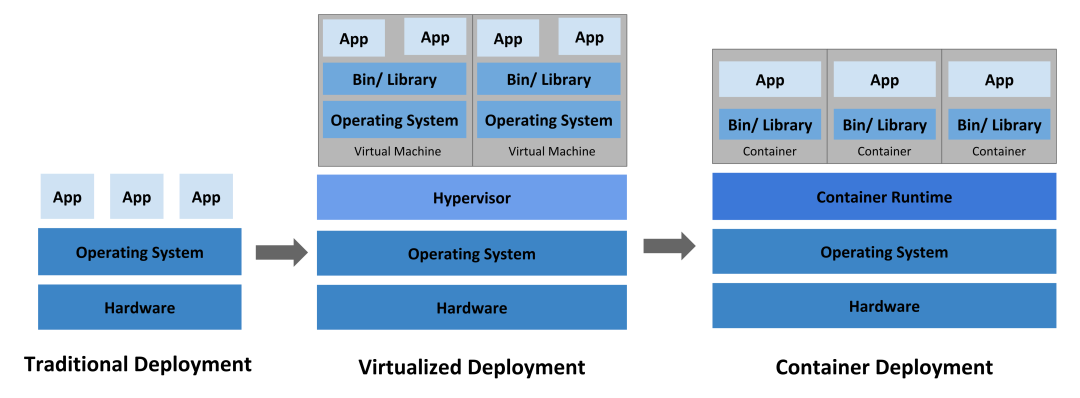
Traditional model deployments, which run multiple applications directly on a physical server, may cause performance degradation of other applications if one of them takes up most of the resources.
In the era of virtualized deployments, multiple virtual machines (VMs) can be run on the CPU of a single physical server, with each VM being a complete computer running all components (including the operating system) on top of the virtualized hardware. As a result, it is possible to have different applications running securely and in isolation between VMs, making better use of the resources on the physical server.
Containers are similar to VMs in that they have their own file system, CPU, memory, process space, etc., but unlike VMs, containers share the operating system (OS) between them. Therefore, containers are considered to be a lightweight OS-level virtualization technology.
Lightweight containers are better suited for cloud-native model practices than VMs.
The nature of containers

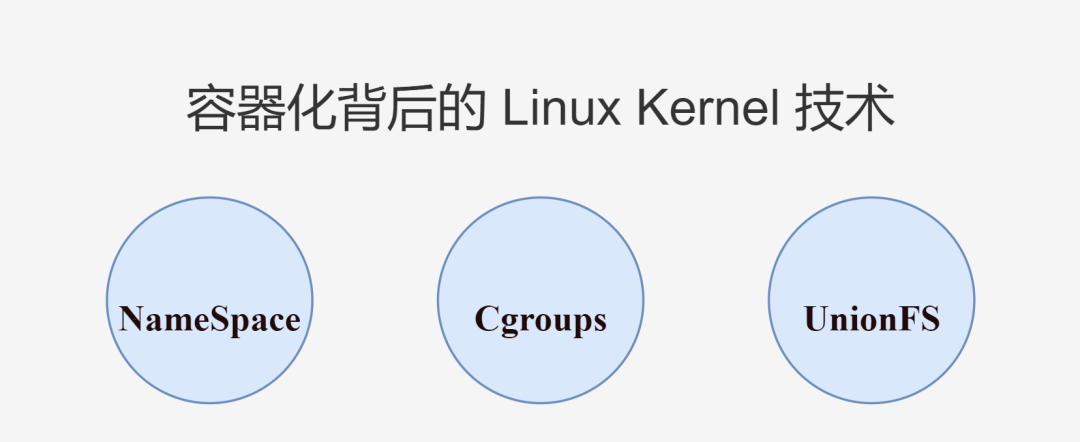
Containers are a lightweight operating system level virtualization technology.
The focus is on the “operating system level”, i.e. containers essentially use the functionality provided by the operating system to implement virtualization.
Docker, the poster child for container technology, is a virtualization tool based on the Linux operating system, written in Go, that invokes Linux Kernel functionality.
To better understand the nature of containers, let’s take a look at what Linux Kernel technologies are specifically used by containers and how they should be invoked in Go.
1. NameSpace
NameSpace is a powerful feature of Linux Kernel, which can be used for resource isolation between processes.
As the OS is shared between containers, for the operating system, the essence of the container is the process, multiple containers running, corresponding to the operating system is also running multiple processes.
When processes run in their own separate namespace, the resource isolation of the namespace ensures that the processes do not affect each other and everyone thinks they are in a separate OS. Such processes can be called containers.
Back to resource isolation, starting from Kernel: version 5.6, there are 8 types of NameSpace, which can be used to isolate different resources (Docker mainly uses the first 6 types).
| namespace | system call parameters | role |
|---|---|---|
| Mount (mnt) | CLONE_NEWNS | File directory mount isolation. Used to isolate the mount point view seen by individual processes |
| Process ID (pid) | CLONE_NEWPID | Process ID isolation. Make each namespace have its own initialization process with a PID of 1, as the parent of all processes |
| Network (net) | CLONE_NEWNET | Network isolation. Make each net namespace have separate network resources such as network devices, IP addresses, routing tables, /proc/net directories, etc. |
| Interprocess Communication (ipc) | CLONE_NEWIPC | Process IPC communication isolation. Let only processes with the same IPC namespace share memory, semaphores, and message queues to communicate with each other |
| UTS | CLONE_NEWUTS | Hostname or domain name isolation. So that it can be treated as a separate node on the network rather than a process on the host |
| User ID (user) | CLONE_NEWUSER | User UIDs and group GIDs are isolated. For example, each namespace can have its own root user |
| Control group (cgroup) Namespace | CLONE_NEWCGROUP | Cgroup information isolation. Used to hide the identity of the control group to which the process belongs, so that the cgroup view in the namespace is always presented as the root, for security |
| Time Namespace | CLONE_NEWTIME | System time isolation. Allow different processes to see different system times |
A detailed description of NameSpace can be found in the NAMESPACES section of the Linux man manual, which also describes several NameSpace APIs, mainly process-related system call functions.
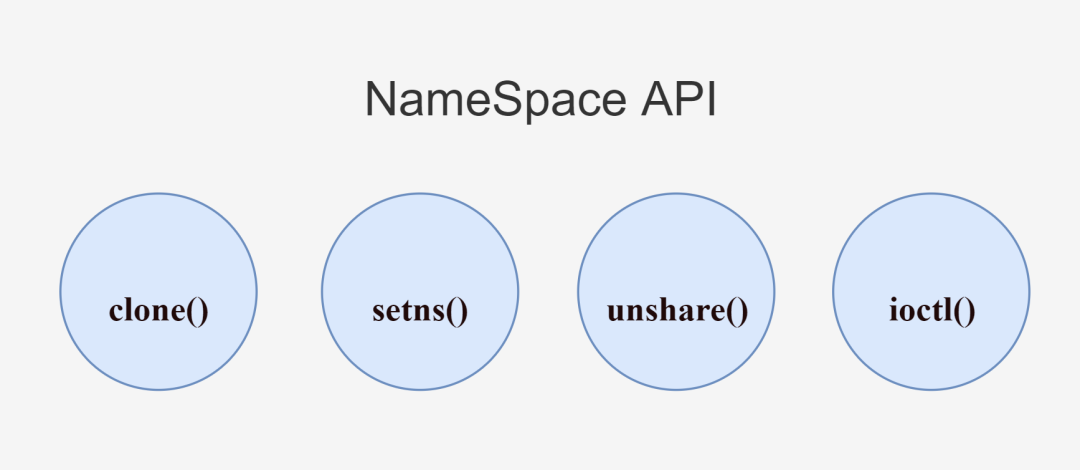
clone()
clone() is used to create a new process. Different types of NameSpace can be created by passing one or more system call parameters (flags parameter) and the child processes will become members of these NameSpace.
setns()
|
|
setns() is used to add a process to an existing Namespace. Where fd is a file descriptor that references the corresponding file in the /proc/[pid]/ns/ directory and nstype represents the NameSpace type.
unshare()
|
|
unshare() is used to move the process out of the original NameSpace and add it to the newly created NameSpace. The new NameSpace is also created by passing in one or more system call parameters (flags parameter).
ioctl()
|
|
ioctl() is used to discover information about the NameSpace.
The above system call functions can be called directly in C to create various types of NameSpace, which is the most intuitive way to do it. The Go language already encapsulates these functions internally for us, making it easier to use them directly and less mentally taxing.
Let’s start with a simple widget (from Containers From Scratch - Liz Rice - GOTO 2018).
|
|
This program takes the arguments passed from the user’s command line and runs them using exec.Command. For example, when we execute go run main.go run echo hello, the main process is created, a new echo process is created by executing the echo hello command within the main process, and finally the main process ends and exits as the echo process finishes executing.

But the process created above exits too soon for us to see. What happens if we let the main process start a bash process?
For visual comparison, let’s look at the process information for the current session.
We are currently in the bash session process with PID 1115, proceed to the next step.
|
|
After executing go run main.go run /bin/bash, our session is switched to the bash process with PID 1228, and the main process is still running (the bash process we are currently in is a child of the main process, and the main process must be alive in order to keep the bash process (running). When exit is executed to exit the bash process you are currently in, the main process ends and returns to the original PID 1115 bash session process.
As we said, containers are essentially processes, and you can now think of the main process as the “Docker” tool, and the bash process started by the main process, as a “container”. Here “Docker” creates and starts a “container”.
The reason for the double quotes is that in this bash process, we can use as many resources of the operating system as we want, and there is no resource isolation done.
To implement resource isolation, it is also simple to add SysProcAttr configuration to the run() function, starting with the simplest UTS isolation, passing in the corresponding CLONE_NEWUTS system call parameters and setting the hostname via syscall.Sethostname.
This code may not seem like a problem, but think about it.
syscall.Sethostname Which process is executing this line, the main process or the child process created by the main process?
No need to think about it, the child process is not even running yet! The main process is not isolated from resources, so it’s like changing the host name of the host directly.
The host name cannot be changed before the child process is run up, and when the child process is run up, it will enter the blocking state and cannot be changed to the host name in the child process by code. So what can be done?
It seems that we have to bring out the magic tool /proc/self/exe.
In Linux 2.2 kernel version and later, /proc/[pid]/exe is a symbolic link to the binary file corresponding to the pid process, containing the actual pathname of the command being executed. If you open this file, you open the corresponding binary, and can even re-run a process corresponding to the pid’s binary by retyping /proc/[pid]/exe.
For /proc/self, when the process accesses this magic symbolic link, it can resolve to the process’s own /proc/[pid] directory.
All together, when a process accesses /proc/self/exe, it can run a binary file corresponding to the process itself.
What does this do? Continue with the following code.
|
|
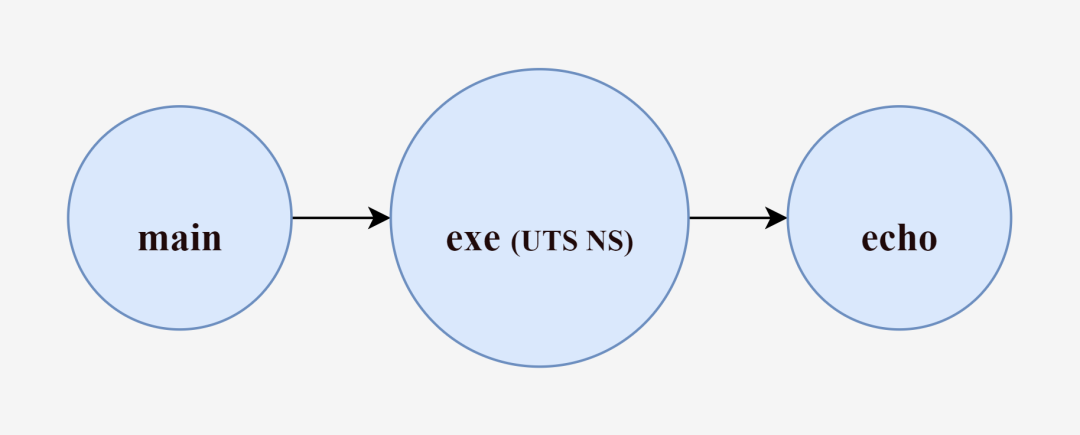
In the run() function, instead of running the user-passed command line arguments directly, we run /proc/self/exe and pass in the child argument and the user-passed command line arguments.
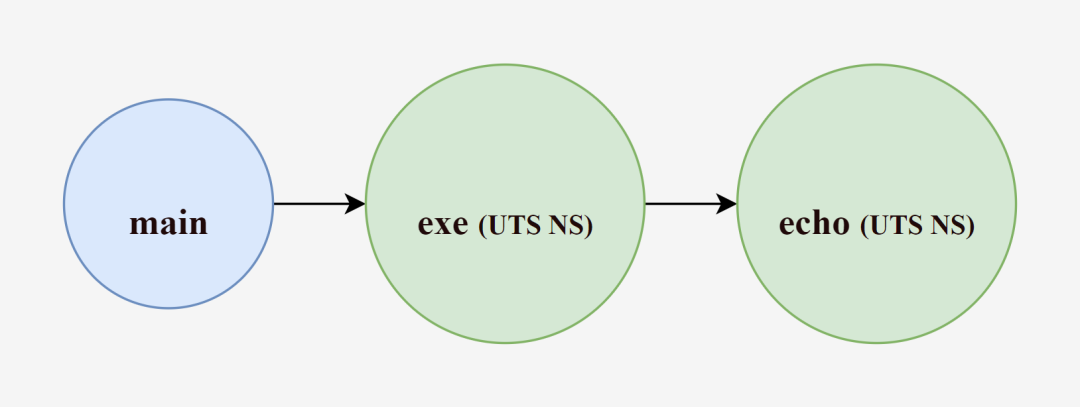
Also when executing go run main.go run echo hello, the main process is created, and the main process executes the /proc/self/exe child echo hello command to create a new exe process, which is the key to this exe process, for which we have configured the CLONE_NEWUTS system call parameter for UTS isolation. That is, the exe process can have a different host name than the main process, without interfering with each other.
Process access to /proc/self/exe means running the binary file of the corresponding process itself. Therefore, according to the start parameters of the exe process, the child() function is executed, and within the child() function, syscall.Sethostname is first called to change the hostname (which is executed by the exe process and does not affect the main process), and then, as with the run() function at the beginning of this article, the exec.Command to run the parameters passed by the user command line.
To summarize, the main process creates the exe process (the exe process is already UTS-isolated, so the host name change of the exe process will not affect the main process), then the exe process executes the echo hello command to create a new echo process, and finally, as the echo process finishes executing, the exe process ends, and after the exe process ends, the main process ends and exits again.
What is the difference between the echo process created by the intermediary exe and the echo process created directly by the main process.
We know that while creating the exe process we pass the CLONE_NEWUTS identifier to create a UTS NameSpace, Go internally encapsulates the call to the system call function clone() for us, and as we said, the children of the process created by the clone() function will also become members of these NameSpace. So by default (when creating a new process without continuing to specify system call parameters), the echo process created by the exe process will inherit the resources of the exe process, and the echo process will have the same hostname as the exe process, and will also not interfere with the main process.
Thus, with the intermediary exe process, the echo process can be successfully resource isolated from the host (main process) and have a different host name.
Verify that the hostname has been successfully quarantined by starting /bin/bash again.
|
|
When executing go run main.go run /bin/bash, we can also use ps afx in another ssh session to view hierarchical information about the bash session process with PID 15243.
|
|
And so on, adding new resources to isolate just keep passing the specified system call parameters.
|
|
The Cloneflags parameter adds CLONE_NEWPID and CLONE_NEWNS to isolate the process pid and file directory mount point view respectively, while Unshareflags: syscall.CLONE_NEWNS is used to disable mount propagation (if this parameter is not set, the If this parameter is not set, the mounts in the container will be shared to the host, and mount propagation is out of the scope of this article).
When we create the PID Namespace, the pid of the exe process including its created child processes is already isolated from the main process, which can be verified by printing the os.Getpid() result or executing the echo $ command. But at this point you can’t use the ps command to see it yet, because commands like ps and top use the contents of /proc, so we went ahead and introduced Mount Namespace and mounted the /proc directory on the exe process.
Mount Namespace was the first Linux implementation of Namespace with the CLONE_NEWNS ( New Namespace ) system call parameter, because it was not realized that so many more Namespace types would be added later.
|
|
At this point, exe as the initialization process, pid 1, created a pid 4 bash sub-process, and no longer see the main process.
The rest of the IPC, NET, USER and other NameSpace will not be shown one by one in this article.
2. Cgroups
NameSpace technology can help processes isolate their own separate spaces and successfully implement minimal containers. But how to limit the physical resource overhead of these spaces (CPU, memory, storage, I/O, etc.) requires the use of Cgroups technology.
Limiting the resource usage of containers is a very important feature, if a container can use the server resources without restraint, it will return to the traditional model of running applications directly on the physical server drawbacks. This is not acceptable for containerization technology.
Cgroups, whose full name is Control groups, was first started by Google engineers (mainly Paul Menage and Rohit Seth) in 2006 and was initially called process containers. In 2007, because the term container has many different meanings in the Linux Kernel, it was renamed cgroup to avoid confusion and was merged into the 2.6.24 version of the kernel.
Android also uses this technique to assign different cgroups to each APP, isolating each APP without affecting other APP environments.
Cgroups is a mechanism for managing groups of processes, providing the ability to limit, control and count the resources of a group of processes and their children, and defining a subsystem for each resource that can be controlled in a uniform interface, hence the name resource controllers.
Some of the major subsystems are listed below (Cgroups V1).
| subsystem | Role |
|---|---|
| cpu | Limit the cpu usage of the process |
| cpuacct | Count the cpu usage of the process |
| cpuset | Allocate separate cpu nodes or memory nodes for processes on multicore machines (NUMA architecture only) |
| memory | Limit the amount of memory used by the process |
| blkio | Control process access to block devices (e.g., hard disks) io |
| devices | Control process access to devices |
| net_cls | Mark network packets of the process so that they can be restricted, monitored, etc. using the tc module (traffic control) |
| net_prio | Control the priority of network traffic generated by the process |
| freezer | Suspend or resume processes |
| pids | Limit the number of processes in a cgroup |
| For more subsystems refer to the Linux man cgroups documentation |
With the Cgroups mechanism, a group of processes (task group) and a group of subsystems can be associated to achieve the ability to control the resources associated with the processes. As shown in the figure.
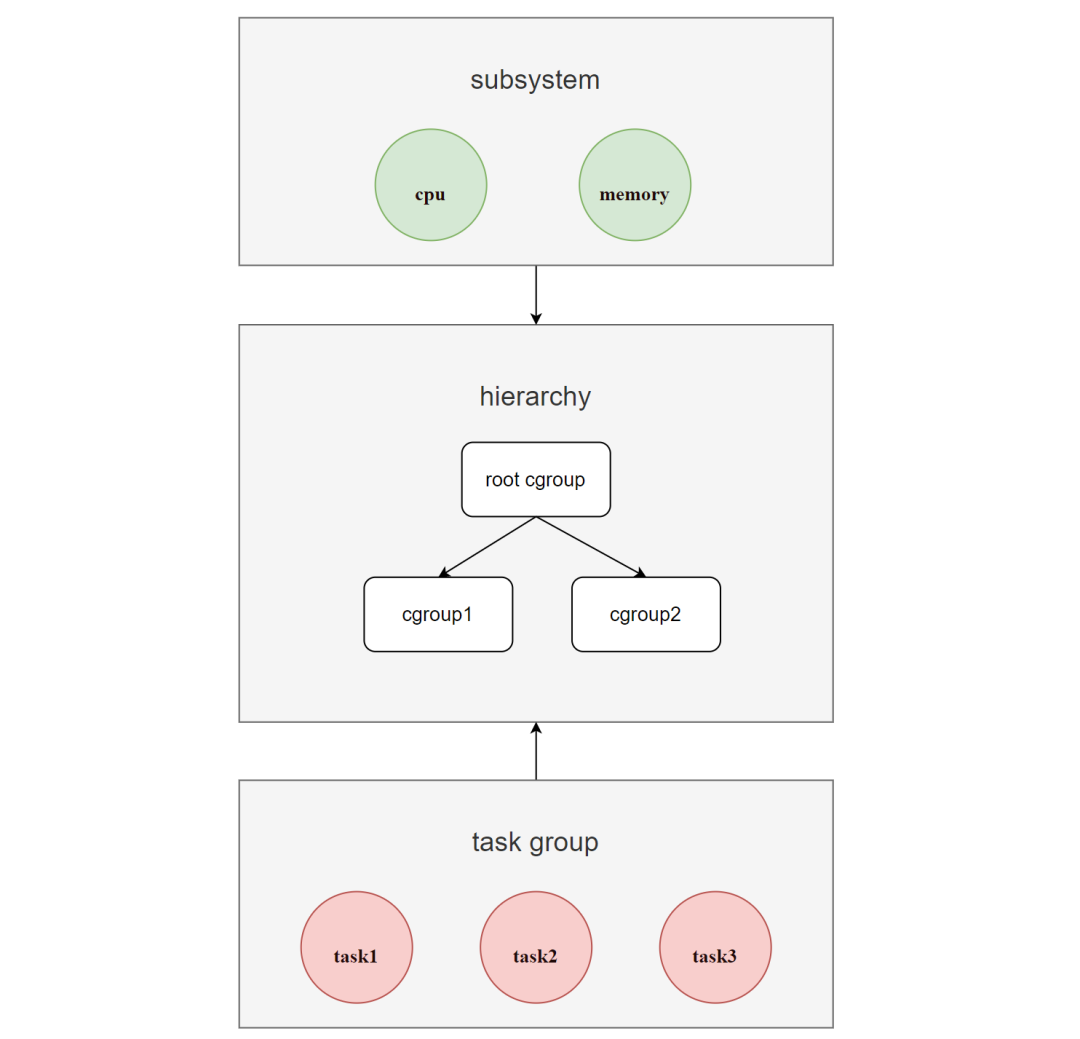
The hierarchy of Cgroups is called hierarchy (i.e. cgroup tree), which is a tree consisting of cgroup nodes.
When a new hierarchy is created, all processes in the system are added to the root cgroup node of the hierarchy, which is created by default, and in the tree, child nodes can inherit the properties of the parent node.
For the same hierarchy, processes can only exist in one of the cgroup nodes. If a process is added to another cgroup node in the same hierarchy, it is removed from the first cgroup node.
A hierarchy can have one or more subsystems attached to it to have management rights to corresponding resources (such as cpu and memory), where each cgroup node can set different resource limit weights, and processes (tasks) are bound to cgroup nodes and their children are bound to the parent cgroup node by default. in the parent process.
Based on these principles of Cgroups, we can conclude that if you want to restrict the memory resources of some processes, you can create a hierarchy and mount a memory subsystem for it, then create a cgroup node in this hierarchy, and in this node, write the pid and control attributes of the processes you want to control to in this node.
Let’s put it into practice next.
Everything is a file in Linux.
In the Linux Kernel, in order to make the configuration of Cgroups more intuitive, a hierarchy of directories is used to simulate a hierarchy, which is exposed to the user by means of a virtual tree file system.
Create a hierarchy and mount the memory subsystem for it. We can skip this step because the system has already created a default hierarchy for each subsystem by default and we can use it directly.
For example, the default hierarchy for the memory subsystem is in the /sys/fs/cgroup/memory directory.
Simply creating a folder in this hierarchy directory is equivalent to creating a cgroup node.
|
|
All the files in the hello folder that we created are automatically created by the system. A few commonly used files function as follows.
| filename | function |
|---|---|
| tasks | A list of processes (PIDs) running in a cgroup. Writing a PID to a cgroup’s tasks file moves the process to that cgroup |
| cgroup.procs | A list of thread groups (TGIDs) running in a cgroup. Writing the TGID to a cgroup’s cgroup.procs file moves the thread group to that cgroup |
| cgroup.event_control | The interface to event_fd(). Allows cgroup change status notifications to be sent |
| notify_on_release | Used to automatically remove empty cgroups. The default state is disabled (0). When set to enabled (1), when the cgroup no longer contains any tasks (i.e., the cgroup’s tasks file contains a PID and the PID is removed, leaving the file empty), the kernel executes the contents of the release_agent file (which appears only for the root cgroup) and provides the relevant path (related to the root cgroup) to the cleared cgroup as an argument |
| memory.usage_in_bytes | Shows the total amount of memory (in bytes) currently used by processes in the cgroup |
| memory.memsw.usage_in_bytes | Shows the total amount of memory and swap space (in bytes) currently used by processes in the cgroup |
| memory.max_usage_in_bytes | Shows the maximum amount of memory (in bytes) used by processes in the cgroup |
| memory.memsw.max_usage_in_bytes | Shows the maximum memory usage and maximum swap space usage (in bytes) of the processes in the cgroup |
| memory.limit_in_bytes | Set the maximum amount of user memory (including file cache) |
| memory.memsw.limit_in_bytes | Set the maximum value of the sum of memory and swap usage |
| memory.failcnt | Shows the number of times the memory reaches the limit set by memory.limit_in_bytes |
| memory.memsw.failcnt | Shows the number of times the sum of memory and swap space reached the limit set by memory.memsw.limit_in_bytes |
| memory.oom_control | The Out of Memory (OOM) terminator can be enabled or disabled for cgroup. The default is enabled (0), and tasks that attempt to consume more memory than they are allowed are immediately terminated by the OOM terminator. When set to the disabled state (1), tasks that attempt to use more memory than they are allowed will be suspended until additional memory is available. |
| For more information on the functionality of the file, see cgroup-v1/memory in the kernel documentation. |
In this hello cgroup node, we want to limit the memory resources of certain processes by writing the corresponding process pid to the tasks file and setting the maximum memory usage to the memory.limit_in_bytes file.
The hello cgroup node has OOM termination enabled by default, so when a process tries to use more memory than is available, it will be terminated immediately. A query to memory.failcnt shows that no process memory has yet reached the set maximum memory limit.
We have set the maximum memory available for the hello cgroup node to 100M, so start a new bash session process and move it into the hello cgroup node.
Subsequent child processes created in this session will be added to the hello cgroup node (e.g. pid 4135 is a new process created as a result of the cat command and is automatically added to the tasks file).
Continue using the memtester utility to test that the 100M maximum memory limit is in effect.
|
|
You can see that when memtester tries to request 100M memory, it fails, and memory.failcnt reports that the number of times the memory reaches the limit set by memory.limit_in_bytes (100M) is 1434.
If you want to delete a cgroup node, you only need to delete the corresponding folder.
After using and practicing Cgroups above, we can apply it to our previous Go programs.
|
|
We added a call to the cg() function in the exe process, the code is relatively simple and almost identical to our practice, except that we set the notify_on_release file to a value of 1 so that when our exe process exits, the created cgroup is automatically removed.
|
|
Testing with memtester was consistent with the results expected.
|
|
The rest of the subsystem will not be shown in this article.
In fact, we have already isolated the processes through NameSpace technology to help them isolate their own separate space, and use Cgroups technology to limit and monitor the resource overhead of these spaces, this special process is the essence of the container. We can say that we have achieved the purpose of this article and can end it.

But in addition to using NameSpace and Cgroups to implement containers, in Docker, a Linux Kernel technology is also used: UnionFS to implement images.
The main theme of this article is to explore the principles of containerization using Go and Linux Kernel technologies with the main technical points being NameSpace and Cgroups. UnionFS, the technology for implementing images, is an extra.
3. UnionFS
UnionFS, known as the Union File System, was developed in 2004 by the State University of New York at Stony Brook as a hierarchical, lightweight and high-performance file system for Linux, FreeBSD and NetBSD operating systems that mounts the contents of multiple directories under the same directory, while the physical locations of the directories are separate. physical locations are separate, and changes to the filesystem are made as a single commit overlaid on top of each other, similar to git’s commit.
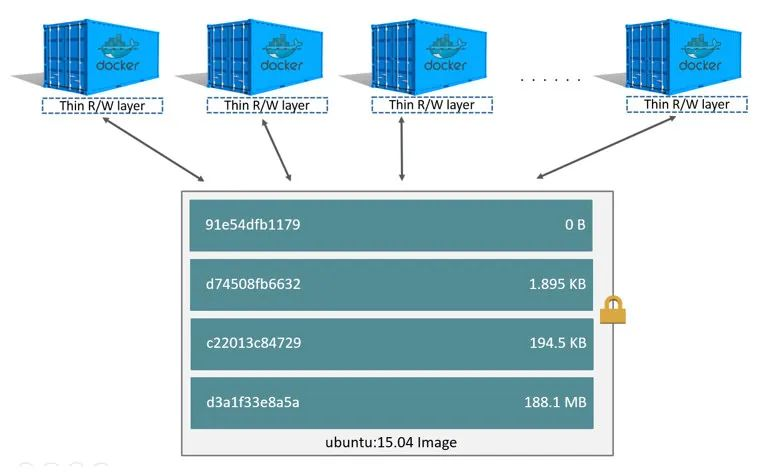
In Docker, mirrors are the equivalent of container templates, and a single image can spawn multiple containers. Mirroring using UnionFS technology to achieve, you can use its layered characteristics to mirror inheritance, based on the base image, to create a variety of specific application images, different containers can directly share the base file system layer, while adding their own unique changes layer, greatly improving the efficiency of storage.
Take this Dockerfile as an example.
Each layer of the image can represent a command in the Dockerfile, and each layer except the last one is read-only.
The Dockerfile contains several commands that create a layer if the command modifies the filesystem (using the UnionFS principle).
First, the FROM statement creates a layer [1] from the ubuntu:18.04 image, while the LABEL command only modifies the image’s metadata and does not create a new image layer, and then the COPY command adds files from the current directory to the /app directory in the image, creating layer [2] on top of layer [1].
The first RUN command builds the application using make and writes the result to the new layer [3]. The second RUN command removes the cache directory and writes the results to the new layer [4]. Finally, the CMD command specifies what commands to run inside the container, modifying only the metadata of the image and not generating the image layer.
These [4] layers are stacked on top of each other to form an image. When a new container is created, a new writable layer, called the container layer, is added on top of the image layers. All changes made to the running container, such as writing new files, modifying existing files, and deleting files, are written to this writable container layer.

For the same image layer, each container will have its own writable container layer and all changes are stored in this container layer, so multiple containers can share access to the same underlying image and have their own data state. And when a container is deleted, its writable container layer is also deleted. If users need to persist the data in the container, they need to use Volume to mount it to the host directory.
After looking at how Docker images work, let’s go back to its implementation technology, UnionFS itself.
There are several types of UnionFS currently supported by Docker.
| Union File System | Storage Drivers | Description |
|---|---|---|
| OverlayFS | overlay2 | Preferred storage driver for all currently supported Linux distributions and does not require any additional configuration |
| OverlayFS | fuse-overlayfs | Preferred only when running Rootless Docker on hosts that do not provide support for rootless |
| Btrfs 和 ZFS | btrfs 和 zfs | Allows advanced options, such as creating snapshots, but requires more maintenance and setup |
| VFS | vfs | 旨Intended for testing purposes and for use in cases where a copy-on-write file system is not available. This storage driver has poor performance and is generally not recommended for production use |
| AUFS | aufs | The preferred storage driver for Docker 18.06 and earlier. However, on machines without an overlay2 driver, aufs will still be used as the default driver for Docker |
| Device Mapper | devicemapper | Default storage driver for Docker Engine in RHEL (older kernel versions do not support overlay2, newer versions do), with two configuration modes: loop-lvm (zero configuration but poor performance) and direct-lvm (recommended for production environments) |
| OverlayFS | overlay | Recommended overlay2 storage driver |
Whenever possible, it is recommended to use the overlay2 storage driver for OverlayFS, which is the current default storage driver for Docker (formerly aufs for AUFS).
To see which storage driver is used by Docker.
OverlayFS is actually a modern Union file system for Linux similar to AUFS, which was merged into the Linux Kernel (version 3.18) in 2014 and is faster and simpler to implement than AUFS. Overlay2 (Linux Kernel version 4.0 or higher) is the recommended driver for it.
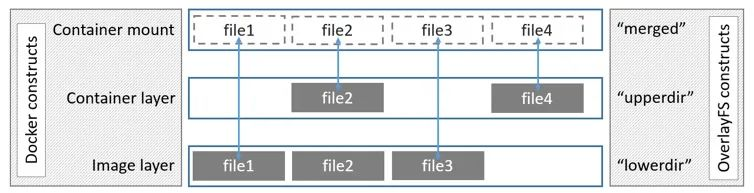
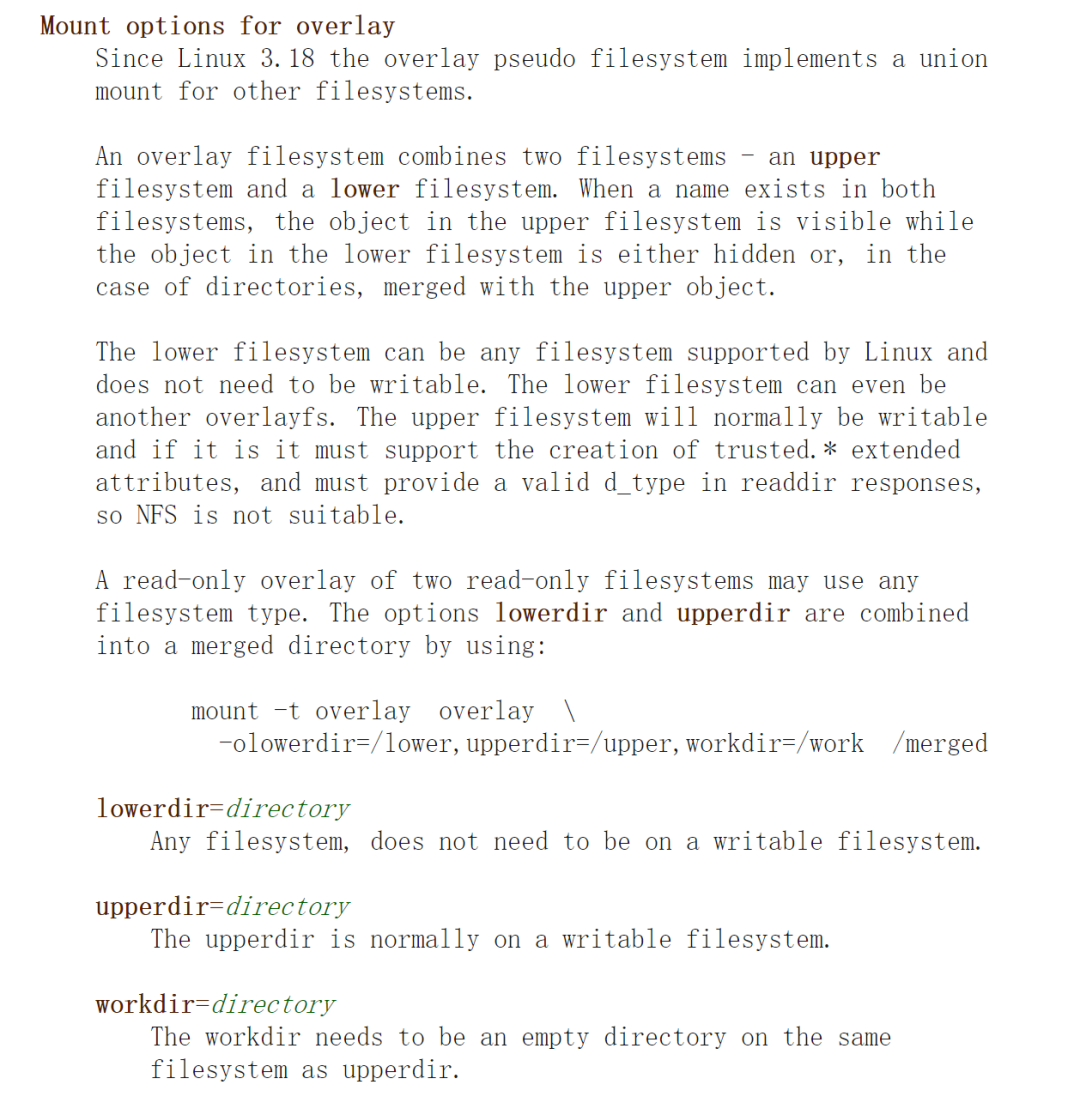
overlay2 consists of four structures, of which
- lowerdir : denotes the lower directory, which corresponds to the read-only image layer in Docker.
- upperdir : indicates the upper directory, which corresponds to the writeable container layer in Docker.
- workdir : indicates the working layer (middle layer) directory, which is not visible to users during use.
- merged : A joint mount point for all directories after merging, exposing a unified view of directories to the user, corresponding to the actual view of directories in the container that the user sees in Docker.
This is the architecture diagram for overlays in the Docker documentation, but it also works for overlay2.
The image layer corresponding to lowerdir can actually have many layers, but only one layer is drawn in the figure.
Careful people may find that there is no workdir in the diagram, how exactly does it work?
We can understand from the perspective of reading and writing, for the case of reading.
- the file is in upperdir, read it directly.
- file is not in upperdir, read from lowerdir, incurring a very small performance overhead.
- files exist in both upperdir and lowerdir, read from upperdir (files in upperdir hide files of the same name in lowerdir).
For the write case.
- Create a new file, if the file does not exist in both upperdir and lowerdir, then create it directly in upperdir.
- Modify the file, if it exists in upperdir, then modify it directly.
- modify the file, or if the file does not exist in upperdir, perform a copy_up operation to copy the file from lowerdir to upperdir, and subsequent writes to the file will operate on the copy file already copied to upperdir. This is copy-on-write.
- Delete the file, or just delete it if it exists only in the upperdir.
- Delete the file, or create a blank file with the same name (whiteout file) in upperdir if the file exists only in lowerdir. The files in lowerdir are not deleted because they are read-only, but the whiteout file prevents them from continuing to be displayed
- Delete files, if they exist in both upperdir and lowerdir, the file in upperdir will be deleted first and then a blank file with the same name (whiteout file) will be created.
- Deleting a directory is the same as deleting a file, creating an opaque directory with the same name in the upperdir (opaque directory). Like the whiteout file principle, the opaque directory will prevent users from continuing to access it, even if the directory in the lowerdir still exists.
After all the talk, it seems that the role of workdir has not been mentioned. This has to be understood, after all, they are not visible to the user in the process of use.
But in fact, the role of workdir can not be ignored. Imagine a scenario where a file (or directory) is deleted (the file or directory exists in both upperdir and lowerdir), for lowerdir it’s nothing, after all it’s read-only and doesn’t need to be ignored, but for upperdir it’s different. In upperdir, we have to delete the corresponding file before we can create a whiteout file with the same name, and how to ensure that both steps must be performed involves atomic operations.
Workdir is used to perform some intermediate operations, which include atomicity guarantees. In the above problem, you can create a whiteout file with the same name in workdir first, then perform the two steps on upperdir, and then delete the whiteout file in workdir after it succeeds.
When modifying files, workdir also acts as an intermediate layer, when modifying the copy in upperdir, it will be put into workdir first, and then moved from workdir to upperdir.
After understanding how overlay2 works, let’s move on to the demonstration.
First, you can see how the mount point of a container looks like after it is started in Docker.
|
|
As you can see, the merged directory after mounting includes the lowerdir, upperdir, and workdir directories, and the merged directory is actually the view of the directory seen by users inside the container.
Back to the technology itself, we can try to use the mount’s overlay mount option ourselves.
First create the lowerdir (2 were created), upperdir, workdir, merged directories and write some files to the lowerdir and upperdir directories.
|
|
Use the mount command’s overlay option mode for mounting.
|
|
At this point, you can see all the files by going to the merged directory.
We try to modify the files in the lowerdir directory.
|
|
As we said before, when a file in lowerdir is modified, a copy_up operation is performed to copy the file from lowerdir to upperdir, and subsequent writes to the file will be performed on the copy file that has been copied to upperdir.
For other read and write cases, you can try it yourself.
Summary
In fact, the underlying principle of the container is not difficult, is essentially a special process, special in its creation of a NameSpace isolated runtime environment, with Cgroups for its control of resource overhead, these are standing on the shoulders of the Linux operating system to achieve, including Docker image implementation is also the use of the UnionFS hierarchical union technology.
We can even say that the essence of almost all applications is that the upper layer calls the lower layer and the lower layer supports the upper layer.