kubevirt connects the VM management interface to kubernetes in the form of a CRD, using libvirtd to manage VMs by means of a pod to achieve a one-to-one correspondence between pods and VMs, to manage VMs as containers do, and to do the same resource management and scheduling planning as containers do. All the code involved in this article can be found in my Github.
Background
CRD Design
Kubevirt implements the following main resources to enable the management of virtual machines.
VirtualMachineInstance (VMI) : Similar to a kubernetes Pod, it is the minimum resource for managing virtual machines . A VirtualMachineInstance object represents a running instance of a virtual machine and contains all the configuration needed for a virtual machine. Usually users do not create VMI objects directly, but rather create higher-level objects, i.e. VMs and VMRS.VirtualMachine(VM) : Provides management functions for VirtualMachineInstance in the cluster, such as powering on/off/restarting VMs, ensuring the startup state of VM instances, and has a 1:1 relationship with VM instances, similar to a StatefulSet with spec.replica of 1. .VirtualMachineInstanceReplicaSet : similar to ReplicaSet, can start a specified number of VirtualMachineInstance and keep a specified number of VirtualMachineInstance running, can be configured with HPA.
Architecture Design
Why does kube-virt allow seamless access to K8S for virtual machines?
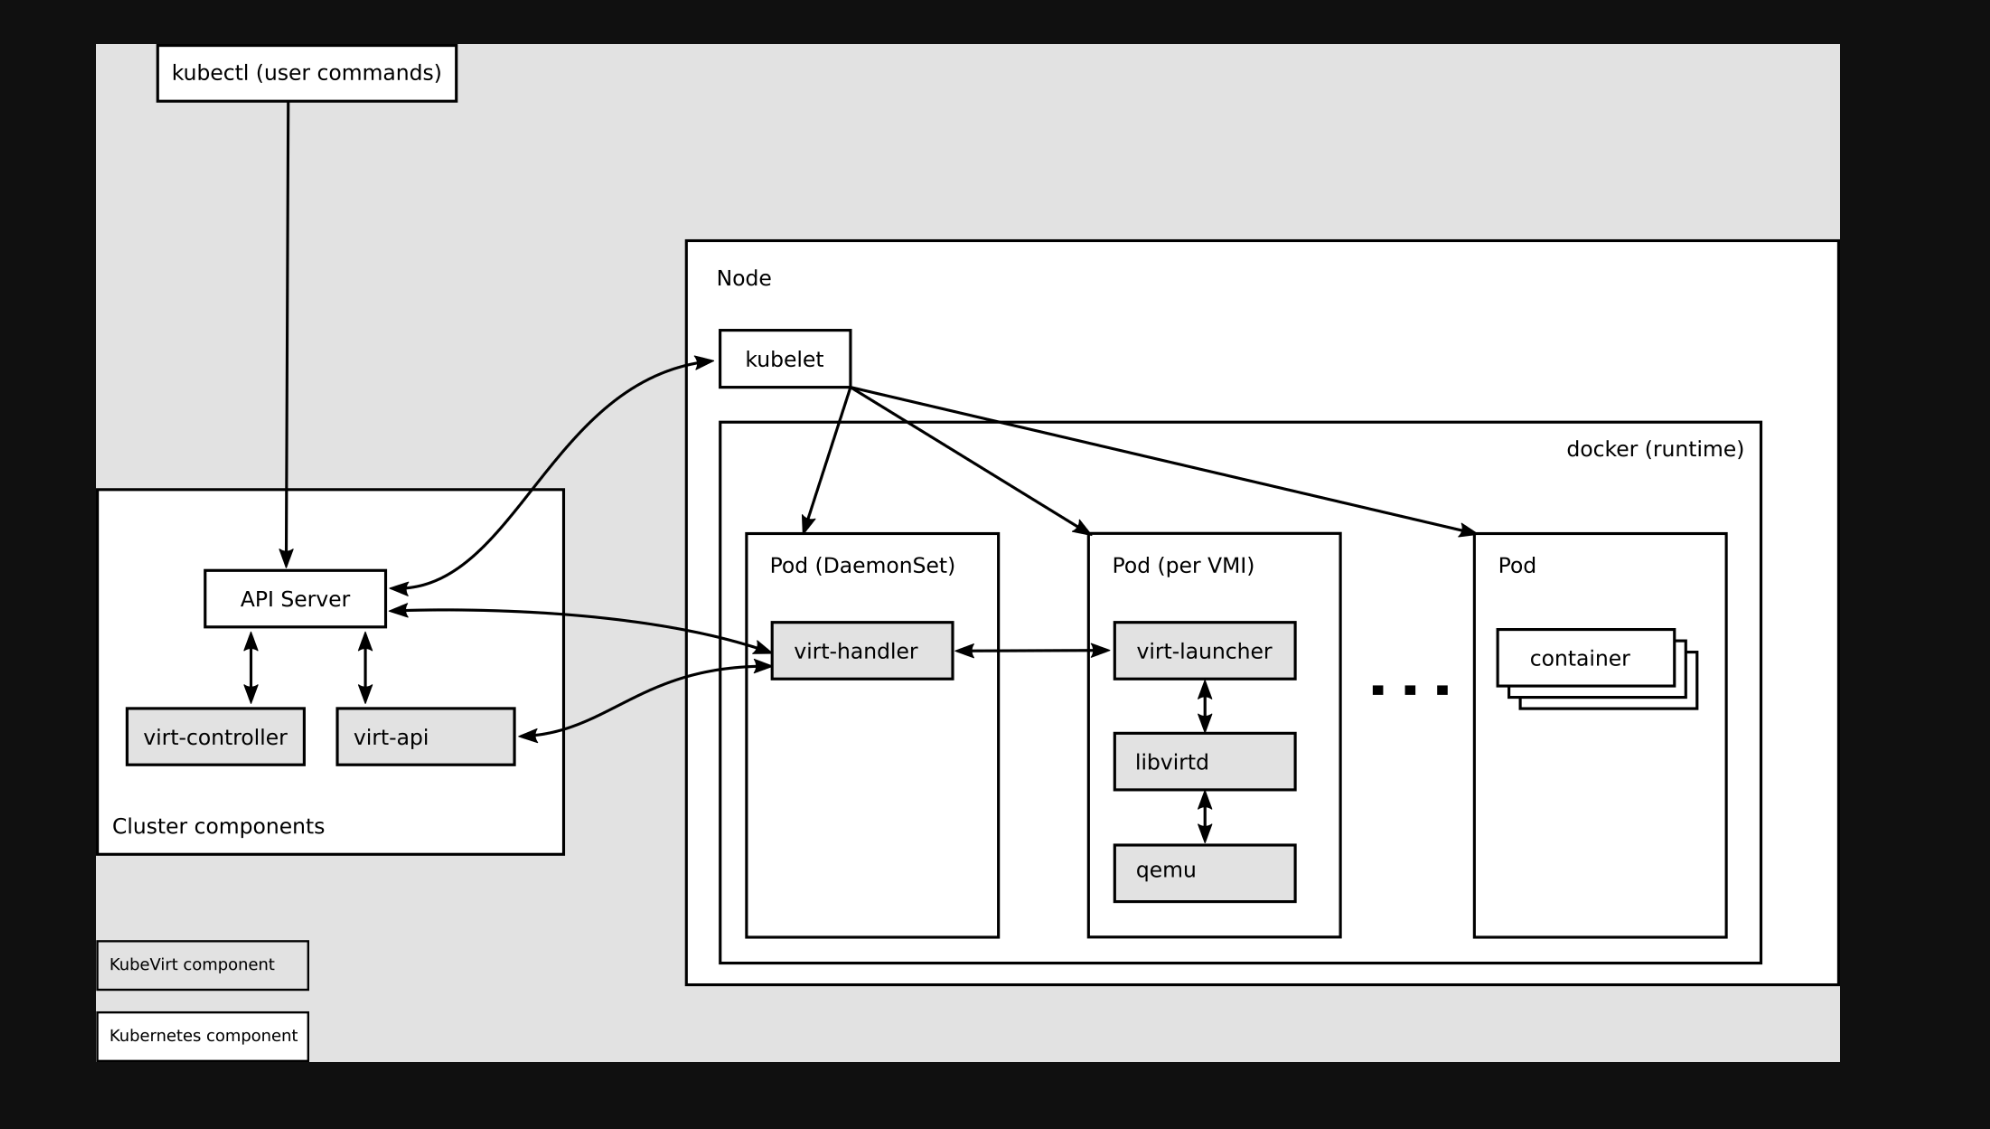
virt-api
- kubevirt is a CRD to manage vm pods, virt-api is the entry point for all virtualization operations, including regular CRD update verification and vm start, stop
virt-controller
- Virt-controller will generate the corresponding virt-lancher pod based on the vmi CRD and maintain the status of the CRD
virt-handler
virt-handler will be deployed on each node as Daemonset, responsible for monitoring the state changes of each VM instance on the node, and once a state change is detected, it will respond and ensure that the corresponding operation can reach the required (desired) state.virt-handler keeps the cluster-level VMI Spec synchronized with the corresponding libvirt domain; reports changes in Libvirt domain state and cluster Spec; invokes node-centric plugins to meet the network and storage requirements defined by the VMI Spec.
virt-lanuncher
- Each
virt-lanuncher pod corresponds to a VMI. kubelet is only responsible for the running state of the virt-lanuncher pod and does not care about VMI creation.
virt-handler will notify virt-lanuncher to start the VMI with a local libvirtd instance based on CRD parameters, virt-lanuncher will manage the VMI by pid, and virt-lanuncher will notify the VMI to terminate if the pod life cycle ends.- Each virt-lanuncher pod corresponds to a libvirtd, and virt-lanuncher manages the VM lifecycle through libvirtd, so that it is decentralized, instead of the old VM practice where one libvirtd manages multiple VMs.
libvirtd
An instance of libvirtd is present in every VMI pod. virt-launcher uses libvirtd to manage the life-cycle of the VMI process.
virtctl
- virctl is kubevirt comes with a command similar to kubectl, it goes beyond the virt-lancher pod layer to manage the vm directly, and can control the start, stop and restart of the vm.
VM process
The above architecture has in fact partially outlined the VM creation process, the following process combing.
- K8S API creates VMI CRD object
virt-controller listens to VMI creation, generates pod spec file based on VMI configuration, and creates virt-launcher pods.virt-controller will update the VMI CRD status when it finds the virt-launcher pods are created.virt-handler listens to the VMI status change, communicates with virt-launcher to create VMs, and is responsible for VM lifecycle management
As shown in the following figure.
 1
 2
 3
 4
 5
 6
 7
 8
 9
10
11
12
13
14
15
16
17
18
19
20
21
22
23
24
25
|
Client                     K8s API     VMI CRD  Virt Controller         VMI Handler
-------------------------- ----------- ------- ----------------------- ----------

                           listen <----------- WATCH /virtualmachines
                           listen <----------------------------------- WATCH /virtualmachines
                                                  |                       |
POST /virtualmachines ---> validate               |                       |
                           create ---> VMI ---> observe --------------> observe
                             |          |         v                       v
                           validate <--------- POST /pods              defineVMI
                           create       |         |                       |
                             |          |         |                       |
                           schedPod ---------> observe                    |
                             |          |         v                       |
                           validate <--------- PUT /virtualmachines       |
                           update ---> VMI ---------------------------> observe
                             |          |         |                    launchVMI
                             |          |         |                       |
                             :          :         :                       :
                             |          |         |                       |
DELETE /virtualmachines -> validate     |         |                       |
                           delete ----> * ---------------------------> observe
                             |                    |                    shutdownVMI
                             |                    |                       |
                             :                    :                       :
|
Deployment Process
This experiment is conducted on Tencent Cloud to create a TKE cluster containing Blackrock models.
Node initialization
The libvirt and qemu packages need to be installed on the node.
1
2
3
4
5
|
# Ubuntu
$ apt install -y qemu-kvm libvirt-bin bridge-utils virt-manager

# CentOS
$ yum install -y qemu-kvm libvirt virt-install bridge-utils
|
Check if the node supports KVM hardware virtualization.
 1
 2
 3
 4
 5
 6
 7
 8
 9
10
11
12
13
14
15
|
[root@VM-4-27-centos ~]# virt-host-validate qemu
  QEMU: Checking for hardware virtualization                                 : PASS
  QEMU: Checking if device /dev/kvm exists                                   : PASS
  QEMU: Checking if device /dev/kvm is accessible                            : PASS
  QEMU: Checking if device /dev/vhost-net exists                             : PASS
  QEMU: Checking if device /dev/net/tun exists                               : PASS
  QEMU: Checking for cgroup 'cpu' controller support                         : PASS
  QEMU: Checking for cgroup 'cpuacct' controller support                     : PASS
  QEMU: Checking for cgroup 'cpuset' controller support                      : PASS
  QEMU: Checking for cgroup 'memory' controller support                      : PASS
  QEMU: Checking for cgroup 'devices' controller support                     : PASS
  QEMU: Checking for cgroup 'blkio' controller support                       : PASS
  QEMU: Checking for device assignment IOMMU support                         : PASS
  QEMU: Checking if IOMMU is enabled by kernel                               : WARN (IOMMU appears to be disabled in kernel. Add intel_iommu=on to kernel cmdline arguments)
  QEMU: Checking for secure guest support                                    : WARN (Unknown if this platform has Secure Guest support)
|
Check that kvm is loaded on the node at this point.
1
2
3
4
|
[root@VM-4-27-centos ~]# lsmod | grep kvm
kvm_intel             315392  15
kvm                   847872  1 kvm_intel
irqbypass              16384  17 kvm
|
Install kubevirt
1
2
3
|
$ export VERSION=$(curl -s https://api.github.com/repos/kubevirt/kubevirt/releases | grep tag_name | grep -v -- '-rc' | head -1 | awk -F': ' '{print $2}' | sed 's/,//' | xargs)
$ kubectl apply -f https://github.com/kubevirt/kubevirt/releases/download/${VERSION}/kubevirt-operator.yaml
$ kubectl apply -f https://github.com/kubevirt/kubevirt/releases/download/${VERSION}/kubevirt-cr.yaml
|
Note: If the previous node does not support hardware virtualization, you can enable software emulation mode by modifying kubevirt-cr, refer to software emulation fallback
Deployment results
 1
 2
 3
 4
 5
 6
 7
 8
 9
10
11
|
$ kubectl -n kubevirt get pod
NAME                               READY   STATUS    RESTARTS   AGE
virt-api-64999f7bf5-n9kcl          1/1     Running   0          6d
virt-api-64999f7bf5-st5qv          1/1     Running   0          6d8h
virt-controller-8696ccdf44-v5wnq   1/1     Running   0          6d
virt-controller-8696ccdf44-vjvsw   1/1     Running   0          6d8h
virt-handler-85rdn                 1/1     Running   3          7d19h
virt-handler-bpgzp                 1/1     Running   21         7d19h
virt-handler-d55c7                 1/1     Running   1          7d19h
virt-operator-78fbcdfdf4-sf5dv     1/1     Running   0          6d8h
virt-operator-78fbcdfdf4-zf9qr     1/1     Running   0          6d
|
Deploy Containerized Data Importer
The Containerized Data Importer (CDI) project provides functionality for making PVCs available as KubeVirt VM disks. See Github: Containerized Data Importer.
1
2
3
|
$ export VERSION=$(curl -s https://github.com/kubevirt/containerized-data-importer/releases/latest | grep -o "v[0-9]\.[0-9]*\.[0-9]*")
$ kubectl create -f https://github.com/kubevirt/containerized-data-importer/releases/download/$VERSION/cdi-operator.yaml
$ kubectl create -f https://github.com/kubevirt/containerized-data-importer/releases/download/$VERSION/cdi-cr.yaml
|
Deploy HostPath Provisioner
In this experiment, we use PVC as persistent storage, but when we use CBS as PVC in Tencent Cloud Blackrock server cluster, we found that there is a problem that PVC cannot mount Pod, so we choose to use hostpath-provisioner provided by kubevirt as the provisioner of PVC.
Referring to Github: kubevirt.io.hostpath-provisioner, hostpath-provisioner runs as DaemonSet on on each node, which can be deployed via hostpath-provisioner-operator in the following way.
1
2
3
4
5
6
7
8
9
|
# hostpath provisioner operator 依赖于 cert manager 提供鉴权能力
$ kubectl create -f https://github.com/cert-manager/cert-manager/releases/download/v1.7.1/cert-manager.yaml

# 创建 hostpah-provisioner namespace
$ kubectl create -f https://raw.githubusercontent.com/kubevirt/hostpath-provisioner-operator/main/deploy/namespace.yaml

# 部署 operator
$ kubectl create -f https://raw.githubusercontent.com/kubevirt/hostpath-provisioner-operator/main/deploy/operator.yaml -n hostpath-provisioner
$ kubectl create -f https://raw.githubusercontent.com/kubevirt/hostpath-provisioner-operator/main/deploy/webhook.yaml
|
Next, the CR is created as the back-end storage, where /var/hpvolumes on the Node is specified as the actual data storage location.
 1
 2
 3
 4
 5
 6
 7
 8
 9
10
11
12
|
apiVersion: hostpathprovisioner.kubevirt.io/v1beta1
kind: HostPathProvisioner
metadata:
  name: hostpath-provisioner
spec:
  imagePullPolicy: Always
  storagePools:
    - name: "local"
      path: "/var/hpvolumes"
  workload:
    nodeSelector:
      kubernetes.io/os: linux
|
After the PVC is actually created, you can see the stored image in the corresponding directory.
 1
 2
 3
 4
 5
 6
 7
 8
 9
10
11
12
13
14
15
|
[root@VM-4-27-centos hostpath-provisioner]# tree /var/hpvolumes/csi/
/var/hpvolumes/csi/
|-- pvc-11d671f7-efe3-4cb0-873b-ebd877af53fe
|   `-- disk.img
|-- pvc-a484dae6-720e-4cc4-b1ab-8c59eec7a963
|   `-- disk.img
`-- pvc-de897334-cb72-4272-bd76-725663d3f515
    `-- disk.img

3 directories, 3 files
[root@VM-4-27-centos hostpath-provisioner]# kubectl get pvc
NAME          STATUS   VOLUME                                     CAPACITY   ACCESS MODES   STORAGECLASS   AGE
iso-win10     Bound    pvc-de897334-cb72-4272-bd76-725663d3f515   439Gi      RWO            hostpath-csi   23h
iso-win10-2   Bound    pvc-a484dae6-720e-4cc4-b1ab-8c59eec7a963   439Gi      RWO            hostpath-csi   23h
iso-win10-3   Bound    pvc-11d671f7-efe3-4cb0-873b-ebd877af53fe   439Gi      RWO            hostpath-csi   22h
|
Next, you need to create the corresponding storageclass, note that the storagePool here is the local inside the CR you just created.
1
2
3
4
5
6
7
8
9
|
apiVersion: storage.k8s.io/v1
kind: StorageClass
metadata:
  name: hostpath-csi
provisioner: kubevirt.io.hostpath-provisioner
reclaimPolicy: Delete
volumeBindingMode: WaitForFirstConsumer
parameters:
  storagePool: local
|
Configuring HardDisk
Refer to Kubevirt: Activating feature gates to turn on the HardDisk mode of kubevirt.
 1
 2
 3
 4
 5
 6
 7
 8
 9
10
11
12
13
14
15
16
|
$ cat << END > enable-feature-gate.yaml

apiVersion: kubevirt.io/v1
kind: KubeVirt
metadata:
  name: kubevirt
  namespace: kubevirt
spec:
  configuration:
    developerConfiguration:
      featureGates:
        - HardDisk
        - DataVolumes
END

$ kubectl apply -f enable-feature-gate.yaml
|
Client preparation
Kubevirt provides a command line tool virtctl that can be downloaded directly.
1
2
3
|
$ export VERSION=$(curl -s https://api.github.com/repos/kubevirt/kubevirt/releases | grep tag_name | grep -v -- '-rc' | head -1 | awk -F': ' '{print $2}' | sed 's/,//' | xargs)
$ curl -L -o /usr/local/bin/virtctl https://github.com/kubevirt/kubevirt/releases/download/$VERSION/virtctl-$VERSION-linux-amd64
$ chmod +x /usr/local/bin/virtctl
|
It can also be installed as a plugin for kubectl via krew.
1
|
$ kubectl krew install virt
|
Creating a Linux Virtual Machine
The following is an example of a VMI for creating a Linux virtual machine, based on which a VM is automatically created. in this CR, several key elements are specified that are required for a virtual machine:
- Domain: domain is the root element required by a VM, specifying all the resources required by the VM. kubevirt will create the VM based on this domain spec into a libvirt XML file.
- Storage:
spec.volumes indicates the real storage backend, and spec.domain.devices.disks indicates what storage this VM will use. See the section on storage for details.
- Network:
spec.networks indicates the real network backend, spec.domain.devices.interfaces indicates what type of NIC devices this VM uses.
 1
 2
 3
 4
 5
 6
 7
 8
 9
10
11
12
13
14
15
16
17
18
19
20
21
22
23
24
25
26
27
28
29
30
31
32
33
34
35
36
37
38
39
40
|
apiVersion: kubevirt.io/v1alpha3
kind: VirtualMachineInstance
metadata:
  name: testvmi-nocloud2
spec:
  terminationGracePeriodSeconds: 30
  domain:
    resources:
      requests:
        memory: 1024M
    devices:
      disks:
      - name: containerdisk
        disk:
          bus: virtio
      - name: emptydisk
        disk:
          bus: virtio
      - disk:
          bus: virtio
        name: cloudinitdisk
      interfaces:
      - bridge: {}
        name: default
  networks:
  - name: default
    pod: {}
  volumes:
  - name: containerdisk
    containerDisk:
      image: kubevirt/fedora-cloud-container-disk-demo:latest
  - name: emptydisk
    emptyDisk:
      capacity: "2Gi"
  - name: cloudinitdisk
    cloudInitNoCloud:
      userData: |-
        #cloud-config
        password: fedora
        chpasswd: { expire: False }
|
After creating the following VirtualMachineInstance CR, you can see that the Pod virt-launcher-testvmi-nocloud2-jbbhs is launched in the cluster. view Pod and virtual machine
1
2
3
4
5
6
|
[root@VM-4-27-centos ~]# kubectl get po -owide
NAME                                   READY   STATUS    RESTARTS   AGE   IP            NODE        NOMINATED NODE   READINESS GATES
virt-launcher-testvmi-nocloud2-jbbhs   2/2     Running   0          24h   172.16.0.24   10.3.4.27   <none>           1/1
[root@VM-4-27-centos ~]# kubectl get vmi
NAME               AGE   PHASE     IP            NODENAME    READY
testvmi-nocloud2   24h   Running   172.16.0.24   10.3.4.27   True
|
Log in to the virtual machine with fedora as the account and password.
 1
 2
 3
 4
 5
 6
 7
 8
 9
10
11
12
13
14
15
16
17
18
19
|
[root@VM-4-27-centos ~]# ssh fedora@172.16.0.24
fedora@172.16.0.24's password:
Last login: Wed Feb 23 06:30:38 2022 from 172.16.0.1
[fedora@testvmi-nocloud2 ~]$ uname -a
Linux testvmi-nocloud2 5.6.6-300.fc32.x86_64 #1 SMP Tue Apr 21 13:44:19 UTC 2020 x86_64 x86_64 x86_64 GNU/Linux
[fedora@testvmi-nocloud2 ~]$ ip a
1: lo: <LOOPBACK,UP,LOWER_UP> mtu 65536 qdisc noqueue state UNKNOWN group default qlen 1000
    link/loopback 00:00:00:00:00:00 brd 00:00:00:00:00:00
    inet 127.0.0.1/8 scope host lo
       valid_lft forever preferred_lft forever
    inet6 ::1/128 scope host
       valid_lft forever preferred_lft forever
2: eth0: <BROADCAST,MULTICAST,UP,LOWER_UP> mtu 1500 qdisc fq_codel state UP group default qlen 1000
    link/ether 5e:04:61:17:c1:c9 brd ff:ff:ff:ff:ff:ff
    altname enp1s0
    inet 172.16.0.24/26 brd 172.16.0.63 scope global dynamic noprefixroute eth0
       valid_lft 86226231sec preferred_lft 86226231sec
    inet6 fe80::5c04:61ff:fe17:c1c9/64 scope link
       valid_lft forever preferred_lft forever
|
Create a Windows virtual machine
Uploading an image
CDI provides the option to use PVCs as virtual machine disks. CDI supports the following modes to import images to PVCs.
- Import a virtual machine image to a PVC via URL, which can be an http link, s3 link
- Clone an existing PVC
- Import VM disk to PVC via container registry, need to use with
ContainerDisk.
- Uploading a local image to a PVC via a client
Here we use the fourth way, upload local image to PVC via virtctl command line tool, combined with CDI project.
 1
 2
 3
 4
 5
 6
 7
 8
 9
10
11
12
13
14
15
16
17
18
19
|
$ virtctl image-upload \
  --image-path='Win10_20H2_Chinese(Simplified)_x64.iso' \
  --storage-class hostpath-csi \
  --pvc-name=iso-win10 \
  --pvc-size=10Gi \
  --uploadproxy-url=https://<cdi-uploadproxy_svc_ip> \
  --insecure \
  --wait-secs=240

PersistentVolumeClaim default/iso-win10 created
Waiting for PVC iso-win10 upload pod to be ready...
Pod now ready
Uploading data to https://10.111.29.156

 5.63 GiB / 5.63 GiB [======================================================================================================================================================] 100.00% 27s

Uploading data completed successfully, waiting for processing to complete, you can hit ctrl-c without interrupting the progress
Processing completed successfully
Uploading Win10_20H2_Chinese(Simplified)_x64.iso completed successfully
|
Parameter explanation.
- -image-path : the local address of the OS image
- -pvc-name : Specify the PVC to store the OS image, this PVC does not need to be prepared in advance, it will be created automatically during the image upload process.
- -pvc-size : the size of the PVC, set according to the size of the OS image, usually slightly larger than a G
- -uploadproxy-url : Service IP of cdi-uploadproxy, you can check it by command
kubectl -n cdi get svc -l cdi.kubevirt.io=cdi-uploadproxy.
Creating Virtual Machines
After creating the VirtualMachine CR, you can see that the corresponding Pods and virtual machines are created in the cluster.
 1
 2
 3
 4
 5
 6
 7
 8
 9
10
11
12
13
14
15
16
17
18
19
20
21
22
23
24
25
26
27
28
29
30
31
32
33
34
35
36
37
38
39
40
41
42
43
44
45
46
47
48
49
50
51
|
apiVersion: kubevirt.io/v1alpha3
kind: VirtualMachine
metadata:
  name: win10
spec:
  running: false
  template:
    metadata:
      labels:
        kubevirt.io/domain: win10
    spec:
      domain:
        cpu:
          cores: 4
        devices:
          disks:
          - bootOrder: 1
            disk:
              bus: virtio
            name: harddrive
          - bootOrder: 2
            cdrom:
              bus: sata
            name: cdromiso
          - cdrom:
              bus: sata
            name: virtiocontainerdisk
          interfaces:
          - masquerade: {}
            model: e1000
            name: default
        machine:
          type: q35
        resources:
          requests:
            memory: 16G
      networks:
      - name: default
        pod: {}
      volumes:
      - name: cdromiso
        persistentVolumeClaim:
          claimName: iso-win10-3
      - name: harddrive
        hostDisk:
          capacity: 50Gi
          path: /data/disk.img
          type: DiskOrCreate
      - name: virtiocontainerdisk
        containerDisk:
          image: kubevirt/virtio-container-disk
|
There are 3 volumes used here.
- harddrive : The disk used by the virtual machine, i.e. the OS will be mounted on that disk. Here you choose
hostDisk to mount directly to the host for better performance, which is a very bad experience if you use distributed storage.
- cdromiso : Provides the OS installation image, i.e. the PVC
iso-win10 generated after uploading the image above.
- virtiocontainerdisk : Since Windows does not recognize raw format disks by default, you need to install a virtio drive. containerDisk can mount the packaged virtio-driven container image into a virtual machine.
Start the virtual machine instance.
1
2
3
|
$ virtctl start win10
# 如果 virtctl 安装为 kubectl 的插件,命令格式如下:
$ kubectl virt start win10
|
Checking the started VM instance, the Windows VM is up and running.
1
2
3
4
5
6
|
[root@VM-4-27-centos ~]# kubectl get vmi
NAME               AGE   PHASE     IP            NODENAME    READY
win10              23h   Running   172.16.0.32   10.3.4.27   True
[root@VM-4-27-centos ~]# kubectl get vm
NAME    AGE   STATUS    READY
win10   23h   Running   True
|
Configuring VNC access
Refer to Access Virtual Machines’ graphic console using noVNC you can deploy virtVNC to access the booted Windows server. The main point here is to expose a NodePort service that can be accessed via the
 1
 2
 3
 4
 5
 6
 7
 8
 9
10
11
12
13
14
15
16
17
18
19
20
21
22
23
24
25
26
27
28
29
30
31
32
33
34
35
36
37
38
39
40
41
42
43
44
45
46
47
48
49
50
51
52
53
54
55
56
57
58
59
60
61
62
63
64
65
66
67
68
69
70
71
72
73
74
75
76
77
78
79
80
81
82
83
84
85
86
87
88
89
90
91
92
|
apiVersion: v1
kind: ServiceAccount
metadata:
  name: virtvnc
  namespace: kubevirt

kind: ClusterRoleBinding
apiVersion: rbac.authorization.k8s.io/v1
metadata:
  name: virtvnc
subjects:
- kind: ServiceAccount
  name: virtvnc
  namespace: kubevirt
roleRef:
  kind: ClusterRole
  name: virtvnc
  apiGroup: rbac.authorization.k8s.io

kind: ClusterRole
apiVersion: rbac.authorization.k8s.io/v1
metadata:
  name: virtvnc
rules:
- apiGroups:
  - subresources.kubevirt.io
  resources:
  - virtualmachineinstances/console
  - virtualmachineinstances/vnc
  verbs:
  - get
- apiGroups:
  - kubevirt.io
  resources:
  - virtualmachines
  - virtualmachineinstances
  - virtualmachineinstancepresets
  - virtualmachineinstancereplicasets
  - virtualmachineinstancemigrations
  verbs:
  - get
  - list
  - watch

apiVersion: v1
kind: Service
metadata:
  labels:
    app: virtvnc
  name: virtvnc
  namespace: kubevirt
spec:
  ports:
  - port: 80
    protocol: TCP
    targetPort: 8001
  selector:
    app: virtvnc
  #type: LoadBalancer
  type: NodePort

apiVersion: apps/v1
kind: Deployment
metadata:
  name: virtvnc
  namespace: kubevirt
spec:
  replicas: 1
  selector:
    matchLabels:
      app: virtvnc
  template:
    metadata:
      labels:
        app: virtvnc
    spec:
      serviceAccountName: virtvnc
      containers:
      - name: virtvnc
        image: quay.io/samblade/virtvnc:v0.1
        livenessProbe:
          httpGet:
            port: 8001
            path: /
            scheme: HTTP
          failureThreshold: 30
          initialDelaySeconds: 30
          periodSeconds: 10
          successThreshold: 1
          timeoutSeconds: 5

$ kubectl apply -f virtvnc.yaml
|
By accessing this NodePort service, you can both

Next you can install the Windows operating system as instructed in kubernetes creating a windows 10 virtual machine using kubevirt.
Configuring remote connections
Although VNC can access the Windows graphical interface remotely, the operating experience is rather unpleasant. Once the system is installed, you can use Windows’ Remote Connection Protocol, RDP, by selecting Start > Settings > System > Remote Desktop and turning on Enable Remote Desktop.
Now you can test the connectivity of RDP port 3389 via telnet.
1
2
3
4
|
[root@VM-4-27-centos ~]# telnet 172.16.0.32 3389
Trying 172.16.0.32...
Connected to 172.16.0.32.
Escape character is '^]'.
|
If your local computer can connect directly to the Pod IP and SVC IP, you can now connect directly to Windows remotely via the RDP client. If your local computer cannot connect directly to the Pod IP and SVC IP, but can connect directly to the Node IP of the Kubernetes cluster, you can expose the RDP port via NodePort. This is done by creating a Service with the type NodePort.
1
2
3
4
5
6
7
8
|
[root@VM-4-27-centos ~]# virtctl expose vm win10  --name win10-rdp --port 3389 --target-port 3389 --type NodePort
Service win10-rdp successfully exposed for vm win10
[root@VM-4-27-centos ~]#
[root@VM-4-27-centos ~]# kubectl get svc
NAME         TYPE           CLUSTER-IP      EXTERNAL-IP   PORT(S)          AGE
kube-user    LoadBalancer   172.16.253.39   10.3.4.28     443:31525/TCP    27h
kubernetes   ClusterIP      172.16.252.1    <none>        443/TCP          42h
win10-rdp    NodePort       172.16.255.78   <none>        3389:32200/TCP   8s
|
Then you can connect to Windows remotely via Node IP. If your local operating system is Windows 10, you can type " Remote Desktop Connection" in the search box in the taskbar, and then select " Remote Desktop Connection". In “Remote Desktop Connection”, type the name of the computer you want to connect to (from step 1), and then select “Connect”. If your local operating system is macOS, you need to install Microsoft Remote Desktop in the App Store.
windows to access the external network
Installing the nginx service in a Windows virtual machine allows you to access it in Windows.
At this point, you can access the Nginx service within the cluster by directly accessing the IP corresponding to the Windows virtual machine.
 1
 2
 3
 4
 5
 6
 7
 8
 9
10
11
12
13
14
15
16
17
18
19
20
21
22
23
24
25
26
27
28
29
|
[root@VM-4-27-centos ~]# kubectl get vmi win10
NAME    AGE    PHASE     IP            NODENAME    READY
win10   5d5h   Running   172.16.0.32   10.3.4.27   True
[root@VM-4-27-centos ~]# curl 172.16.0.32:80

<html>
<head>
<title>Welcome to nginx!</title>
<style>
    body {
        width: 35em;
        margin: 0 auto;
        font-family: Tahoma, Verdana, Arial, sans-serif;
    }
</style>
</head>
<body>
<h1>Welcome to nginx!</h1>
<p>If you see this page, the nginx web server is successfully installed and
working. Further configuration is required.</p>

<p>For online documentation and support please refer to
<a href="http://nginx.org/">nginx.org</a>.<br/>
Commercial support is available at
<a href="http://nginx.com/">nginx.com</a>.</p>

<p><em>Thank you for using nginx.</em></p>
</body>
</html>
|
To be able to expose the services of this Windows virtual machine to the extranet, create the following Service.
 1
 2
 3
 4
 5
 6
 7
 8
 9
10
11
12
13
14
15
|
apiVersion: v1
kind: Service
metadata:
  name: win10-nginx
  namespace: default
spec:
  externalTrafficPolicy: Cluster
  ports:
  - port: 80
    protocol: TCP
    targetPort: 80
  selector:
    kubevirt.io/domain: win10
  sessionAffinity: None
  type: NodePort
|
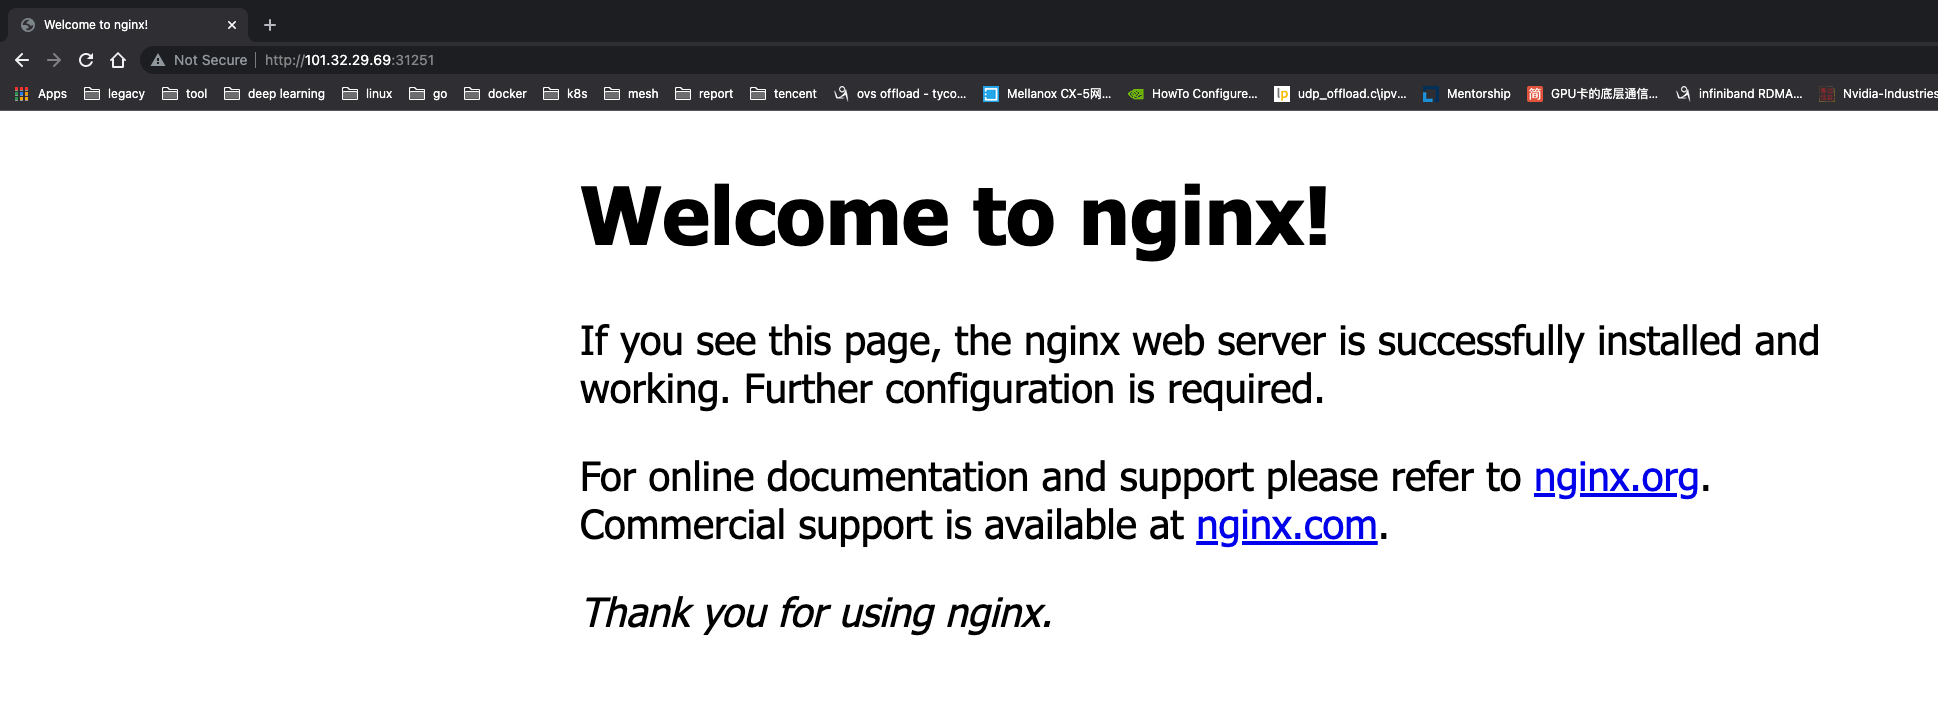
You can see that the NodePort service was created.
1
2
|
[root@VM-4-27-centos ~]# kubectl get svc
win10-nginx   NodePort       172.16.255.171   <none>        80:31251/TCP     3s
|
Accessing the NodePort service at this point gives access to the services provided by the Windows VM.
Storage
Virtual machine images (disks) are an essential part of starting a virtual machine, and KubeVirt provides a variety of ways to use virtual machine disks, and virtual machine images (disks) are very flexible. Here are some of the more common ones.
- PersistentVolumeClaim : Use PVC as backend storage, suitable for data persistence, i.e. data still exists after VM reboot or rebuild. The PV type used can be block and filesystem
- When using filesystem, the /disk.img file on the PVC in RAW format is used as the hard disk.
- When block mode is used, the block volume is provided directly to the virtual machine as a raw block device.
- ephemeral : Make a copy-on-write (COW) mirror layer locally based on the backend storage, all writes are in the mirror on the local storage, the write layer is removed when the VM instance is stopped and the mirror on the backend storage does not change.
- containerDisk : A docker image built based on scratch, the image contains the VM image needed for VM boot, you can push the docker image to registry, pull the image from registry when using, use containerDisk directly as VMI disk, the data is not persistent.
- hostDisk : Use the disk image on the node, similar to
hostpath, you can also create an empty image at initialization time.
- dataVolume : Provides the ability to automatically import VM disks into a pvc during the VM boot process. without DataVolume, the user must first prepare the pvc with the disk image and then assign it to the VM or VMI. dataVolume pulls the image from a source such as http, object storage, another PVC, etc.
See Kubevirt: Disks and Volumes for more information.
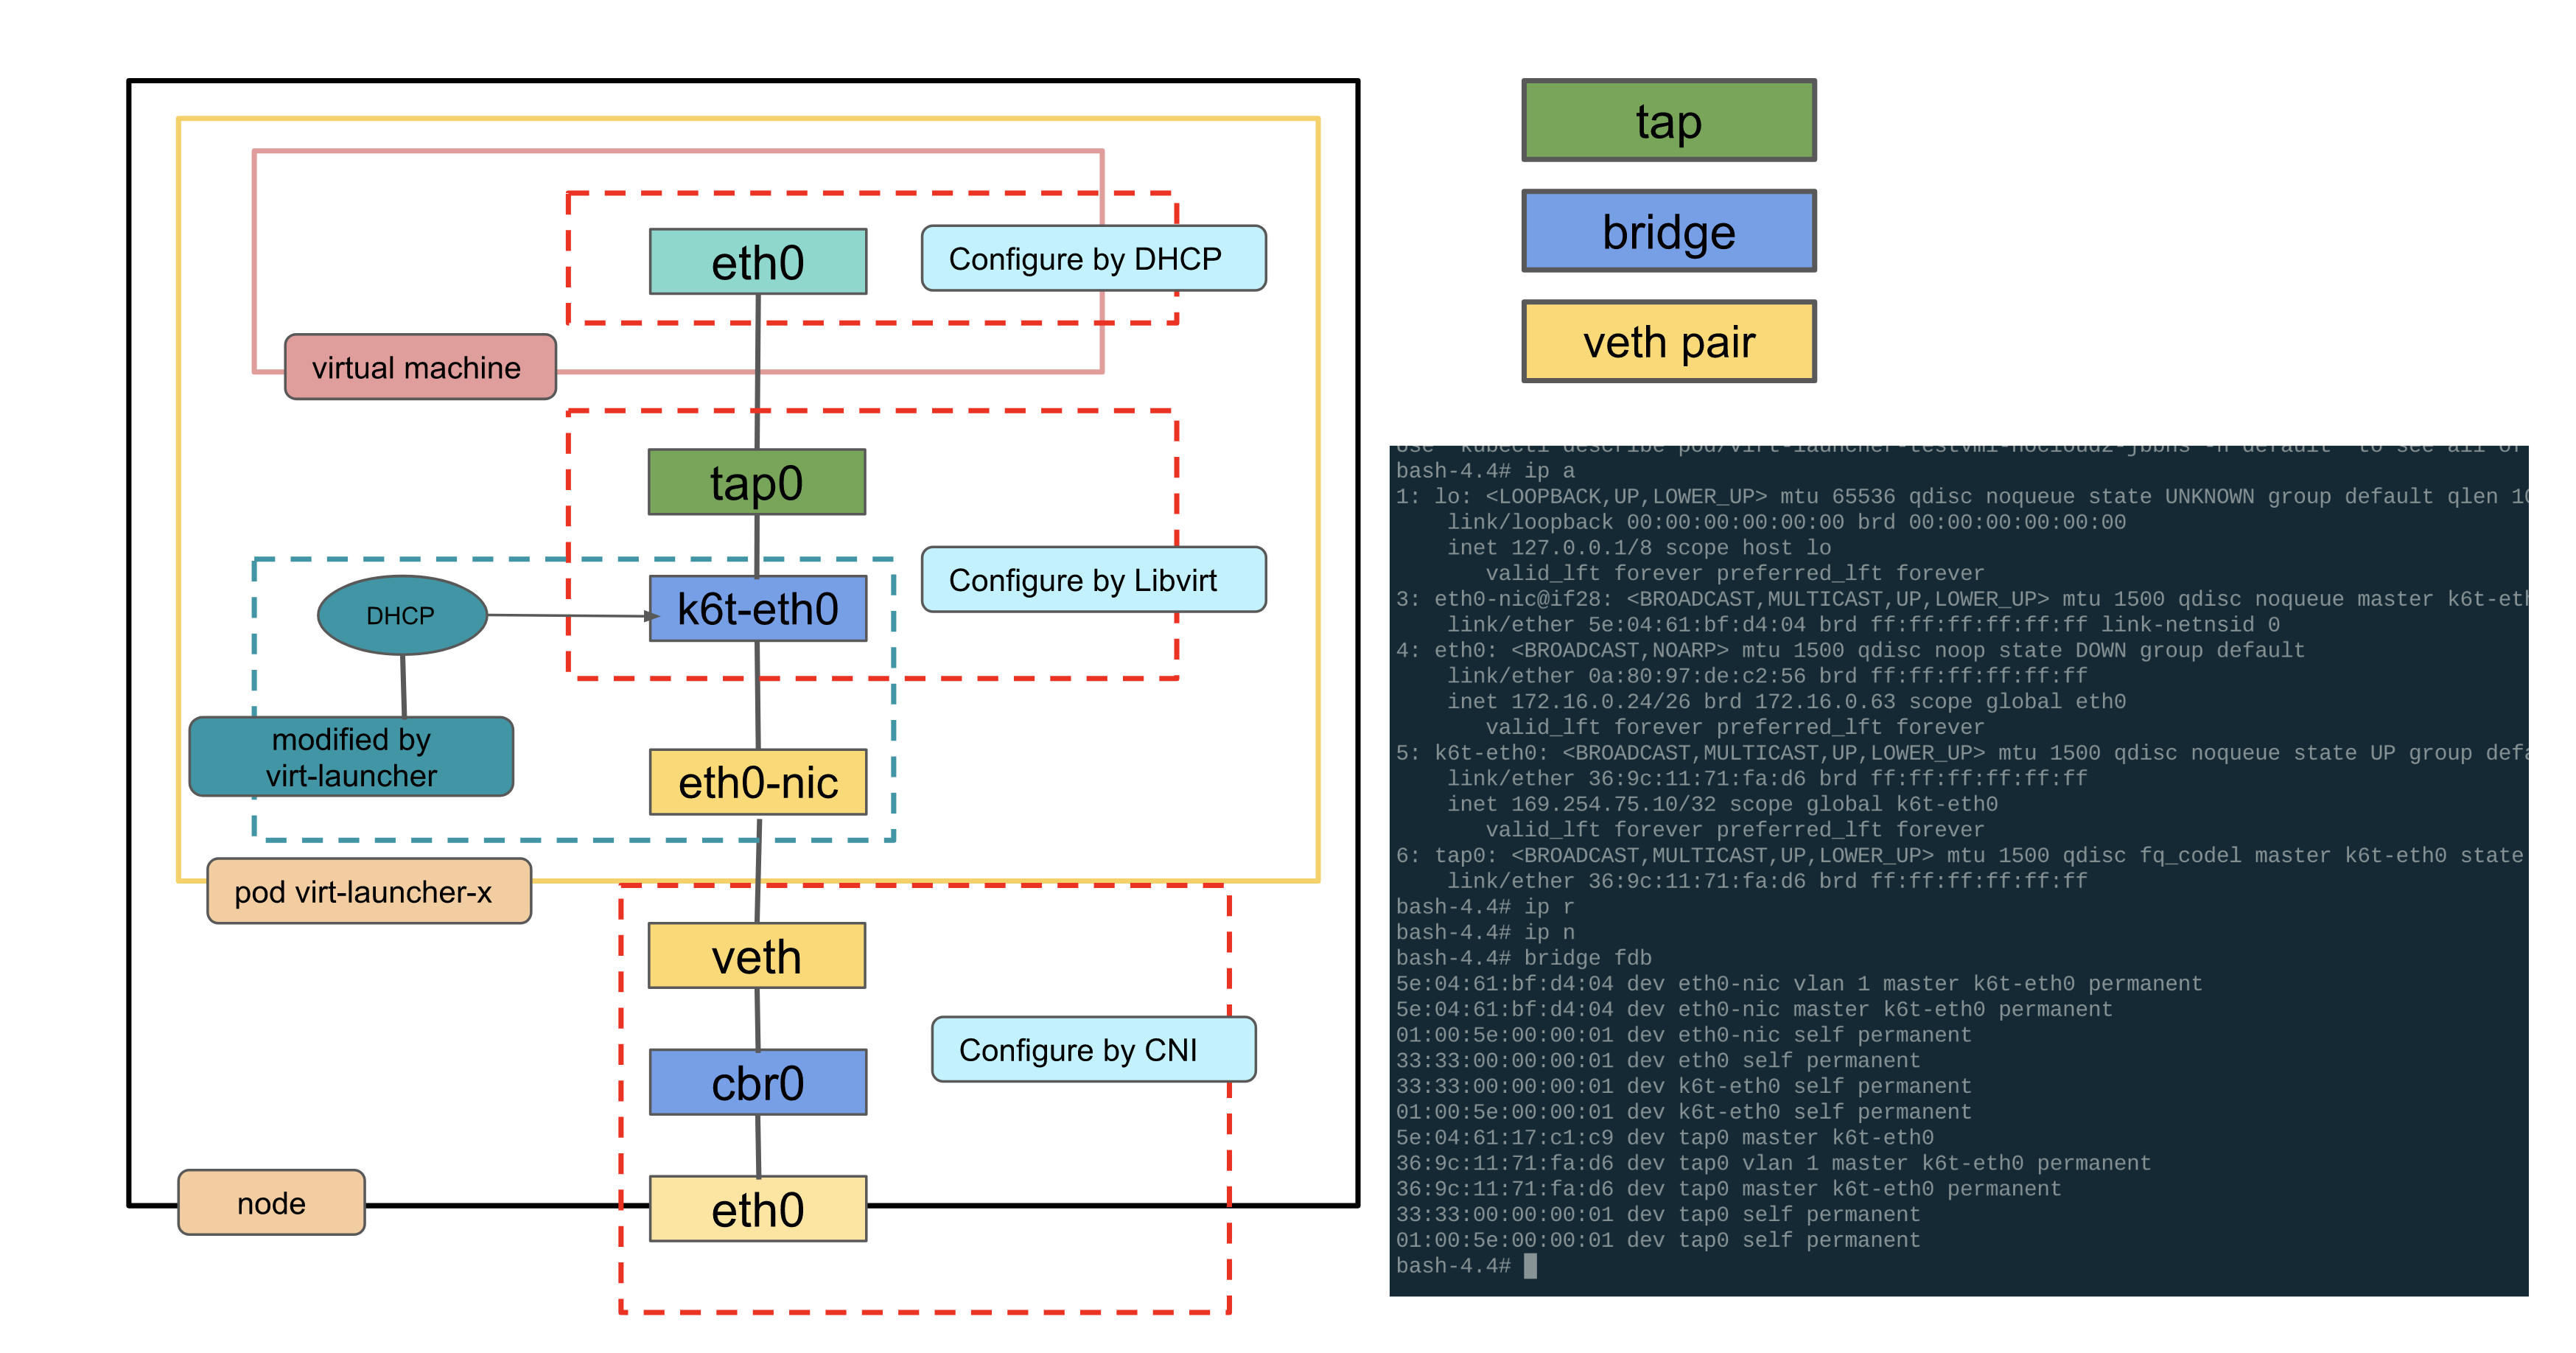
global route mode bridge network principle
The virtual machine network is pod network, the NIC of virt-launcher pod network no longer hangs with pod ip, but acts as a handover physical NIC for virtual machine’s virtual NIC to communicate with external network. virt-launcher implements a simple single ip dhcp server, that is, you need to start dhclient in virtual machine, virt- launcher service will be assigned to the virtual machine.
Outbound: destination is an out-of-cluster address
To view the route in the virtual machine.
1
2
3
|
[fedora@testvmi-nocloud2 ~]$ ip route
default via 172.16.0.1 dev eth0 proto dhcp metric 100
172.16.0.0/26 dev eth0 proto kernel scope link src 172.16.0.24 metric 100
|
- All Pods on virtual machine Node1 belong to the same IP subnet 172.20.0.0/26, and these Pods are connected to virtual bridge cbr0. As shown in the second routing entry in the routing table above, traffic destined for subnet 172.20.0.0/26 will be sent out through eth0 of the virtual machine. The Veth pair of eth0 is on the bridge, so the bridge will receive the packet. After the bridge receives the packet, it will send the packet out through Layer 2 forwarding from the port on the bridge connected to the destination Pod, and the data will reach the Veth pair pair on that end, i.e. the destination Pod of the packet.
- If the IP is sent to the outside world, it is sent to the gateway 172.16.0.1 by default. here the gateway is the address of cbr0 on top of the host.
In fact, the routes of the virtual machine here all come from the routing information in the launcher Pod. If you look at the routing information in the launcher Pod, it is empty.
1
2
|
[root@VM-4-27-centos ~]# ip r
[root@VM-4-27-centos ~]# ip n
|
Checking the virtual machine IP information, you can see that the virtual machine IP is 172.16.0.24 and the MAC is 5e:04:61:17:c1:c9, which is also taken from the launcher Pod.
 1
 2
 3
 4
 5
 6
 7
 8
 9
10
11
12
13
|
1: lo: <LOOPBACK,UP,LOWER_UP> mtu 65536 qdisc noqueue state UNKNOWN group default qlen 1000
    link/loopback 00:00:00:00:00:00 brd 00:00:00:00:00:00
    inet 127.0.0.1/8 scope host lo
       valid_lft forever preferred_lft forever
    inet6 ::1/128 scope host
       valid_lft forever preferred_lft forever
2: eth0: <BROADCAST,MULTICAST,UP,LOWER_UP> mtu 1500 qdisc fq_codel state UP group default qlen 1000
    link/ether 5e:04:61:17:c1:c9 brd ff:ff:ff:ff:ff:ff
    altname enp1s0
    inet 172.16.0.24/26 brd 172.16.0.63 scope global dynamic noprefixroute eth0
       valid_lft 85794782sec preferred_lft 85794782sec
    inet6 fe80::5c04:61ff:fe17:c1c9/64 scope link
       valid_lft forever preferred_lft forever
|
View the existing interfaces in the launcher Pod.
eth0-nic is the original eth0 interface of the Podtap0 is the tap device corresponding to eth0 of the virtual machinek6t-eth0 is the bridge in the launcher Pod
 1
 2
 3
 4
 5
 6
 7
 8
 9
10
11
12
13
14
15
16
|
1: lo: <LOOPBACK,UP,LOWER_UP> mtu 65536 qdisc noqueue state UNKNOWN group default qlen 1000
    link/loopback 00:00:00:00:00:00 brd 00:00:00:00:00:00
    inet 127.0.0.1/8 scope host lo
       valid_lft forever preferred_lft forever
3: eth0-nic@if28: <BROADCAST,MULTICAST,UP,LOWER_UP> mtu 1500 qdisc noqueue master k6t-eth0 state UP group default
    link/ether 5e:04:61:bf:d4:04 brd ff:ff:ff:ff:ff:ff link-netnsid 0
4: eth0: <BROADCAST,NOARP> mtu 1500 qdisc noop state DOWN group default
    link/ether 0a:80:97🇩🇪c2:56 brd ff:ff:ff:ff:ff:ff
    inet 172.16.0.24/26 brd 172.16.0.63 scope global eth0
       valid_lft forever preferred_lft forever
5: k6t-eth0: <BROADCAST,MULTICAST,UP,LOWER_UP> mtu 1500 qdisc noqueue state UP group default
    link/ether 1a:2b:ab:44:18:07 brd ff:ff:ff:ff:ff:ff
    inet 169.254.75.10/32 scope global k6t-eth0
       valid_lft forever preferred_lft forever
6: tap0: <BROADCAST,MULTICAST,UP,LOWER_UP> mtu 1500 qdisc fq_codel master k6t-eth0 state UP group default qlen 1000
    link/ether 36:9c:11:71:fa:d6 brd ff:ff:ff:ff:ff:ff
|
You can see that eth0-nic and tap0 are both mounted on the bridge k6t-eth0.
1
2
3
4
5
|
# ip link show master k6t-eth0
3: eth0-nic@if28: <BROADCAST,MULTICAST,UP,LOWER_UP> mtu 1500 qdisc noqueue master k6t-eth0 state UP mode DEFAULT group default
    link/ether 5e:04:61:bf:d4:04 brd ff:ff:ff:ff:ff:ff link-netnsid 0
6: tap0: <BROADCAST,MULTICAST,UP,LOWER_UP> mtu 1500 qdisc fq_codel master k6t-eth0 state UP mode DEFAULT group default qlen 1000
    link/ether 36:9c:11:71:fa:d6 brd ff:ff:ff:ff:ff:ff
|
For information about cbr0 on the host.
1
2
3
4
5
6
|
5: cbr0: <BROADCAST,MULTICAST,PROMISC,UP,LOWER_UP> mtu 1500 qdisc noqueue state UP group default qlen 1000
    link/ether 92:3f:13:e2:55:c9 brd ff:ff:ff:ff:ff:ff
    inet 172.16.0.1/26 brd 172.16.0.63 scope global cbr0
       valid_lft forever preferred_lft forever
    inet6 fe80::903f:13ff:fee2:55c9/64 scope link
       valid_lft forever preferred_lft forever
|
Access the external segment from the virtual machine, e.g. 8.8.8.8, and capture the packet in the launcher Pod, here on the tap device.
- Source IP: IP of virtual machine eth0
- Source Mac: the MAC of the virtual machine eth0
- Destination IP: IP of the virtual machine gateway, that is, the IP of cbr0 on the host
- Destination Mac: MAC of cbr0 on the host
1
2
3
4
5
6
7
|
[root@VM-4-27-centos ~]# tcpdump -itap0 -nnvve host 8.8.8.8
dropped privs to tcpdump
tcpdump: listening on tap0, link-type EN10MB (Ethernet), capture size 262144 bytes
20:19:58.369799 5e:04:61:17:c1:c9 > 92:3f:13:e2:55:c9, ethertype IPv4 (0x0800), length 98: (tos 0x0, ttl 64, id 54189, offset 0, flags [DF], proto ICMP (1), length 84)
    172.16.0.24 > 8.8.8.8: ICMP echo request, id 10, seq 1, length 64
20:19:58.371143 92:3f:13:e2:55:c9 > 5e:04:61:17:c1:c9, ethertype IPv4 (0x0800), length 98: (tos 0x64, ttl 117, id 0, offset 0, flags [none], proto ICMP (1), length 84)
    8.8.8.8 > 172.16.0.24: ICMP echo reply, id 10, seq 1, length 64
|
Tap device is connected to the bridge and captures packets on the bridge k6t-eth0 device, source and destination addresses are unchanged
1
2
3
4
5
6
7
|
[root@VM-4-27-centos ~]# tcpdump -ik6t-eth0 -nnvve host 8.8.8.8
dropped privs to tcpdump
tcpdump: listening on k6t-eth0, link-type EN10MB (Ethernet), capture size 262144 bytes
20:28:28.945397 5e:04:61:17:c1:c9 > 92:3f:13:e2:55:c9, ethertype IPv4 (0x0800), length 98: (tos 0x0, ttl 64, id 21796, offset 0, flags [DF], proto ICMP (1), length 84)
    172.16.0.24 > 8.8.8.8: ICMP echo request, id 11, seq 1, length 64
20:28:28.946743 92:3f:13:e2:55:c9 > 5e:04:61:17:c1:c9, ethertype IPv4 (0x0800), length 98: (tos 0x64, ttl 117, id 0, offset 0, flags [none], proto ICMP (1), length 84)
    8.8.8.8 > 172.16.0.24: ICMP echo reply, id 11, seq 1, length 64
|
The next step is to catch the packet on the Pod’s original network port eth0-nic, with both source and destination addresses unchanged.
1
2
3
4
5
6
7
|
[root@VM-4-27-centos ~]# tcpdump -ieth0-nic -nnvve host 8.8.8.8
dropped privs to tcpdump
tcpdump: listening on eth0-nic, link-type EN10MB (Ethernet), capture size 262144 bytes
20:30:02.087639 5e:04:61:17:c1:c9 > 92:3f:13:e2:55:c9, ethertype IPv4 (0x0800), length 98: (tos 0x0, ttl 64, id 2902, offset 0, flags [DF], proto ICMP (1), length 84)
    172.16.0.24 > 8.8.8.8: ICMP echo request, id 11, seq 94, length 64
20:30:02.088959 92:3f:13:e2:55:c9 > 5e:04:61:17:c1:c9, ethertype IPv4 (0x0800), length 98: (tos 0x64, ttl 117, id 0, offset 0, flags [none], proto ICMP (1), length 84)
    8.8.8.8 > 172.16.0.24: ICMP echo reply, id 11, seq 94, length 64
|
How does the bridge k6t-eth0 know that the packets should go to eth0-nic? Here is the flood done here on the k6t-eth0 bridge, all interfaces hooked up to the bridge can catch access to 8.8.8.8.
How does the virtual machine know the MAC corresponding to 172.16.0.1? Check the ARP in the virtual machine.
1
2
|
[fedora@testvmi-nocloud2 ~]$ ip n
172.16.0.1 dev eth0 lladdr 92:3f:13:e2:55:c9 REACHABLE
|
Here is the MAC of cbr0, after taking out this table entry, you can catch the corresponding arp packet
After reaching eth0-nic, you can reach the veth port on the opposite side of the Pod and go out from the node according to the global routing pattern.
Inbound: accessing the VM from the node
In the global routing mode, for the IP of the global routing segment of this node, the default route is the bridge on the node cbr0
1
2
|
[root@VM-4-27-centos ~]# ip r
172.16.0.0/26 dev cbr0 proto kernel scope link src 172.16.0.1
|
The cbr0 bridge mounts the veth of the Pod, for accessing the IP of the virtual machine, the IP is forwarded to the veth pair corresponding to the Pod through the bridge layer 2 by default. after reaching the Pod, it takes the bridge inside the Pod, gives it to the tap device, and finally reaches the virtual machine.
VPC CNI mode bridge network principle
For VPC CNI network mode, the basic principle is similar to global routing for VMs using bridge, but you will find that you cannot access the external network from the VM. From the tap device, it can not catch the corresponding ip packets, but only ARP packets.
In VPC CNI mode, there is a default route to the default gateway 169.254.1.1 in the Pod, and a static ARP entry is set.
1
2
3
4
5
6
7
8
9
|
➜  ~ k exec network-tool-549c7756bd-6tfkf -- route -n
Kernel IP routing table
Destination     Gateway         Genmask         Flags Metric Ref    Use Iface
0.0.0.0         169.254.1.1     0.0.0.0         UG    0      0        0 eth0
169.254.1.1     0.0.0.0         255.255.255.255 UH    0      0        0 eth0

➜  ~ k exec network-tool-549c7756bd-6tfkf -- arp
Address                  HWtype  HWaddress           Flags Mask            Iface
169.254.1.1              ether   e2:62:fb:d2:cb:28   CM                    eth0
|
However, in the virtual machine, there is only the default route and no static ARP.
1
2
3
4
5
6
|
[fedora@testvmi-nocloud2 ~]$ ip r
default via 169.254.1.1 dev eth0 proto dhcp metric 100
169.254.1.1 dev eth0 proto dhcp scope link metric 100
[fedora@testvmi-nocloud2 ~]$ ip n
10.3.1.6 dev eth0 lladdr d2:e9:79:c9:e6:2d STALE
169.254.1.1 dev eth0  INCOMPLETE
|
We can catch the corresponding ARP packets from the bridge in the VM and Pod, but there is no place to give a response, so
 1
 2
 3
 4
 5
 6
 7
 8
 9
10
11
12
13
14
15
16
17
18
19
20
21
22
23
24
25
|
# 进入 launcher pod netns
[root@VM-1-6-centos ~]# tcpdump -itap0 -nnvve arp
dropped privs to tcpdump
tcpdump: listening on tap0, link-type EN10MB (Ethernet), capture size 262144 bytes
15:46:20.627859 d2:e9:79:c9:e6:2d > 92:7b:a5:ca:24:5a, ethertype ARP (0x0806), length 42: Ethernet (len 6), IPv4 (len 4), Request who-has 10.3.4.17 tell 10.3.1.6, length 28
15:46:20.628185 92:7b:a5:ca:24:5a > d2:e9:79:c9:e6:2d, ethertype ARP (0x0806), length 42: Ethernet (len 6), IPv4 (len 4), Reply 10.3.4.17 is-at 92:7b:a5:ca:24:5a, length 28

[root@VM-1-6-centos ~]# tcpdump -ik6t-eth0 -nnvve arp
dropped privs to tcpdump
tcpdump: listening on k6t-eth0, link-type EN10MB (Ethernet), capture size 262144 bytes
15:47:12.653020 92:7b:a5:ca:24:5a > ff:ff:ff:ff:ff:ff, ethertype ARP (0x0806), length 42: Ethernet (len 6), IPv4 (len 4), Request who-has 169.254.1.1 tell 10.3.4.17, length 28
15:47:13.676948 92:7b:a5:ca:24:5a > ff:ff:ff:ff:ff:ff, ethertype ARP (0x0806), length 42: Ethernet (len 6), IPv4 (len 4), Request who-has 169.254.1.1 tell 10.3.4.17, length 28

[root@VM-1-6-centos ~]# tcpdump -ieth0-nic -nnvve arp
dropped privs to tcpdump
tcpdump: listening on eth0-nic, link-type EN10MB (Ethernet), capture size 262144 bytes
15:47:23.918394 92:7b:a5:ca:24:5a > ff:ff:ff:ff:ff:ff, ethertype ARP (0x0806), length 42: Ethernet (len 6), IPv4 (len 4), Request who-has 169.254.1.1 tell 10.3.4.17, length 28
15:47:24.940922 92:7b:a5:ca:24:5a > ff:ff:ff:ff:ff:ff, ethertype ARP (0x0806), length 42: Ethernet (len 6), IPv4 (len 4), Request who-has 169.254.1.1 tell 10.3.4.17, length 28

# 在宿主机 node netns,针对 pod 的 veth pair 抓包
[root@VM-1-6-centos ~]# tcpdump -ienib7c8df57e35 -nnvve arp
dropped privs to tcpdump
tcpdump: listening on enib7c8df57e35, link-type EN10MB (Ethernet), capture size 262144 bytes
15:48:03.853968 92:7b:a5:ca:24:5a > ff:ff:ff:ff:ff:ff, ethertype ARP (0x0806), length 42: Ethernet (len 6), IPv4 (len 4), Request who-has 169.254.1.1 tell 10.3.4.17, length 28
15:48:04.876960 92:7b:a5:ca:24:5a > ff:ff:ff:ff:ff:ff, ethertype ARP (0x0806), length 42: Ethernet (len 6), IPv4 (len 4), Request who-has 169.254.1.1 tell 10.3.4.17, length 28
|
If you add this static route to a virtual machine, you can get through to the virtual machine network, where the mac is the mac address of the Pod’s veth pair.
1
2
3
4
5
6
|
[fedora@testvmi-nocloud2 ~]$ sudo ip n replace 169.254.1.1 lladdr d2:e9:79:c9:e6:2d dev eth0

[fedora@testvmi-nocloud2 ~]$ ping baidu.com
PING baidu.com (220.181.38.251) 56(84) bytes of data.
64 bytes from 220.181.38.251 (220.181.38.251): icmp_seq=1 ttl=48 time=46.2 ms
64 bytes from 220.181.38.251 (220.181.38.251): icmp_seq=2 ttl=48 time=46.5 ms
|
Networking Code Reading
Referring to Kubevirt: VMI Networking, the configuration of Interface for VMs in Kubevirt is divided into two Phase.
Phase1
The first step in Phase1 is to decide which BindMechanism to use instead, and each BindMechanism implements the following methods.
 1
 2
 3
 4
 5
 6
 7
 8
 9
10
11
12
13
14
15
|
type BindMechanism interface {
    discoverPodNetworkInterface() error
    preparePodNetworkInterfaces() error

    loadCachedInterface(pid, name string) (bool, error)
    setCachedInterface(pid, name string) error

    loadCachedVIF(pid, name string) (bool, error)
    setCachedVIF(pid, name string) error

    // The following entry points require domain initialized for the
    // binding and can be used in phase2 only.
    decorateConfig() error
    startDHCP(vmi *v1.VirtualMachineInstance) error
}
|
Once BindMechanism is determined, the following methods are called in turn.
- discoverPodNetworkInterface: Get the information about the Pod NIC device, including IP address, route, gateway, etc.
- preparePodNetworkInterfaces: Configure the network based on the information obtained earlier.
- setCachedInterface: cache the interface information in memory
- setCachedVIF: persist VIF objects in the file system at
/proc/<virt-launcher-pid>/root/var/run/kubevirt-private/vif-cache-<iface_name>.json.
 1
 2
 3
 4
 5
 6
 7
 8
 9
10
11
12
13
14
15
16
17
18
19
20
21
22
23
24
25
26
27
28
29
30
31
32
33
34
35
36
37
38
39
40
41
42
43
44
45
46
47
48
49
50
51
52
53
54
55
56
57
58
59
60
61
62
63
64
65
66
67
|
func (l *podNIC) PlugPhase1() error {

    // There is nothing to plug for SR-IOV devices
    if l.vmiSpecIface.SRIOV != nil {
        return nil
    }

    state, err := l.state()
    if err != nil {
        return err
    }

    switch state {
    case cache.PodIfaceNetworkPreparationStarted:
        return errors.CreateCriticalNetworkError(fmt.Errorf("pod interface %s network preparation cannot be resumed", l.podInterfaceName))
    case cache.PodIfaceNetworkPreparationFinished:
        return nil
    }

    if err := l.setPodInterfaceCache(); err != nil {
        return err
    }

    if l.infraConfigurator == nil {
        return nil
    }

    if err := l.infraConfigurator.DiscoverPodNetworkInterface(l.podInterfaceName); err != nil {
        return err
    }

    dhcpConfig := l.infraConfigurator.GenerateNonRecoverableDHCPConfig()
    if dhcpConfig != nil {
        log.Log.V(4).Infof("The generated dhcpConfig: %s", dhcpConfig.String())
        err = cache.WriteDHCPInterfaceCache(l.cacheCreator, getPIDString(l.launcherPID), l.podInterfaceName, dhcpConfig)
        if err != nil {
            return fmt.Errorf("failed to save DHCP configuration: %w", err)
        }
    }

    domainIface := l.infraConfigurator.GenerateNonRecoverableDomainIfaceSpec()
    if domainIface != nil {
        log.Log.V(4).Infof("The generated libvirt domain interface: %+v", *domainIface)
        if err := l.storeCachedDomainIface(*domainIface); err != nil {
            return fmt.Errorf("failed to save libvirt domain interface: %w", err)
        }
    }

    if err := l.setState(cache.PodIfaceNetworkPreparationStarted); err != nil {
        return fmt.Errorf("failed setting state to PodIfaceNetworkPreparationStarted: %w", err)
    }

    // preparePodNetworkInterface must be called *after* the Generate
    // methods since it mutates the pod interface from which those
    // generator methods get their info from.
    if err := l.infraConfigurator.PreparePodNetworkInterface(); err != nil {
        log.Log.Reason(err).Error("failed to prepare pod networking")
        return errors.CreateCriticalNetworkError(err)
    }

    if err := l.setState(cache.PodIfaceNetworkPreparationFinished); err != nil {
        log.Log.Reason(err).Error("failed setting state to PodIfaceNetworkPreparationFinished")
        return errors.CreateCriticalNetworkError(err)
    }

    return nil
}
|
Phase2
Phase2 runs in virt-launcher and has many more privileges than phase1, with only CAP_NET_ADMIN privileges in the network. object). Based on the VIF information, proceed to decorate the domain xml configuration of the VM it will encapsulate
loadCachedInterfaceloadCachedVIFdecorateConfig
 1
 2
 3
 4
 5
 6
 7
 8
 9
10
11
12
13
14
15
16
17
18
19
20
21
22
23
24
25
26
27
28
|
func (l *podNIC) PlugPhase2(domain *api.Domain) error {
    precond.MustNotBeNil(domain)

    // There is nothing to plug for SR-IOV devices
    if l.vmiSpecIface.SRIOV != nil {
        return nil
    }

    if err := l.domainGenerator.Generate(); err != nil {
        log.Log.Reason(err).Critical("failed to create libvirt configuration")
    }

    if l.dhcpConfigurator != nil {
        dhcpConfig, err := l.dhcpConfigurator.Generate()
        if err != nil {
            log.Log.Reason(err).Errorf("failed to get a dhcp configuration for: %s", l.podInterfaceName)
            return err
        }
        log.Log.V(4).Infof("The imported dhcpConfig: %s", dhcpConfig.String())
        if err := l.dhcpConfigurator.EnsureDHCPServerStarted(l.podInterfaceName, *dhcpConfig, l.vmiSpecIface.DHCPOptions); err != nil {
            log.Log.Reason(err).Criticalf("failed to ensure dhcp service running for: %s", l.podInterfaceName)
            panic(err)
        }
    }

    return nil
}
|
BindMechanism
DiscoverPodNetworkInterface
 1
 2
 3
 4
 5
 6
 7
 8
 9
10
11
12
13
14
15
16
17
18
19
20
21
22
23
24
25
26
27
28
29
30
31
32
33
34
35
|
func (b *BridgePodNetworkConfigurator) DiscoverPodNetworkInterface(podIfaceName string) error {
    link, err := b.handler.LinkByName(podIfaceName)
    if err != nil {
        log.Log.Reason(err).Errorf("failed to get a link for interface: %s", podIfaceName)
        return err
    }
    b.podNicLink = link

    addrList, err := b.handler.AddrList(b.podNicLink, netlink.FAMILY_V4)
    if err != nil {
        log.Log.Reason(err).Errorf("failed to get an ip address for %s", podIfaceName)
        return err
    }
    if len(addrList) == 0 {
        b.ipamEnabled = false
    } else {
        b.podIfaceIP = addrList[0]
        b.ipamEnabled = true
        if err := b.learnInterfaceRoutes(); err != nil {
            return err
        }
    }

    b.tapDeviceName = virtnetlink.GenerateTapDeviceName(podIfaceName)

    b.vmMac, err = virtnetlink.RetrieveMacAddressFromVMISpecIface(b.vmiSpecIface)
    if err != nil {
        return err
    }
    if b.vmMac == nil {
        b.vmMac = &b.podNicLink.Attrs().HardwareAddr
    }

    return nil
}
|
PreparePodNetworkInterface
 1
 2
 3
 4
 5
 6
 7
 8
 9
10
11
12
13
14
15
16
17
18
19
20
21
22
23
24
25
26
27
28
29
30
31
32
33
|
func (b *BridgePodNetworkConfigurator) PreparePodNetworkInterface() error {
    // Set interface link to down to change its MAC address
    b.handler.LinkSetDown(b.podNicLink)

    if b.ipamEnabled {
        // Remove IP from POD interface
        err := b.handler.AddrDel(b.podNicLink, &b.podIfaceIP)

        b.switchPodInterfaceWithDummy();

        // Set arp_ignore=1 to avoid
        // the dummy interface being seen by Duplicate Address Detection (DAD).
        // Without this, some VMs will lose their ip address after a few
        // minutes.
        b.handler.ConfigureIpv4ArpIgnore();
    }

    b.handler.SetRandomMac(b.podNicLink.Attrs().Name);

    err := b.createBridge();

    tapOwner := netdriver.LibvirtUserAndGroupId
    if util.IsNonRootVMI(b.vmi) {
        tapOwner = strconv.Itoa(util.NonRootUID)
    }
    createAndBindTapToBridge(b.handler, b.tapDeviceName, b.bridgeInterfaceName, b.launcherPID, b.podNicLink.Attrs().MTU, tapOwner, b.vmi)

    b.handler.LinkSetUp(b.podNicLink);

    b.handler.LinkSetLearningOff(b.podNicLink);

    return nil
}
|
Reference https://houmin.cc/posts/b2eff5e7/