In November 2019, GitHub officially opened the feature GitHub Actions, which is now available without a request.
GitHub Actions is a CI/CD (continuous integration/continuous deployment) tool, but can also be used as a code runtime environment. It is very powerful and can be played with in many ways.
I have written GitHub Actions Getting Started Tutorial which describes the basic usage. This article follows on from the previous tutorial and gives a simple, practical example: run a script once a day at regular intervals to get the weather forecast and then send an email.
The full code can be obtained from the GitHub repository ruanyf/weather-action.
Step 1: Get the weather forecast
The website wttr.in supports command line requests for weather forecasts.
|
|
The above command will return the weather at the location of your IP address.
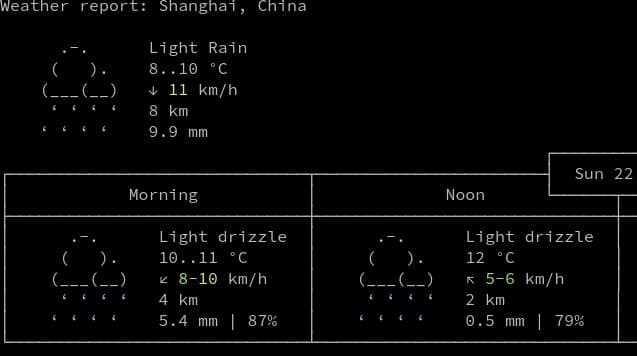
It also allows the city to be specified inside the URL.
|
|
The returned data can be saved as a file for sending later by using the -o parameter of the curl command.
|
|
wttr.in allows customizing the format and content of the weather forecast, see its documentation for details, which will not be expanded here. The final wrapped script weather.sh, see here for the full code.
Step 2: Send an email
After you get the weather forecast, just put it inside the email and send it out.
I use the free sending service of NetEase 163 mail, you need to open it on its website, please see the next step for local configuration.
Step 3: Configure GitHub Actions
To trigger GitHub Actions, you need to create a new .github/workflows subdirectory in your project repository, which is a YAML-formatted configuration file with a name of your choice; GitHub will run Actions whenever it finds the configuration file.
The first part of the configuration file is the trigger condition.
In the above code, the name field is the profile description and the on field is the trigger condition. We specify two conditions for triggering, the first is a code Push into the repository, the second is a timed task, which runs every day at 21:00 international standard time (5:00 am BST).
Next, there is the running process.
The first step in the process is to get the code from the code repository.
Once you have the code, you can get the weather forecast.
In the above code, the run field is the command to be run.
Finally, the email is sent.
|
|
In the above code, the email is sent using an action that is already written and can be used with just a few parameters. Among the parameters, the username and password of the mail SMTP server are encrypted variables, which need to be set in the settings/secrets menu of the project.
The full configuration file is available here. A more specific explanation of the syntax can be found in the “GitHub Actions Getting Started Tutorial”.
After writing the configuration and pushing it to the repository, you will be able to receive a weather forecast email early every morning. It’s not hard to expand on this by executing various scripts at regular intervals (e.g. checking if a site is online every 5 minutes) and then sending the results to a specified channel, here’s an example to the social media Telegram .
Reference https://www.ruanyifeng.com/blog/2019/12/github_actions.html